
Kitchen cabinet respraying service is the professional on-site and shop-applied spray finishing of existing cabinet doors, drawers, and frames to deliver a factory-smooth, durable new color. At 2710 St Clair Ave W in York (Toronto metro), Paint2decor INC provides this specialty, helping homeowners refresh kitchens fast with minimal disruption and strong long-term performance.
By Masoud Kakar — Paint2decor INC
Last updated: 2026-06-01
Overview and takeaways
Cabinet respraying gives your existing kitchen a like-new, furniture-grade finish without replacing boxes. Expect professional prep, HVLP spraying, controlled drying, and careful reassembly. Projects typically run 3–5 days on site with doors finished in a spray shop, producing a smooth, consistent look that resists wear in busy Toronto homes.
Use this complete guide to plan a confident, low-disruption makeover with Paint2decor INC in York.
- Understand what respraying is and when it beats brushing, refinishing, or refacing
- See exactly how our process works from prep to reassembly
- Explore coating systems, color choices, and durability factors
- Avoid common mistakes and care for your finish long-term
- Know what to ask when you hire a specialist in Toronto
At a glance (Table of contents)
- What is cabinet respraying?
- Why it matters in York and Toronto
- How a kitchen cabinet respraying service works
- Methods, coatings, and approaches
- Best practices for a factory finish
- Tools and resources
- Color, sheen, and style decisions
- Timeline planning and prep checklist
- Common mistakes to avoid
- Respray vs. refinish vs. reface vs. replace
- Pricing factors (no numbers)
- Choosing a kitchen cabinet respraying service
- Maintenance and care after respraying
- Health, safety, and environment
- Case examples in the GTA
- Frequently asked questions
- Key takeaways and next steps
What is cabinet respraying?
Cabinet respraying is a pro finishing process that cleans, sands, primes, and spray-applies durable cabinet coatings to existing doors, drawers, and frames. Using HVLP or airless equipment, it creates a consistent, factory-like texture and sheen while preserving your layout and boxes—ideal when wood is sound but color or style is dated.
In our experience across the Greater Toronto Area, respraying bridges the gap between a quick brush repaint and a full refacing or replacement. It keeps the bones of your kitchen, upgrades the visible surfaces, and can integrate light repairs, hinge updates, and soft-close hardware as part of a broader refresh.
- Scope: Doors and drawers are removed, labeled, and finished in a controlled spray area; frames are masked and sprayed in place.
- Finish quality: Smooth, even film build (often 3–5 mils dry) with tight edges and uniform sheen.
- Timing: Typical onsite time is 2–3 days; total project duration is often 4–7 days including shop work and cure windows.
- Durability: Modern cabinet-grade coatings withstand cleaning and humidity; full cure often occurs by day 5–7.
To compare options more deeply, see our comprehensive respraying guide and our professional cabinet painting overview.
Self-contained answer: Cabinet respraying updates sound cabinets with a shop-quality sprayed finish, minimizing waste and disruption while delivering a durable new look. It’s best when layouts work, doors are structurally solid, and the goal is a modern color with a smooth, professional texture.
Why it matters in York and Toronto
In York and the wider Toronto metro, respraying solves a common problem: good cabinets with dated color. Spray finishing upgrades appearance without demolition, fits condo and urban timelines, and controls dust and odors with masking and ventilation—ideal for busy households balancing work, school, and city schedules.
Many York kitchens have strong frames but older maple, oak, or thermofoil faces. Respraying keeps functional boxes while delivering an updated color and sheen. It pairs well with new hardware and a backsplash change, giving you a cohesive makeover without altering plumbing, electrical, or layout.
- Urban fit: Shorter onsite windows (2–3 days) and offsite door spraying reduce disruption.
- Design alignment: Popular Toronto palettes—soft whites, warm grays, deep navy, and sage—spray beautifully with cabinet enamel systems.
- Sustainability: Reusing sound boxes diverts waste and avoids new box manufacturing.
When your goal is a sleek sprayed finish in the city, explore our kitchen cabinet spraying in Toronto page for local considerations and options.
Local considerations for York
- Plan door pick-up or delivery near Jane St at St Clair Ave West to avoid peak traffic; tight scheduling keeps onsite time smooth.
- Spring and fall offer comfortable ventilation windows; winter curing still works with controlled indoor temps and dehumidification.
- Condos and townhomes around York benefit from offsite door spraying and precise masking to limit overspray drift in shared spaces.
Self-contained answer: For York-area homes, respraying delivers a high-impact visual upgrade with lighter logistics than a full renovation. It’s compatible with condo bylaws, predictable timelines, and the color trends Toronto homeowners request most.
How a kitchen cabinet respraying service works
A professional respraying service follows a controlled sequence: evaluate, label and remove, deep-clean, sand, prime, spray color coats, cure, reassemble, and align hardware. The workflow separates offsite door finishing from onsite frame spraying to maintain quality, speed, and a dust-controlled environment.
- Assessment and color planning: Confirm door material, coating compatibility, and sheen. Note repairs and hinge upgrades; align to a color plan and any island/perimeter contrast.
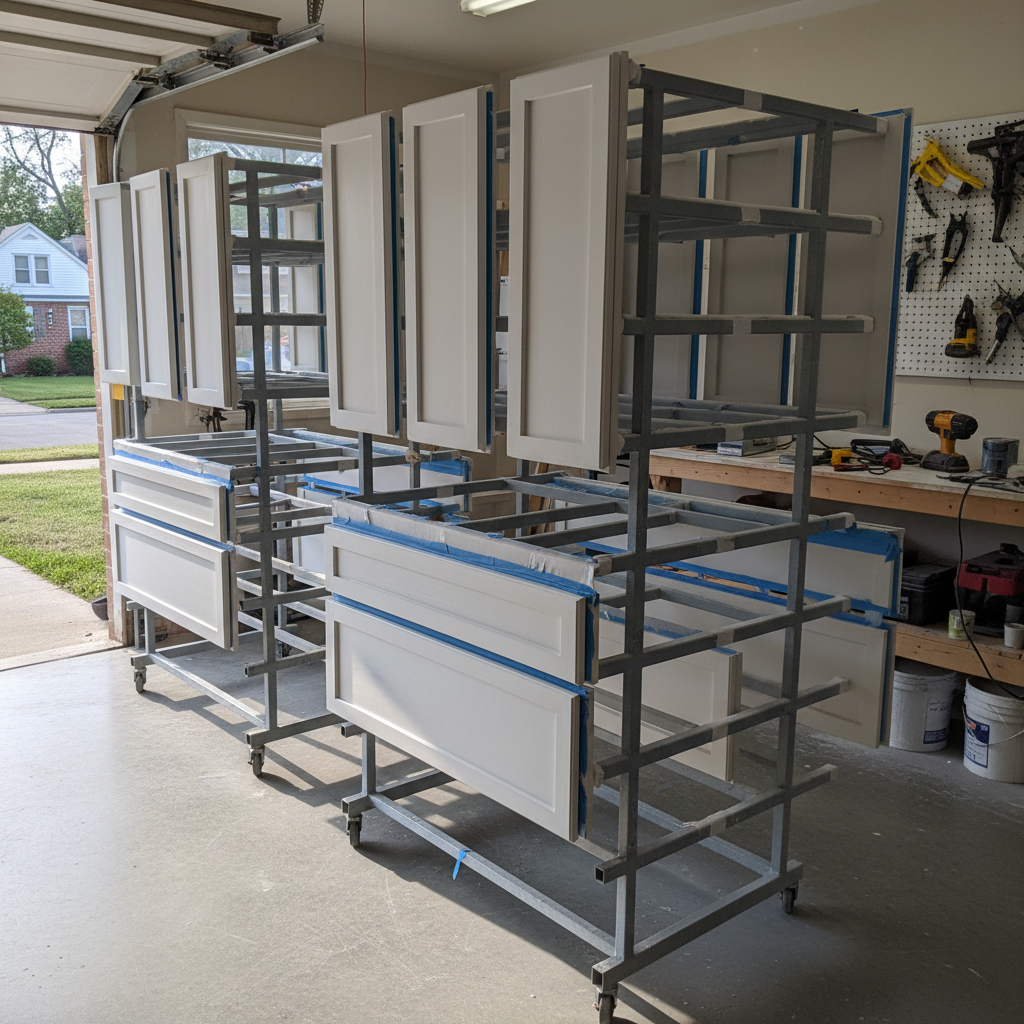
- Labeling and removal: Map doors/drawers so reinstallation is exact; transport to a clean spray area with drying racks.
- Degreasing and prep: Clean with a cabinet-safe degreaser; sand uniformly to promote adhesion; fill dings and caulk seams as needed.
- Masking and protection: Floors, appliances, and counters are masked; temporary zipper walls and ventilation are set up for frames.
- Priming: Bonding primer addresses tannins and slick factory finishes; spot prime repairs and edges.
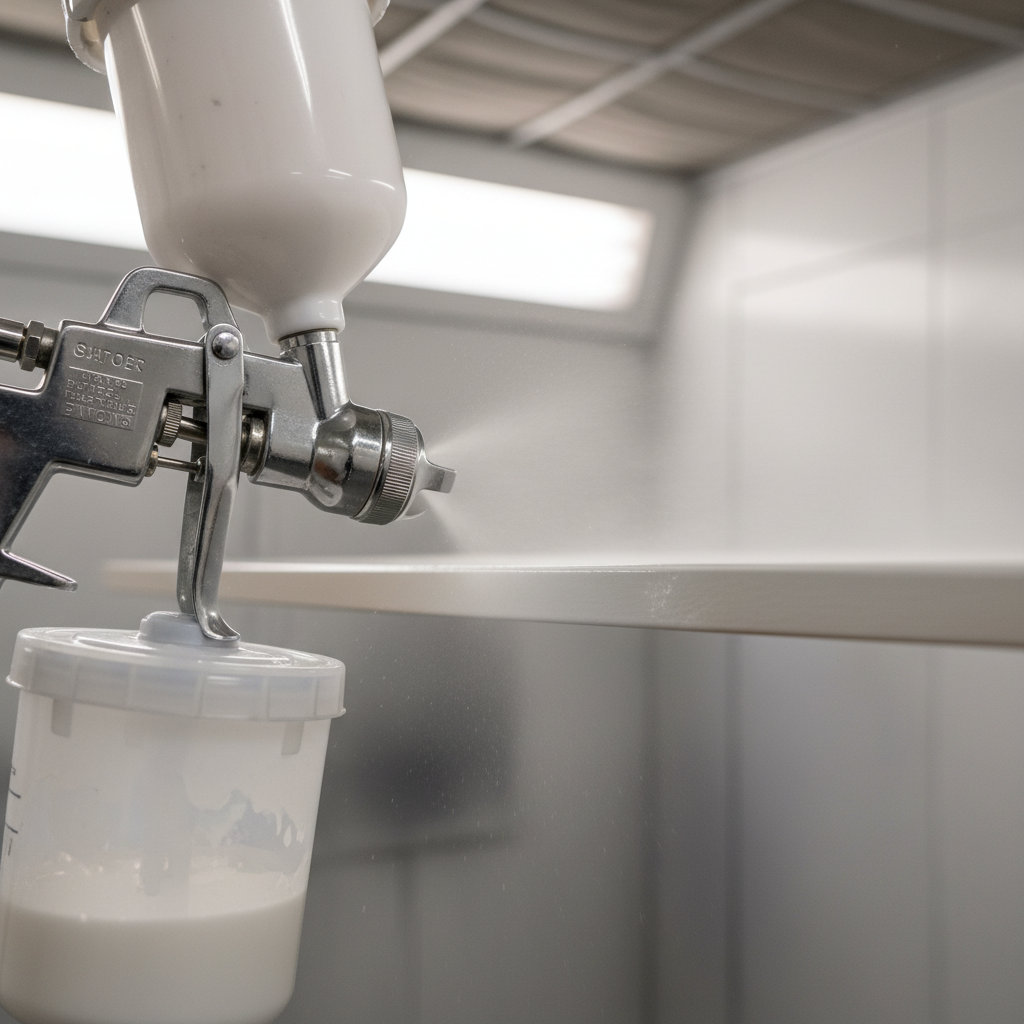
- Spray application: HVLP or fine-finish airless lays down thin, even coats with proper flash time between passes.
- Curing: Doors rest on drying racks; frames cure in place. Handling strength arrives in hours; full cure in roughly 5–7 days.
- Reassembly and tune-up: Reinstall hardware, adjust doors and drawers, add bumpers/soft-close as planned, and complete a final walkthrough.
Timing benchmarks we see most often: degrease/sand (2–4 hours for a standard kitchen), primer flash (45–90 minutes), color coats (2–3 passes), and safe handling by the next day, with full hardness building through day 5–7. For deeper context, review our Toronto refinishing guide.
Self-contained answer: The service is a measured sequence emphasizing surface prep, controlled spraying, and patient curing. When followed, it delivers a consistent, factory-like finish that holds up to daily use and cleaning.
Methods, coatings, and approaches
Respraying methods vary by material and setting. HVLP excels at fine control and transfer efficiency; fine-finish airless speeds coverage on frames. Cabinet-grade waterborne enamels and 2K urethanes offer hardness, stain resistance, and stable sheen. The right system depends on wood species, prior finish, and household needs.
Application approaches
- Shop-sprayed doors, onsite frames: Maximizes finish control; keeps kitchens usable sooner.
- Full onsite spraying: Useful for tight schedules; requires robust masking and ventilation.
- Hybrid touch-ups: Integrates light repairs, filler, and edge caulking for a seamless look.
Coating systems
- Waterborne cabinet enamels: Low odor, fast recoat (often 60–120 minutes), tough films; great for lively households and condos.
- 2K polyurethane/urethanes: Exceptional hardness and chemical resistance; pro-only systems with stringent safety controls.
- Specialty primers: Stain-blocking, adhesion-promoting, and bonding formulas address oak grain, maple slickness, and thermofoil challenges.
For a broader painting perspective, see our professional kitchen cabinet painting guide.
Self-contained answer: Choose method and coating by substrate, schedule, and performance targets. A pro service balances speed with film build and curing to produce a uniform, long-wearing finish.
Best practices for a factory finish
Factory-level results come from disciplined prep, dust control, and measured spraying. Degrease thoroughly, sand uniformly, use bonding primer, control temp/humidity, and respect cure times. Label everything, mask generously, and inspect between coats to prevent telegraphed defects.
- Prep discipline: Kitchens collect aerosolized oils; thorough degreasing prevents adhesion failures.
- Uniform sanding: Even scuffing (220–320 grit) improves bonding without gouging profiles.
- Environmental control: Target ~68–75°F and moderate RH; stable conditions speed consistent curing.
- Thin coats: Multiple light passes reduce sags, orange peel, and edge build-up.
- Quality checks: Rake lighting reveals nibs and dust before they get locked under the next coat.
In our GTA projects, we find a two-coat color system over a bonding primer balances speed and durability for busy homes. Expect planable intervals: surface prep half-day, primer plus sand late-day, then color coats and reassembly through the week. For detailed scenarios, our contractors guide outlines pro standards.
Self-contained answer: Best practices center on cleanliness, consistency, and climate control. When each variable is managed, the finish flows out smooth and cures to a tough, easy-clean surface.
Tools and resources
Pro shops rely on HVLP or fine-finish airless rigs, clean spray areas with filtration, drying racks, degreasers, and cabinet-grade primers and enamels. A documented labeling system, hardware bags, and checklists prevent reassembly errors and keep projects on schedule.
- Spray equipment: HVLP guns with fine needles/caps; low-pressure airless for frames and boxes.
- Prep gear: Cabinet-safe degreasers, sanding sponges (220–320 grit), tack cloths, and vacuums with HEPA filters.
- Protection: Masking film, paper, plastic sheeting, and zipper walls to isolate work zones.
- Organization: Numbered labels, parts trays, and hinge bagging to match every piece to its location.
Self-contained answer: The right tools support process discipline—fine atomization, clean air, safe masking, and organized parts management are what separate a professional, repeatable finish from a one-off DIY attempt.
Color, sheen, and style decisions
Color and sheen define the final look as much as the spraying itself. Choose neutral, light-reflective tones for brightness; add contrast on the island; and match sheen to use—satin for versatility, matte to mute texture, semi-gloss for extra wipeability.
- Light neutrals: Soft whites and warm grays brighten smaller Toronto kitchens and bounce daylight.
- High-contrast islands: Navy, charcoal, or deep green islands anchor otherwise airy palettes.
- Sheen strategy: Satin balances cleanability and subtlety; matte hides minor imperfections; semi-gloss wipes clean fastest.
- Hardware pairing: Brushed brass warms whites; matte black sharpens contrast; stainless keeps it timeless.
If you’re comparing style paths, our kitchen cupboard refinishing insights cover how color and substrate interact for a stable, long-wearing finish.
Self-contained answer: Set a palette that fits your light and layout, then pick a sheen that supports daily cleaning. The spray process will elevate whatever style you choose.
Timeline planning and prep checklist
Most resprays fit a 3–5 day onsite window, plus offsite days for doors. Plan fridge access, simple meals, and a temporary coffee station. Clear counters, empty drawers, and remove fragile items so crews can mask quickly and keep the schedule tight.
Homeowner prep list
- Empty drawers and clear upper shelves near the work zone (save 30–45 minutes of onsite prep).
- Store small appliances and decor to reduce masking footage.
- Confirm parking/loading windows and elevator access (for condos).
- Discuss pets and child-safe zones; zipper walls help keep areas separate.
- Share 6–8 photos with your estimator to validate scope and door count.
Scheduling insight: In a typical week, day 1 covers degrease/sand/prime, day 2–3 coats and cure, and day 4–5 reassembly and tuning. Variations depend on kitchen size and repairs needed.
Self-contained answer: A little homeowner prep keeps the project moving and reduces onsite hours. Plan simple meals and access paths, and your kitchen stays functional while the finish cures.
Common mistakes to avoid
Most failures trace back to prep and environment. Skipping degreasing, rushing flash times, overloading edges, and ignoring humidity swing risk adhesion issues and orange peel. A disciplined, stepwise process prevents 90% of problems before the first coat.
- Under-cleaning: Kitchen aerosols cling to doors; stubborn residues sabotage adhesion.
- Heavy passes: Thick coats sag and telegraph brush-like texture; use multiple light passes.
- Edge overload: Slow down on profiles to avoid build-up that chips under use.
- Ignoring cure: Hardness builds over days; treat gently the first week.
Need a broader decision framework? Our resurfacing vs. refacing guide helps match method to the condition of your doors and boxes.
Self-contained answer: Clean thoroughly, spray thin, control climate, and be patient. Those four rules deliver the smooth, durable result homeowners expect from a kitchen cabinet respraying service.
Respray vs. refinish vs. reface vs. replace
Respraying updates color and sheen on sound doors and frames. Refinishing preserves or stains real wood. Refacing swaps doors/veneers while keeping boxes. Replacement rebuilds everything. The best option depends on cabinet condition, layout goals, and timeline tolerance.
| Approach | What changes | Disruption | Timeline | Best when… |
|---|---|---|---|---|
| Respray | Color + sheen on existing doors/frames | Low | ~3–5 days onsite | Boxes are sound; want a modern color and smooth texture |
| Refinish | Sand/stain clear wood; new topcoats | Moderate | ~1–2 weeks | You love natural wood grain and want a different tone |
| Reface | New doors + veneers on boxes | Moderate | ~1–2 weeks | Doors are dated/damaged; want new profiles without layout changes |
| Replace | All-new boxes, doors, layout | High | Several weeks | Layout changes, water damage, or full renovation goals |
If you’re leaning toward a paint-forward refresh, our painting your kitchen cabinets guide explains how sprayed finishes compare to brush/roll systems in real kitchens.
Self-contained answer: If you like your layout and your boxes are sturdy, respraying often delivers the biggest visual change for the least disruption. If doors are failing or you want new profiles, consider refacing; pursue replacement when layout or damage demands it.
Pricing factors (no numbers)
Quotes for respraying reflect size, door count, material and damage, coating system, masking complexity, and hardware upgrades. A clear scope, photos, and finish targets help your estimator align expectations and schedule accurately—without needing demolition or layout redesign.
- Door and drawer count: More pieces mean more prep, spray passes, and rack space.
- Material and condition: Oak grain filling, maple slickness, or repairs influence prep steps.
- Access and masking: Large islands, glass inserts, and nearby open shelving add protection time.
- Finish system: Standard cabinet enamel vs. specialty 2K urethane affects process and safety controls.
- Upgrades: New pulls, hinges, bumpers, and soft-close retrofits add reassembly time.
Self-contained answer: The most accurate quotes start with photos and a short call. Door counts, substrate, and finish goals shape scope and scheduling; your provider should outline each step and the expected timeline.
Choosing a kitchen cabinet respraying service
Pick a service with cabinet-specific experience, spray-shop capability, documented process, and strong local reviews. Look for labeled parts systems, dust control plans, and clear timelines. Ask for coatings by name and sample boards showing color, sheen, and edge quality.
- Specialization: Cabinet-focused crews know how to block stains, control edges, and tune hinges.
- Process clarity: Written steps, prep lists, and a plan for masking, ventilation, and curing.
- Finish proof: Sample doors, photo galleries, and references in Toronto neighborhoods.
- Safety and ventilation: Respirators, filtration, and low-VOC options where appropriate.
As you evaluate providers, compare notes with our kitchen cabinet respraying page and the broader refinishing guide for Toronto.
Self-contained answer: The right partner brings repeatable methods and Toronto references, not guesswork. Expect specifics on prep, products, safety, and scheduling before work begins.
Thinking about a refresh? Share a few photos and your target color for a fast, helpful consultation. We’ll outline our process, coatings, and schedule so you know exactly what to expect.
Maintenance and care after respraying
Treat your new finish like quality furniture in the first week: avoid heavy scrubbing, use soft cloths, and let the coating reach full cure. Long-term, clean with mild soap, avoid abrasives, and add felt pads where doors touch walls or appliances.
- First 7 days: Light use; no tape on fresh paint; wipe gently if needed.
- Cleaning routine: Mild soap and water; avoid solvents and harsh pads.
- Hardware checks: Retighten handles and hinges after a few weeks of use.
- Edge protection: Add bumpers or felt pads at frequent contact points.
Self-contained answer: Cautious early use and gentle cleaning extend finish life. Treat edges kindly, add bumpers where doors meet, and you’ll keep that smooth look for years.
Health, safety, and environment
Professional respraying manages ventilation, PPE, and product selection to protect your home’s air quality and the crew. Low-VOC options and capture filtration reduce odors, while respirators and spray booths keep atomized coatings away from living areas.
- Air quality: Low-VOC waterborne systems help limit odor during application; filtration further improves indoor conditions.
- Respiratory protection: Fit-tested respirators and spray booths reduce exposure to fine particulates and mists.
- Waste management: Proper handling of filters, masking, and containers keeps your space tidy and compliant.
If you’re exploring broader remodel concepts for context, these before-and-after kitchen galleries provide visual benchmarks: see dramatic kitchen upgrades.
Self-contained answer: Ask your provider how they control ventilation, what PPE they use, and whether low-VOC cabinet systems are appropriate for your project and household.
Case examples in the GTA
Across Toronto, we respray sound cabinets to modernize color, add soft-close hardware, and coordinate with backsplashes. Results are consistent: cleaner lines, brighter light bounce, and a cohesive look—usually achieved within a week without tearing out boxes or moving plumbing.
- York family kitchen: 28 doors/drawers, oak grain minimized with primer and filler; warm white satin with brushed brass pulls; onsite 3 days, full cure by day 6.
- Midtown condo: Tight ventilation plan, shop-sprayed slab doors; cool gray matte to offset strong daylight; labeled parts simplified reassembly.
- West-end semi: Maple shaker set, touch-up repairs at dishwasher panel; deep navy island + white perimeter for contrast.
For ideas beyond spraying, compare door styles and materials to understand how profiles influence modern looks: standard vs. custom cabinet doors.
Self-contained answer: Whether a York family home or downtown condo, the process stays disciplined—prep, prime, spray, cure, reassemble—tailored to layout and ventilation needs.
Glossary and quick references
A few terms help you compare services confidently: HVLP (high-volume, low-pressure) spraying improves control; bonding primer promotes adhesion; flash time is the brief wait between coats; and full cure marks when a coating reaches maximum hardness.
- HVLP: Fine atomization at low pressures for smooth edges and efficient transfer.
- Bonding primer: Grips slick factory finishes and helps block stains.
- Flash time: The recoat window—often 60–120 minutes—before applying the next pass.
- Full cure: Typically 5–7 days for cabinet enamels to reach maximum hardness.
Looking for broader DIY context? This primer on cabinet painting basics offers a high-level overview of steps and considerations: how to paint kitchen cabinets.
Self-contained answer: With these basics, you can ask sharper questions and align expectations on prep, schedule, and final appearance.
Frequently asked questions
Homeowners ask about timing, compatibility, odors, and care. The short answers: most kitchens fit a 3–5 day onsite window; wood, MDF, and many laminates are compatible with the right primers; low-VOC options help with odor; and gentle cleaning protects the finish long-term.
How long does a typical respray take?
Most projects finish onsite within 3–5 days, with doors sprayed offsite and reinstalled near the end. Handling strength usually arrives within 24 hours of the final coat, while full cure builds over about a week.
Will the new finish chip or yellow?
Cabinet-grade waterborne enamels and pro urethanes resist chipping when surfaces are cleaned, sanded, and primed correctly. Non-yellowing formulas and stable sheens help maintain color, especially in bright kitchens with strong daylight.
Can you respray thermofoil or laminate?
Yes, with careful prep and the right primers. Sound, well-adhered thermofoil and many laminates accept bonding primers and cabinet enamels. If foil is failing or peeling widely, replacement doors are often the better path.
What about odors during spraying?
Low-VOC waterborne systems and active ventilation help manage odors. Offsite door spraying reduces indoor exposure further, and masking plus zipper walls keep atomized coatings out of living areas while work is underway.
Key takeaways and next steps
Respraying is a fast, sustainable way to modernize cabinets you already own. With disciplined prep and pro coatings, you’ll get a factory-smooth finish within a predictable window—usually under a week onsite—with minimal disruption compared with larger renovations.
- Respraying refreshes color and sheen while keeping functional boxes.
- Projects often run 3–5 onsite days, with full hardness around day 5–7.
- Choose specialized crews, clear processes, and cabinet-grade systems.
- Treat finishes gently the first week; clean with mild soap long-term.
Ready to explore color options and scheduling for your York home? Share a few photos and we’ll map your kitchen, outline the steps, and confirm a smooth, predictable plan with Paint2decor INC.
{
“@context”: “https://schema.org”,
“@type”: “Article”,
“headline”: “Cabinet Respraying Guide: Get a Fresh Look in 2026”,
“description”: “Kitchen cabinet respraying service guide for York and Toronto: process, coatings, timelines, safety, care, and how to choose a pro.”,
“author”: {
“@type”: “Person”,
“name”: “Masoud Kakar”,
“url”: “https://paint2decor.com/blogs/”,
“jobTitle”: “Cabinetry Refinishing Specialist”,
“knowsAbout”: [
“kitchen cabinet respraying service”,
“cabinet refinishing”,
“cabinet refacing”,
“kitchen cabinet painting”
]
},
“publisher”: {
“@type”: “Organization”,
“name”: “Paint2decor INC”,
“url”: “https://paint2decor.com/”,
“logo”: {
“@type”: “ImageObject”,
“url”: “https://paint2decor.com/wp-content/uploads/2022/03/website-1.png”,
“width”: 512,
“height”: 512
}
},
“mainEntityOfPage”: “https://paint2decor.com/blogs/”,
“image”: [
{
“@type”: “ImageObject”,
“url”: “https://res.cloudinary.com/dmboo1nu1/image/upload/v1780279839/ai-images/rni4k7qtphqoero7zbrr.png”,
“width”: 1200,
“height”: 630,
“caption”: “Wide shot of a professional spraying kitchen cabinet doors with protective masking and ventilation.”
},
{
“@type”: “ImageObject”,
“url”: “https://res.cloudinary.com/dmboo1nu1/image/upload/v1780279840/ai-images/lhvb3jbkbgcqpqqfwpo4.png”,
“width”: 1200,
“height”: 800,
“caption”: “Close-up HVLP spray gun applying smooth white enamel to a cabinet door edge during respraying.”
},
{
“@type”: “ImageObject”,
“url”: “https://res.cloudinary.com/dmboo1nu1/image/upload/v1780279839/ai-images/hsc4yttdtkcwmlor7fa6.png”,
“width”: 1200,
“height”: 800,
“caption”: “Multiple cabinet doors drying vertically on racks after professional respraying in a workshop.”
}
],
“keywords”: [“kitchen cabinet respraying service”,”cabinet respraying”,”cabinet refinishing”,”Toronto”,”York”],
“datePublished”: “2026-06-01T08:00:00-04:00”,
“dateModified”: “2026-06-01T08:00:00-04:00”,
“speakable”: {
“@type”: “SpeakableSpecification”,
“cssSelector”: [“.featured-snippet-answer”, “.faq-answer”]
}
}
{
“@context”: “https://schema.org”,
“@type”: “ProfilePage”,
“mainEntity”: {
“@type”: “Person”,
“name”: “Masoud Kakar”,
“url”: “https://paint2decor.com/blogs/”,
“description”: “Cabinetry Refinishing Specialist serving York and the Toronto metro with cabinet respraying, painting, and refacing insights.”,
“knowsAbout”: [
“kitchen cabinet respraying service”,
“cabinet refinishing”,
“cabinet refacing”
]
}
}
{
“@context”: “https://schema.org”,
“@type”: “FAQPage”,
“mainEntity”: [
{
“@type”: “Question”,
“name”: “How long does a typical respray take?”,
“acceptedAnswer”: {
“@type”: “Answer”,
“text”: “Most projects finish onsite within 3–5 days, with doors sprayed offsite and reinstalled near the end. Handling strength usually arrives within 24 hours of the final coat, while full cure builds over about a week.”
}
},
{
“@type”: “Question”,
“name”: “Will the new finish chip or yellow?”,
“acceptedAnswer”: {
“@type”: “Answer”,
“text”: “Cabinet-grade waterborne enamels and pro urethanes resist chipping when surfaces are cleaned, sanded, and primed correctly. Non-yellowing formulas and stable sheens help maintain color, especially in bright kitchens with strong daylight.”
}
},
{
“@type”: “Question”,
“name”: “Can you respray thermofoil or laminate?”,
“acceptedAnswer”: {
“@type”: “Answer”,
“text”: “Yes, with careful prep and the right primers. Sound, well-adhered thermofoil and many laminates accept bonding primers and cabinet enamels. If foil is failing or peeling widely, replacement doors are often the better path.”
}
},
{
“@type”: “Question”,
“name”: “What about odors during spraying?”,
“acceptedAnswer”: {
“@type”: “Answer”,
“text”: “Low-VOC waterborne systems and active ventilation help manage odors. Offsite door spraying reduces indoor exposure further, and masking plus zipper walls keep atomized coatings out of living areas while work is underway.”
}
}
]
}