
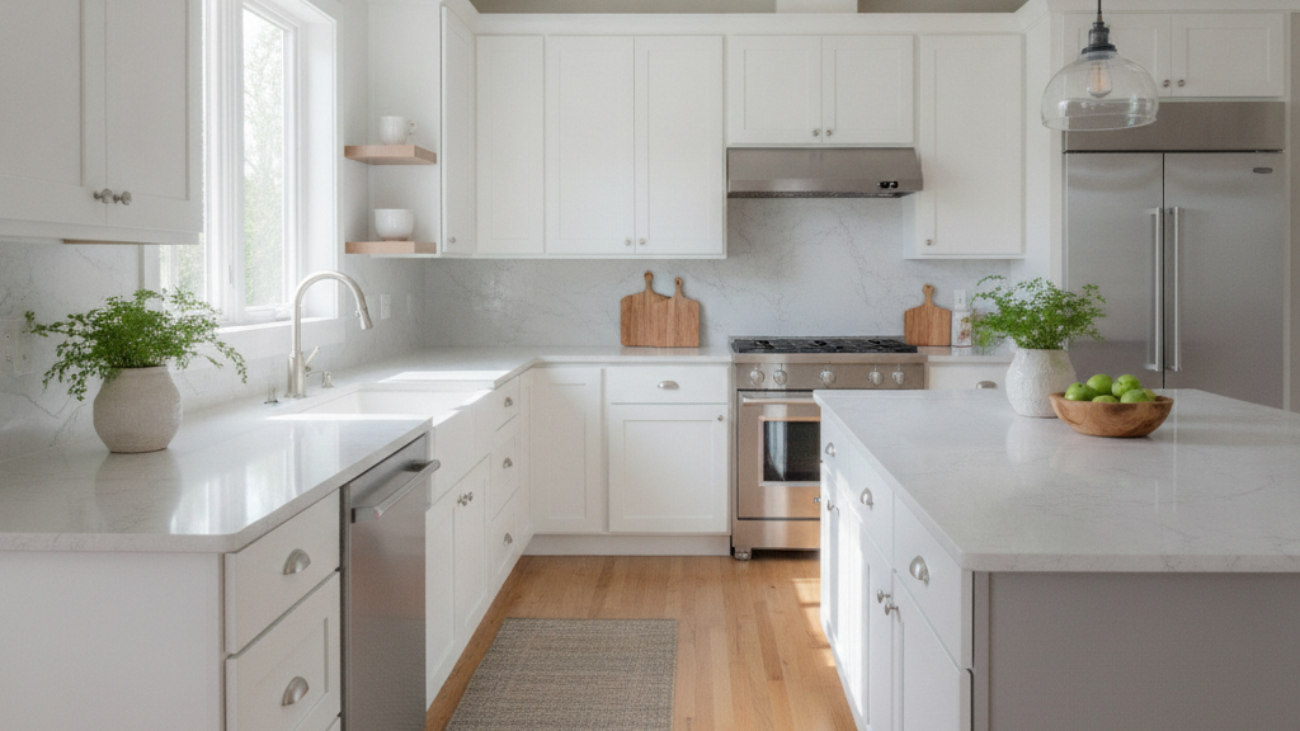
Paint for painting kitchen cupboards is a specialized, durable coating formulated to bond to wood, MDF, and laminate doors and frames. The best options balance adhesion, hardness, and a smooth finish while resisting moisture, grease, and daily wear. In York, a pro-grade system reduces downtime and keeps your kitchen usable.
By Paint2decor INC • Last updated: June 26, 2026
Quick Summary
Choose a cabinet-specific, low-VOC, scuff-resistant paint system and pair it with pro prep: degrease, sand to 220–320 grit, prime for adhesion, then spray or roll-and-tip two color coats. Waterborne alkyd or acrylic urethane finishes deliver a factory-smooth look with fast recoat times and strong durability.
Here’s what you’ll learn in this complete guide from Paint2decor INC (York):
- What cabinet paint is and how it’s different from wall paint
- Why the right product choice prevents chips, stains, and peeling
- How cabinet paint systems work from prep to cure
- Types of finishes compared in a clear table: waterborne alkyd, acrylic urethane, catalyzed lacquer, 2K poly
- Buying-guide checkpoints and a nine-step application process
- Local considerations for York homes, including humidity and ventilation
What Is Cabinet Paint for Kitchen Cupboards?
Cabinet paint is a hard-wearing coating engineered for doors, frames, and panels. It offers superior adhesion, leveling, and stain resistance compared to wall paint. When paired with proper prep and an adhesion primer, it cures into a durable shell that withstands daily cleaning and cooking splatter.
Cabinet paint isn’t just “any paint on a cupboard.” It’s a system. You need degreasing to remove cooking oils, abrasion for tooth, bonding primer to lock down tannins and slick surfaces, and a topcoat that levels smooth. When each layer does its job, failure rates drop and touch-ups become rare.
In our experience across the GTA, waterborne technologies have reshaped kitchen makeovers. Modern waterborne alkyds and acrylic urethanes dry in 30–90 minutes, recoat in 2–4 hours, and fully cure in roughly 7–14 days, allowing families to get back to normal faster. A consistent 3–5 mils dry film thickness usually delivers the sweet spot between look and longevity.
For homeowners weighing refinishing versus refacing, our kitchen cabinet refinishing guide explains where each path shines. If you like your current layout and door style, refinishing with the right paint system can transform the space without a full remodel.
Why Your Paint Choice Matters (Especially in York)
The right cabinet paint resists grease, moisture, and frequent cleaning. In York’s variable seasons, stable, low-VOC waterborne coatings minimize odor, dry quickly, and stay flexible enough to handle temperature and humidity swings without cracking or yellowing.
Kitchen cabinets get handled 30–50+ times per day. That’s constant abrasion on edges and around pulls. Grease aerosols from cooking settle on surfaces within minutes, and daily wipe-downs add chemical exposure. A standard wall paint softens under this routine; cabinet paints are formulated to stay firm and cleanable at least 1,000+ wipe cycles.
York homes also see humidity shifts between 25–60% RH across the year. Coatings that cure too brittle can micro-crack at joints as wood moves. Waterborne alkyds and acrylic urethanes maintain flexibility, reducing hairline cracks at stile-and-rail seams. We’ve observed fewer callbacks when RH is managed near 40–50% during cure.
Thinking long term? Our repainting kitchen cupboards guide shares maintenance routines that keep finishes fresh. For door styles that are dated, pairing paint with selective cabinet door updates can modernize lines without replacing boxes.
How Cabinet Paint Systems Work
A durable cabinet finish relies on process control: clean, sand, prime, and apply two to three color coats at the right thickness and conditions. Temperature (65–75°F), humidity (40–55%), and dust control drive leveling, adhesion, and final hardness.
Cabinet finishing is 70% prep and 30% painting. A predictable workflow reduces risk:
- Degrease: Use a kitchen-safe cleaner, rinse, and allow 30–60 minutes to dry.
- Mechanical abrasion: Sand to 220–320 grit; scuff all profiles and edges.
- Dust management: HEPA vacuum plus tack cloth between stages.
- Adhesion primer: Apply 1–2 uniform coats; typical recoat 1–3 hours.
- Fill and caulk: Use wood filler and a paintable, flexible caulk; let cure fully.
- Topcoat 1: Spray or roll-and-tip; aim ~2 mils dry film.
- Scuff sand: Lightly sand to 320–400 grit after first color coat.
- Topcoat 2: Final build to ~3–5 mils total dry film thickness.
- Install and cure: Rehang after 24–48 hours; gentle use for 7–14 days.
To understand the pro spray route versus an in-home brush-and-roll, see our cabinet respraying guide. Spray equipment (HVLP with a 1.3–1.5 mm tip) atomizes paint into a fine, even fan that levels out brush marks. In tight condos, a low-odor, quick-dry system reduces disruption.
Process checkpoints help avoid defects. Keep air movement gentle (50–100 fpm), avoid forced heat in the first 60 minutes, and maintain a clean, contained space. Small adjustments—like strainers (100–150 mesh) and 5–10% reduction when permitted—improve leveling on detailed profiles.
Types of Cabinet Paint (With Comparison Table)
Most kitchens benefit from modern waterborne alkyd or acrylic urethane paints. They balance hardness, adhesion, and low odor. Catalyzed lacquer and 2K polyurethane offer harder films for extreme wear, but they demand pro handling, tight ventilation, and precise mixing.
Choosing paint for painting kitchen cupboards starts with your surface (oak, maple, MDF, laminate), desired sheen, and sensitivity to odor and downtime. Below is a practical, side‑by‑side view of the leading systems we use or encounter on York projects.
| Type | Best For | Pros | Watch Outs | Typical Recoat | Notes |
|---|---|---|---|---|---|
| Waterborne Alkyd | Most wood/MDF kitchens | Great leveling, hard film, low odor | Needs proper cure (7–14 days) | 2–4 hours | Minimal yellowing vs oil alkyds |
| Acrylic Urethane | High-traffic families | Scuff/scratch resistance, flexible | Less self-leveling than alkyd blends | 2–3 hours | Great for wipe-down durability |
| Catalyzed Lacquer | Factory shops | Very fast dry, smooth finish | Higher odor; pro-only setup | 15–30 minutes | Booth and ventilation required |
| 2K Polyurethane | Commercial-level wear | Highest chemical resistance | Mixing ratio critical; PPE mandatory | 1–2 hours | Strict pot-life management |
| Oil Alkyd (legacy) | Traditional looks | Hard film, classic look | Odor, longer dry, yellowing | 6–16 hours | Less common in occupied homes |
If you’re unsure which path fits your kitchen, our professional cabinet painting service outlines when we choose each chemistry and why. For a broad DIY overview, this industry write-up on how to paint kitchen cabinets summarizes common steps many homeowners consider before calling a specialist.
Buying Guide: Best Paint for Painting Kitchen Cupboards
Look for low-VOC, cabinet-rated paints with strong adhesion and block resistance. Prioritize waterborne alkyd or acrylic urethane formulas, pair with a bonding primer, and match sheen to lifestyle: satin for easy cleaning, semi-gloss for maximum wipeability, matte for a contemporary look with more care.
Core selection checklist
- Adhesion and blocking: Handles rubbing doors without sticking after 24–72 hours.
- Low-VOC and low odor: Aim for products labeled low-VOC; ventilate at 0.3–0.5 air changes/hour.
- Leveling and hardness: Smooth film at ~3–5 mils dry; resists fingernail gouges.
- Humidity tolerance: Performs reliably between 40–55% RH during cure.
- Sheen choice: Satin/semigloss are the top picks for busy kitchens.
Match to your substrate
- Oak: Grain is open; grain-fill or embrace the texture. Bonding primer reduces bleed.
- Maple: Dense, smooth; scuff thoroughly to 320 grit for tooth.
- MDF: Seal edges with primer; double-prime routed profiles.
- Laminate/Thermofoil: Only with robust bonding primers and careful prep.
Color durability and maintenance
- Light colors: Reflect more light; pair with stain-resistant topcoats.
- Dark colors: Show micro-scratches; choose tougher acrylic urethanes.
- Trend-proof choices: Warm whites, soft grays, and muted greens age well.
For construction details that affect finishing results, this overview of melamine vs plywood cabinet boxes helps you anticipate how panels behave under paint. And if you want a deep dive on process, our complete cabinet painting guide walks through tools, prep, and reassembly.
Best Practices for a Factory-Smooth Finish
Control dust, film thickness, and environmental conditions. Use 220–320 grit between coats, keep RH around 45%, and spray or roll-and-tip thin, even passes. Let each coat level for 5–10 minutes before moving air to avoid skinning and trapped solvent.
Surface prep that sticks
- Clean twice: degrease, rinse, and let dry 30–60 minutes.
- Sand smart: 180 grit for knockdown, 220–320 grit before primer and between coats.
- Prime right: one bonding coat on maple/MDF; two on laminate or heavy grain.
Application controls
- Use an HVLP 1.3–1.5 mm tip or a high-density foam roller plus sash brush for tipping.
- Target 2–3 wet mils per pass; two color coats typically reach 3–5 mils dry.
- Strain the paint (100–150 mesh) and reduce 5–10% only if the label allows.
Local considerations for York
- Plan ventilation around family schedules; a short walk to Smythe Park while coats flash off keeps the kitchen clear of traffic.
- Winter jobs cure slower; keep the space 65–75°F and RH near 45% to avoid slow blocking.
- If kids study at the nearby Toronto Public Library – Daniel G. Hill Branch, coordinate quieter sanding windows during those hours.
To avoid common errors, this practical article on avoiding painting mistakes reinforces how prep and patience pay off. When you prefer a turnkey, dust-controlled workflow, our team handles remove‑label‑spray‑reinstall with shop-grade containment.
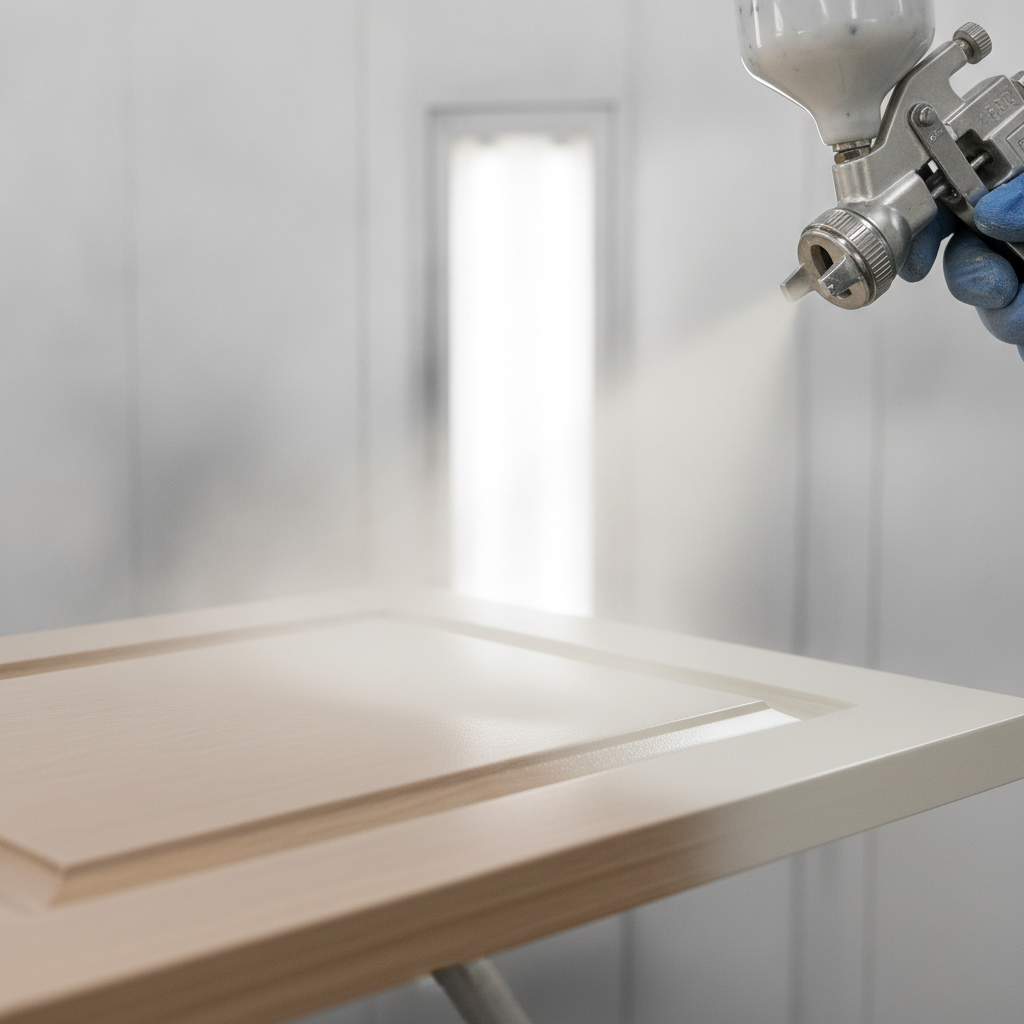
Tools and Materials We Rely On
A pro-grade cabinet finish needs the right kit: degreasers, HEPA vacuums, sanding blocks, bonding primers, and a controllable application tool (HVLP sprayer or roll‑and‑tip). Labeling hardware, clean racks, and breathable drying help maintain order and speed.
- Degreaser + rinse bottle set
- HEPA vacuum, sanding sponges (180/220/320/400 grit)
- Bonding primer + stain-blocker
- Waterborne alkyd or acrylic urethane topcoat
- HVLP sprayer (1.3–1.5 mm) or microfiber rollers + quality brushes
- Strainers (100–150 mesh), mixing cups, tack cloths
- Numbered bags for hinges and pulls; painters’ pyramids and drying racks
Curious what this looks like up close? Here’s a detail of the spray step and a staged workflow ready for priming and topcoats.
If you’d rather skip equipment setup and dust control, our professional kitchen cabinet painting covers prep, spraying, and careful reassembly—so you can enjoy the results without juggling tools.
York Project Snapshots: Real-World Results
Across York, we’ve updated dozens of kitchens by pairing robust prep with waterborne systems. Results include 30–50% brighter rooms using satin whites and grays, fewer visible grains on oak via double-priming, and durable satin finishes that shrug off daily wipe-downs.
Maple Shaker, near Smythe Park: These doors had light corner wear and oily tops near the range. We cleaned twice, scuffed to 320 grit, double-primed the profiles, and finished with a satin waterborne alkyd. Rehang in 36 hours; gentle use for 10 days delivered a rock-solid cure.
Oak with Deep Grain, family home off Jane St at St Clair Ave West: The brief called for less texture. We used a high-build primer, spot grain‑filled end grain, and finished in an acrylic urethane. After two color coats and a 400‑grit inter‑sand, the grain telegraphing dropped significantly.
Rental Condo, study trips to Toronto Public Library – Daniel G. Hill Branch: The client needed quick turnaround and low odor. We staged on-site with plastic containment, used quick‑dry waterborne systems, and allowed controlled airflow after 10 minutes of open time. Doors returned the next day; the tenant could cook the same evening.
To explore whether painting or refacing is smarter for your layout and door style, scan our kitchen cupboard refinishing overview for pros and cons tailored to Toronto homes.
Step-by-Step: Our 9-Step Cabinet Painting Process
Our nine-step process balances speed and quality: clean, label, remove, sand, prime, fill/caulk, spray color 1, sand, spray color 2. Maintain 65–75°F and ~45% RH, and allow 24–48 hours before gentle use to protect the film while it gains hardness.
- Walkthrough and labeling: Photograph layout, label doors/drawers, bag hardware.
- Degrease and rinse: Focus on handles, edges, and above the cooktop.
- Remove doors/drawers: Set up stands and protective pads.
- Sand and scuff: 180 grit to knock down, then 220–320 grit for tooth.
- Prime: Bonding primer; double-prime MDF edges and laminate faces.
- Fill/caulk: Patch dings; use flexible, paintable caulk for gaps.
- Color coat 1: Spray or roll‑and‑tip thin, even passes; flash 10–20 minutes.
- Inter‑sand: 320–400 grit to remove nibs and improve leveling.
- Color coat 2 + cure: Build to 3–5 mils dry; rehang 24–48 hours later.
Want the short version? Our painting kitchen cabinets overview distills the workflow and answers the most common homeowner questions we hear in York.
How to Choose: DIY vs. Hiring a Pro
Choose DIY if you have time, space, and dust control. Hire a pro when you need shop-grade spray results, low-odor products, and predictable timelines. Pros bring containment, HVLP gear, and a repeatable system that minimizes rework and call-backs.
- DIY fits smaller kitchens, flexible timelines, and homeowners comfortable with sanding to 320–400 grit and methodical masking.
- Pro fits detailed doors, color changes from dark to light, timelines under a week, and homes needing dust-free, low-odor systems.
- Hybrid fits when you remove and label; we spray and reinstall. This keeps momentum while ensuring a factory-like finish.
Not sure which path is right? Our professional cabinet painting guide lays out expectations, timelines, and finish options we recommend for busy York families.
Free Color & Finish Consult (Soft CTA)
Thinking about repainting your cabinets this season? Share your door style, photos, and a preferred palette. We’ll recommend a paint system, sheen, and a realistic timeline for your York home—no pressure and no obligation.
Start with our kitchen cabinet painting service page to see how we stage, spray, and reinstall with minimal downtime.
Frequently Asked Questions
These quick answers cover the most common questions York homeowners ask about cabinet paint, sheen, and durability. Each response is concise and practical so you can move forward with confidence.
What’s the best paint sheen for kitchen cupboards?
Satin strikes the best balance of easy cleaning and subdued glare. Semi‑gloss is toughest for heavy wipe‑downs, but it highlights surface flaws. Matte looks contemporary, yet it can mark more easily. In busy kitchens, satin or soft semi‑gloss is the safe bet.
How long before I can use my kitchen normally?
Most waterborne systems are dry to touch in 30–90 minutes and recoat in 2–4 hours. We rehang doors after 24–48 hours and suggest gentle use for 7–14 days while the film reaches full hardness. Avoid harsh cleaners until the finish is fully cured.
Can you paint laminate or thermofoil doors?
Yes—with rigorous prep and a strong bonding primer. We scuff the surface thoroughly, double‑prime, and apply a cabinet‑rated topcoat. Results are excellent when the substrate is stable. If the foil is delaminating, refacing or door replacement may be smarter.
Do I need to empty all cabinets?
For best results, yes. Removing items prevents dust contamination and allows full access for sanding and priming. We set up clean containment, but cleared interiors speed work and reduce the chance of debris settling on fresh coats.
Key Takeaways
Pick a cabinet-rated waterborne alkyd or acrylic urethane, control prep and environment, and build to 3–5 mils dry for durability. Aim for satin on busy kitchens, keep RH near 45%, and let the film cure 7–14 days before heavy cleaning.
- Use cabinet-specific systems, not wall paint
- Waterborne technologies reduce odor and downtime
- Prep is 70% of success; sanding and priming are non-negotiable
- Satin or semi‑gloss balances durability and style
- Pro spray delivers a factory-smooth finish in less time
Conclusion: Your Smoothest Path to a Like-New Kitchen
For a durable, beautiful makeover, pair disciplined prep with a cabinet-rated waterborne system. If you want predictable timelines, low odor, and a flawless spray finish, partner with a York team that does this work every day.
Paint2decor INC specializes in kitchen cabinet refinishing, painting, and respraying across the GTA. Review our professional cabinet painting guide and book a friendly consult. Ready to move? We’ll plan around your schedule and deliver a clean, consistent result that holds up to daily life.