
Kitchen cabinets resurfacing is the professional renewal of cabinet exteriors—doors, drawer fronts, and face frames—without replacing the cabinet boxes. It delivers a like-new style and durable finish while preserving your layout. In York, it’s a fast, low-disruption way to modernize your kitchen with refacing, refinishing, or respraying techniques from trusted specialists.
By Masoud Kakar, Paint2decor INC • Last updated: 2026-06-24
Above the fold: quick summary and table of contents
Cabinet resurfacing refreshes what you see—doors, drawer fronts, face frames, and hardware—while keeping sturdy boxes. This guide explains what resurfacing includes, when it’s right for your York home, the step-by-step process, pro tools and coatings, best practices, and real examples so you can plan a smooth, durable transformation.
Here’s what you’ll learn and why it matters right now:
- What resurfacing is: A precise upgrade of visible cabinet parts using refacing, refinishing, or respraying.
- Why it’s popular in York: Shorter timelines, less mess, and modern finishes that hold up to daily cooking.
- How it works: From labeling doors to adhesion-priming, HVLP spray, and careful cure windows.
- Which method fits: Compare refacing vs. refinishing/respraying vs. hybrid approaches.
- Pro best practices: Surface prep, dust control, ventilation, and hardware alignment.
- Tools and coatings: Containment, sprayers, abrasives, and high-durability waterborne finishes.
- Real outcomes: York-area mini case studies you can relate to.
Jump to a section:
- What is kitchen cabinets resurfacing?
- Why resurfacing matters
- How resurfacing works (step-by-step)
- Types, methods, and approaches
- Best practices that protect your finish
- Tools and resources
- Case studies and examples
- Frequently asked questions
- Key takeaways
- Conclusion and next steps
Overview: what homeowners in York can expect
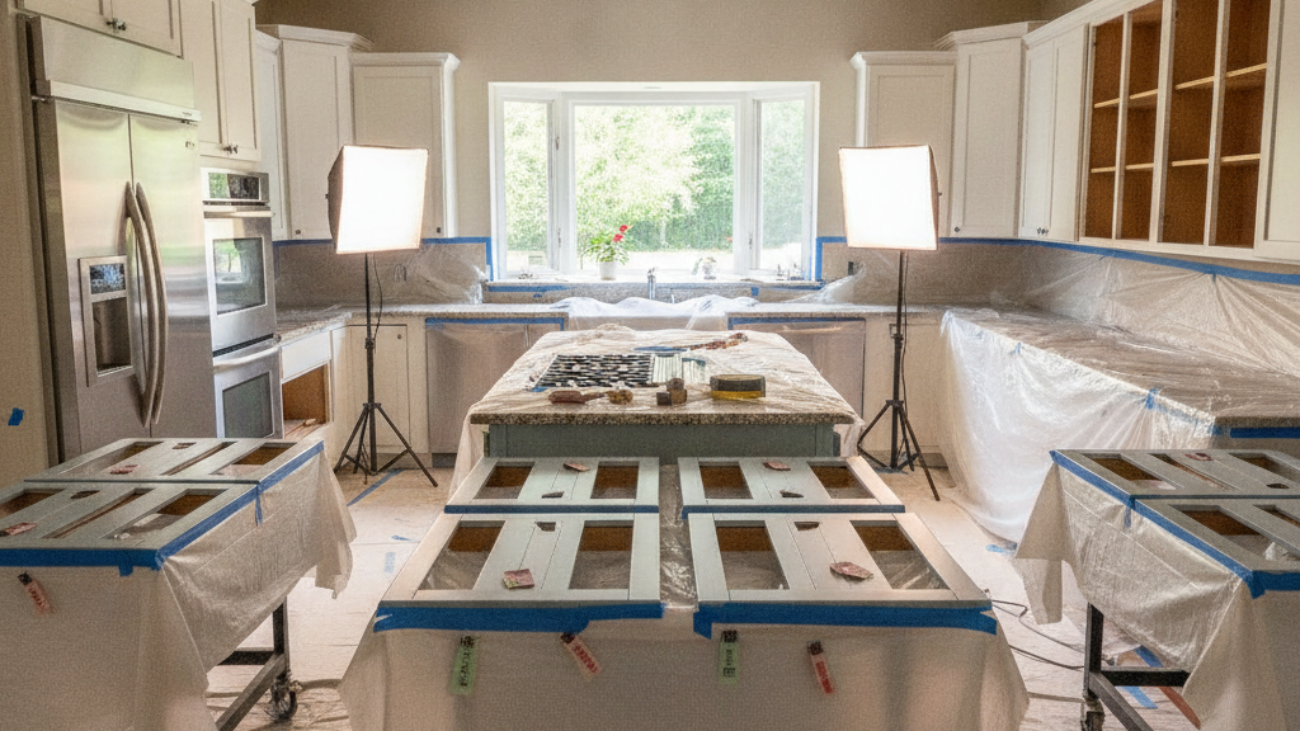
Expect cleaner prep and faster turnarounds than a full renovation. With proper degreasing, sanding, and adhesion-priming, professional respraying or refacing produces a factory-smooth finish. Most kitchens keep partial function during the project, while doors are finished off-site to maintain speed and quality.
In our experience serving the GTA, the transformation hinges on two things: surface prep and patient curing. When those are right, finishes resist everyday wear, clean easily, and look consistent across doors, drawers, and frames. You can also integrate upgrades like soft-close hinges and modern pulls for a complete feel change.
For a deeper dive into planning mindset and options, see our internal explainer on resurfacing kitchen cabinets and our practical kitchen cabinet refinishing guide for Toronto-area homes.
What is kitchen cabinets resurfacing?
Kitchen cabinets resurfacing updates the visible components—doors, drawer fronts, face frames, and hardware—while keeping the existing boxes. It includes refacing (new doors, veneered frames) and refinishing/respraying (repairing and coating existing doors and frames) to achieve a like-new look with far less disruption.
Think of resurfacing as a spectrum. Refacing installs new doors and drawer fronts, then applies matching veneer to frames for a cohesive species or color. Refinishing/respraying repairs, sands, primes, and professionally sprays your current doors and frames with durable coatings. A hybrid approach mixes both: replace selected doors (for style or damage) and spray the rest.
When is resurfacing a smart fit?
- Your cabinet boxes are structurally sound and securely fastened to walls and floors.
- The layout still works, but the style, color, or hardware feels dated.
- You want reduced downtime, controlled dust, and a consistent, easy-clean finish.
- You prefer less material waste compared to a full tear-out.
In many York projects, on-site work spans 3–5 days for sanding, priming, and frame finishing, while doors are handled off-site in a spray environment. Total project cadence depends on door count, repair needs, and curing windows—but homeowners usually maintain partial kitchen function throughout.
Local considerations for York
- Plan spray and cure windows around seasonal humidity shifts near Smythe Park; moisture affects how fast coatings harden.
- Schedule errands or quiet reading time at the Toronto Public Library – Daniel G. Hill Branch while on-site spraying occurs.
- For busy households, we stage work so doors travel to our spray setup while your kitchen stays usable.
For an at-a-glance comparison of resurfacing paths and their trade-offs, our internal cabinet refacing guide lays out options next to refinishing and hybrid approaches.
Why kitchen resurfacing matters
Resurfacing maximizes visible impact while minimizing disruption. You keep sturdy boxes, gain a factory-smooth finish, and align style with today’s designs—often while maintaining partial kitchen use. It’s efficient, lower-waste, and upgrade-friendly with hinges, pulls, and organizers.
Here’s why homeowners choose it over a tear-out:
- High impact, low disruption: Focus effort on doors, drawers, and frames—where eyes land and hands touch every day.
- Layout continuity: Keep the working triangle, outlets, and plumbing where they are; no major rework required.
- Lower waste: Reuse boxes and shelves; swap or spray the visible parts. Less debris, fewer trips, cleaner site.
- Modern durability: Factory-grade waterborne finishes resist kitchen humidity and daily cleaning when cured properly.
- Design flexibility: From shaker doors to sleek slab looks, pair color changes with hardware and organizer upgrades.
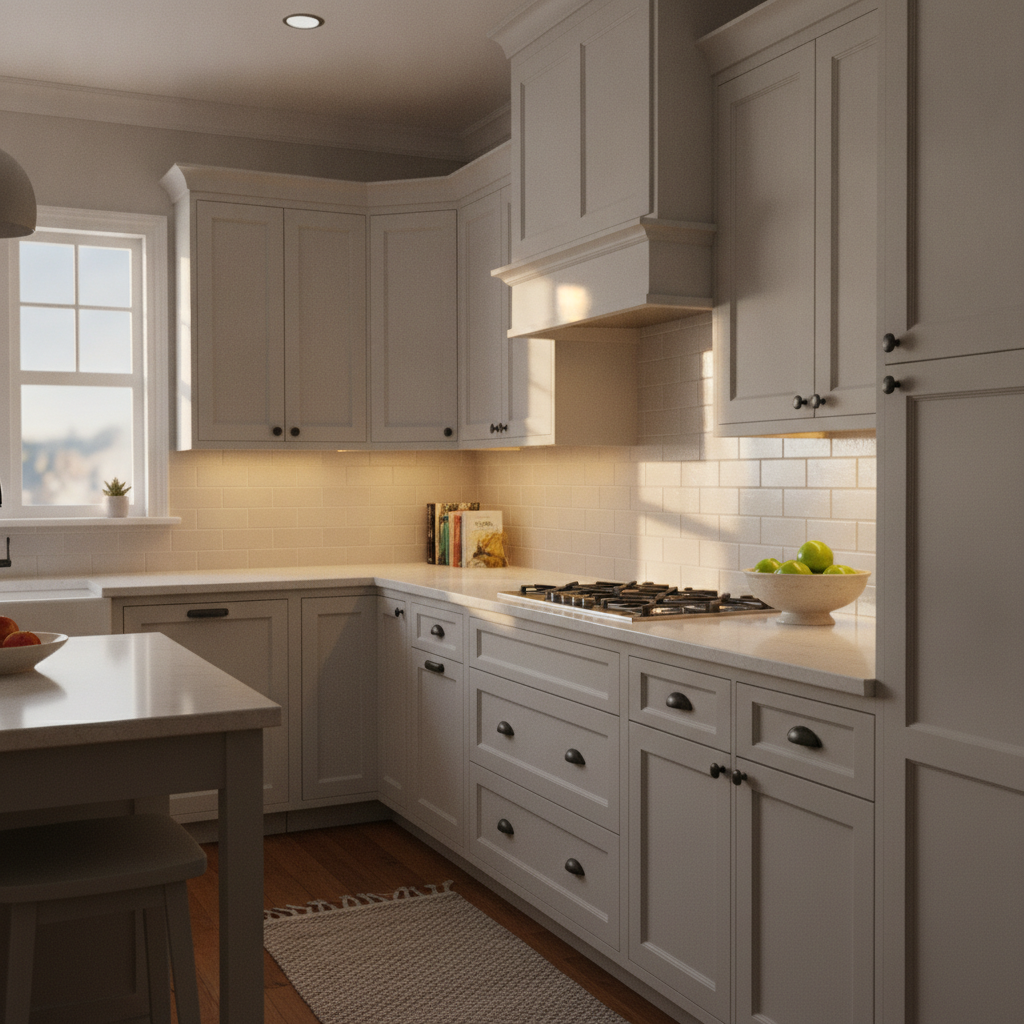
Practical example: A York family wanted a calmer, brighter space without moving walls. We refinished maple doors, color-matched frames, added soft-close hinges, and swapped pulls. The kitchen felt new, function stayed intact, and the finish stood up to daily use after a patient seven-day cure period.
Want more context on choosing the right path? Compare options in our GTA-focused overview: what pro refinishers recommend.
How cabinet resurfacing works (step-by-step)
Pros document the kitchen, remove and label doors, repair and degrease, sand uniformly, apply an adhesion primer, then spray a factory-grade topcoat. With clean containment and correct cure time, the finish levels smooth and hard for long-term durability.
- Assessment and planning: Confirm box integrity, door style, hinge alignment, and target finish sheen (matte, satin, or semi-gloss). Note repairs.
- Numbering and removal: Label each door/drawer and hinge position. Photograph reveals and gaps for accurate reassembly.
- Repairs and cleaning: Fill dings, tighten fasteners, and degrease thoroughly to ensure primer bonds uniformly.
- Uniform sanding: Scuff-sand doors and frames (often 180–220 grit). Vacuum and tack to remove dust.
- Adhesion-priming: Apply a high-bond primer designed for slick or prefinished surfaces; sand light nibs after dry.
- HVLP spray finishing: Spray thin, even coats for a fine finish. Many kitchens target 2–3 color coats.
- Controlled curing: Allow adequate dry-to-touch and handle times; full hardness typically develops over several days.
- Reassembly and alignment: Reinstall hardware, check reveals, adjust doors, and add bumpers/soft-close where planned.
- Quality checks: Inspect sheen consistency, edges, and inside returns; touch-up any micro-defects.
- Care walkthrough: Provide cleaning and curing guidance so homeowners protect the new finish early on.
In our GTA workflow, door and drawer fronts move to a controlled spray setup while frames are finished on-site with dust control and ventilation. That division speeds production and keeps your kitchen partially usable.

Curious how this compares to a full refacing program? Our overview on Renuit cabinet refacing explains when brand-new doors and veneered frames are the right play versus keeping existing doors and respraying.
Types, methods, and approaches
Pick from refacing (new doors + veneered frames), refinishing/respraying (repair and pro-coat existing doors and frames), or a hybrid mix. Match the method to door condition, style goals, timeline, and desired hardware upgrades.
Three common paths and how they differ:
| Approach | Keep Doors? | Frame Work | Finish Type | Timeline | Design Flex |
|---|---|---|---|---|---|
| Refacing | No | Apply matching veneer/laminate to frames | Factory finish on new doors | About 1 week on-site | High (style reset) |
| Refinishing/Respraying | Yes | Fill, sand, prime frames | Catalyzed waterborne coatings | 3–5 on-site days | Medium (strong color control) |
| Hybrid | Some new | Veneer + paint as needed | Mixed approach | 4–7 on-site days | High (targeted swaps) |
When to choose refacing
- You want a style reset (e.g., from cathedral doors to modern shaker) and flawless edge profiles.
- Existing doors are damaged beyond practical repair, or species change is desired (oak to maple look).
- You’re pairing with new drawers, slides, and interior accessories for a full refresh.
Refacing pairs well with modern hardware, new toe-kick treatments, and coordinated end panels. For details, explore our concise cabinet refacing guide.
When to choose refinishing/respraying
- Your doors are in good structural condition and the style still works for the space.
- You value speed, dust control, and a consistent sprayed finish across doors and frames.
- You’re focused on color, sheen, and durability over changing the door profile.
Refinishing is often the fastest route to a uniform, durable finish. Many homeowners are surprised how “new” older maple or MDF doors look after proper priming and a satin topcoat.
When to choose a hybrid
- Select doors or drawers are replaced (to fix damage or update a few profiles) while frames and remaining doors are sprayed.
- You need targeted upgrades in busy zones (trash pull-out, spice drawers) without a full-door swap.
- You want the best of both worlds—new style elements plus efficient respraying—on a tight timeline.
Hybrid projects are versatile. They let you channel investment where it shows and feels most, while keeping the rest of the kitchen running smoothly.
Best practices that protect your finish
Meticulous prep and patient cure are non-negotiable. Degrease thoroughly, sand uniformly, use adhesion primers, and spray in clean, controlled conditions. Let the finish harden before heavy use, then clean gently to preserve sheen and edge integrity.
Preparation and priming
- Document everything: Number doors and note hinge positions; photos of reveals speed final alignment.
- Deep clean before sanding: Degrease to remove cooking residues so primers bond evenly.
- Uniform scuff: Maintain consistent abrasion (180–220 grit) to avoid telegraphing through the topcoat.
- Adhesion-first primers: Choose products designed for slick or previously finished substrates.
Spray technique and environment
- Thin, even coats: Build film gradually; avoid heavy passes that cause sags or orange peel.
- Dust control: Use containment, filtration, and clean tack methods between coats.
- Ventilation with care: Balance airflow to clear overspray without drying the finish too fast.
- Edge attention: Edges take the most contact—spray coverage there prevents premature wear.
Curing, reassembly, and care
- Respect cure windows: Dry-to-touch is not full hardness. Many waterborne finishes continue hardening for several days.
- Gentle first week: Use knobs/pulls, avoid scrubbing, and keep heat/steam exposure modest.
- Hardware alignment: Re-check reveals after 24–48 hours of use; micro-adjust hinges if needed.
- Simple cleaning: Mild soap, soft cloths—skip abrasives and harsh chemicals.
For a practical planning companion, scan our York-focused article on smart, stylish cabinet refacing in York and our broader refinishing best practices.
Tools and resources
Containment, surface prep, HVLP sprayers, and catalyzed waterborne coatings drive professional results. Pair that with proper PPE and manufacturer tech sheets for mix, spray, and cure to lock in factory-smooth durability.
Core tools and materials
- Containment: Plastic sheeting, painter’s tape, floor protection, zip walls, and filtered fans.
- Prep: Degreasers, 180–220 grit abrasives, fillers, caulks, and sanding blocks.
- Spraying: HVLP systems with fine-finish tips, test panels, and viscosity cups.
- Coatings: Adhesion primers and low-VOC, high-durability waterborne topcoats.
- Safety: Respirators, nitrile gloves, and eye/skin protection suitable for coatings used.
Helpful reading
For general maintenance perspectives beyond our own process insights, see these background pieces:
- Practical cabinet maintenance tips for long-term care.
- A comparison of replacing vs. refacing from an industry viewpoint.
- Context on remodel vs. cabinet replacement trade-offs.
Remember: product labels and technical data sheets are your most important references for mix ratios, tip sizes, recoat windows, and cure times. Following them is what turns a good spray job into a great one.
Case studies and examples
Three York-area scenarios show how resurfacing adapts to different kitchens: a compact condo with heavy cooking, a mid-century home seeking a calmer style, and a busy family kitchen that needs quick turnaround with long-term durability.
Compact condo: fast refresh, heavy cooking
A York condo owner wanted brighter cabinets that cleaned easily after frequent stovetop use. We cleaned, repaired, and resprayed existing slab doors in a satin off-white; frames were adhesion-primed and sprayed to match. With doors finished off-site, the kitchen stayed functional, and after a week of gentle use, the finish felt rock solid.
Mid-century home: modern shaker without a tear-out
This detached home had warm wood that felt busy. We refaced to shaker doors, veneered frames, and added matte black hardware. The new profile and a soft gray topcoat simplified the lines dramatically. Layout stayed intact, and organizers in base cabinets improved daily flow.
Busy family kitchen: hybrid efficiency
Here we replaced a few damaged doors, sprayed the rest, upgraded hinges to soft-close, and aligned all reveals. Parents appreciated that meal prep continued through most of the schedule, and the final finish held up well after curing, even with constant traffic.
Frequently asked questions
With the right prep and coatings, resurfacing delivers years of performance on wood and laminate. It cleans easily with mild soap and fits most sound cabinet boxes. Here are direct answers to common questions we hear in York.
How long does kitchen cabinets resurfacing usually take?
Most York projects complete on-site work in 3–5 days, while doors are sprayed off-site to maintain speed and quality. The exact timeline depends on door count, surface repairs, and curing conditions.
Will the new finish chip, peel, or yellow?
When surfaces are properly cleaned, sanded, and adhesion-primed, factory-grade waterborne finishes resist chipping and yellowing. Let the coatings cure fully and clean with mild soap to keep the sheen consistent.
Can you resurface laminate as well as wood?
Yes. Laminate requires thorough degreasing, scuff sanding, and an adhesion-promoting primer before spraying. With that foundation, laminate and wood both achieve durable results.
Do I have to replace hardware during resurfacing?
Not necessarily. Many homeowners keep existing pulls and hinges, but adding soft-close hinges or updated pulls can dramatically improve feel and function without extra disruption.
Key takeaways
Resurfacing renews your kitchen quickly and cleanly by upgrading visible components while keeping boxes. Choose the right method, respect prep and cure, and you’ll enjoy a durable, easy-clean finish that looks factory-new.
- Kitchen cabinets resurfacing keeps boxes and refreshes visible parts for a like-new look.
- Pick refacing, respraying, or a hybrid based on door condition and style goals.
- Prep, spray control, and patient curing are what make finishes last.
- Simple care—mild soap, soft cloths—preserves sheen and edges.
Conclusion and next steps
If your layout works and boxes are sound, cabinet resurfacing is the fastest path to a like-new kitchen in York. Plan for proper prep, pro-grade coatings, and cure windows—and schedule a professional assessment to confirm the best approach for your home.
Ready to see what’s possible? Explore our deeper dive on resurfacing options and our practical cabinet refacing guide. Then book a quick assessment so we can recommend the ideal finish, sheen, and hardware upgrades for your day-to-day life.
Related articles
Continue your research with our GTA-focused resources: a Toronto cabinet refinishing guide that expands on finish choices and curing, and a quick primer on working with refinishing contractors to align timelines, prep, and quality checks.