
Cupboard refinishing is the professional process of renewing existing cabinet surfaces with durable coatings instead of replacing boxes and doors. It restores appearance, extends service life, and reduces disruption. At Paint2decor INC in York (2710 St Clair Ave W), we refinish, respray, and reface cabinetry across Toronto and the GTA to deliver like-new results without a full remodel.
By Paint2decor INC • Last updated: 2026-06-18
Summary
Cupboard refinishing keeps your existing cabinet boxes and doors, deep-cleans and sands them, and applies factory-grade coatings for a fresh, durable finish. It’s faster, cleaner, and more sustainable than replacement. This guide explains methods, timelines, maintenance, and how Paint2decor INC executes refinishing projects across Toronto and the GTA.
If your cabinets are structurally sound but look dated, this guide shows you how refinishing compares to refacing and repainting, what the step-by-step process looks like, and how to plan a smooth project in a lived-in home.
- What you’ll learn: Definitions, pros/cons, surface prep, spraying vs brushing, timelines, and care.
- Who it’s for: Toronto/GTA homeowners weighing refinishing versus refacing or full replacement.
- Why it matters: You can achieve a modern, resilient finish without demolition or long downtime.
What Is Cupboard Refinishing?
Cupboard refinishing restores existing cabinet surfaces by cleaning, repairing, sanding, priming, and topcoating with professional systems. It preserves cabinet structure, updates color and sheen, and addresses wear, all without replacing boxes. The result is a like-new finish that matches modern styles and withstands daily kitchen use.
In practice, refinishing focuses on surface renewal. Frames, doors, and drawer fronts are degreased, scuff-sanded, and primed. Then high-performance finishes are applied to achieve a consistent, factory-grade appearance.
- Core goal: Transform aesthetics while keeping sound cabinet carpentry.
- Primary steps: Prep, priming, topcoating, and controlled curing.
- Where it fits: Ideal for kitchens and bathrooms where layout works and boxes are sturdy.
At Paint2decor INC, we combine cabinet refinishing, cabinet respraying, and cabinet painting techniques to meet each home’s needs.
Why Cupboard Refinishing Matters
Refinishing matters because it delivers a modern, durable finish with less disruption than replacement. You keep your layout, avoid landfill waste, and return to a functioning kitchen faster. When cabinets are structurally solid, refinishing is a practical, value-forward path to a refreshed space.
The kitchen is the most-used room in most homes. A resilient coating system reduces visible wear, blocking stains and moisture. You also get immediate design benefits—updated color, sheen, and hardware—without altering plumbing, flooring, or countertops.
- Lower disruption: No demolition or re-measuring boxes.
- Sustainability boost: Reuse existing materials; reduce waste.
- Design flexibility: Bright whites, soft grays, moody greens, or two-tone looks.
- Consistent results: Shop-grade spraying improves uniformity and durability.
For many Toronto kitchens, the layout still functions well. Refinishing aligns with that reality and delivers a high-visibility change quickly.
How Cupboard Refinishing Works (Step-by-Step)
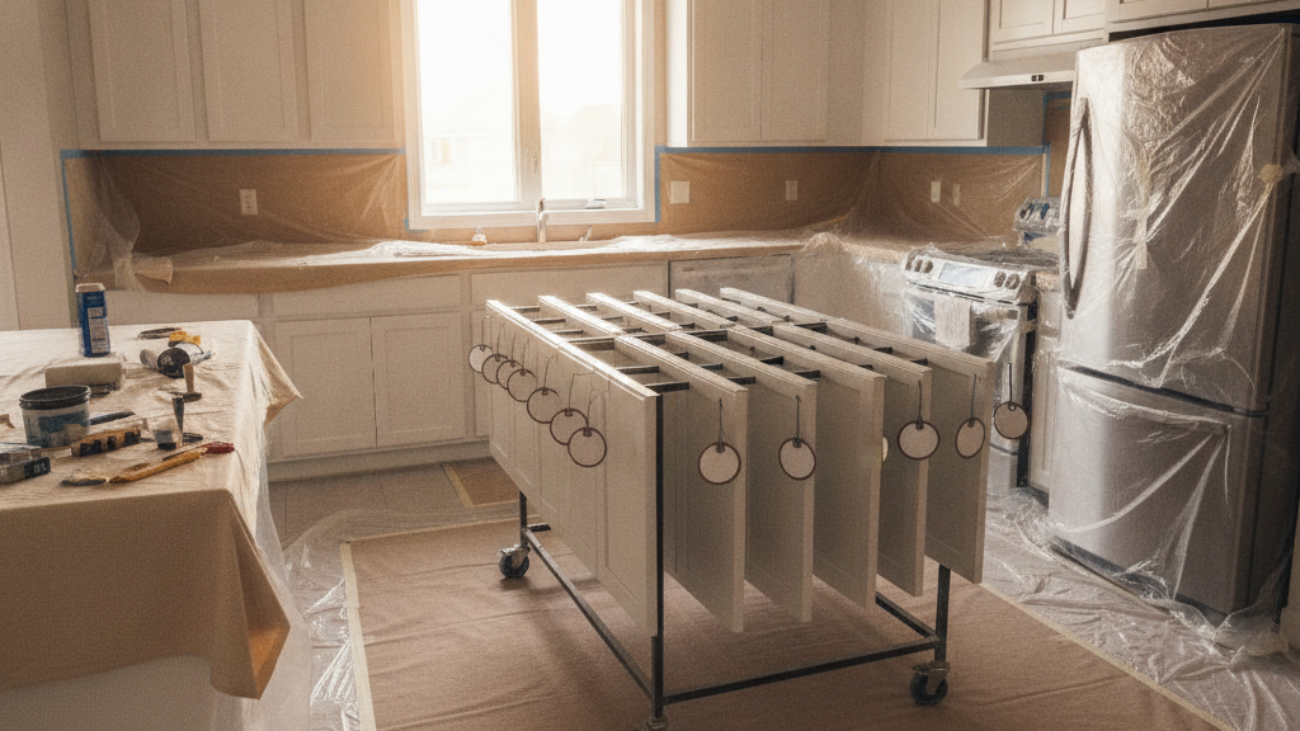
Refinishing follows a controlled sequence: label and remove doors, degrease, sand, repair, prime, and apply professional topcoats. Doors are sprayed off-site or in a contained on-site setup; frames are finished in place. Correct cure times ensure a hard, kitchen-ready finish.
- Assessment and labeling: Inspect boxes and doors; label hardware and hinges for a clean reassembly.
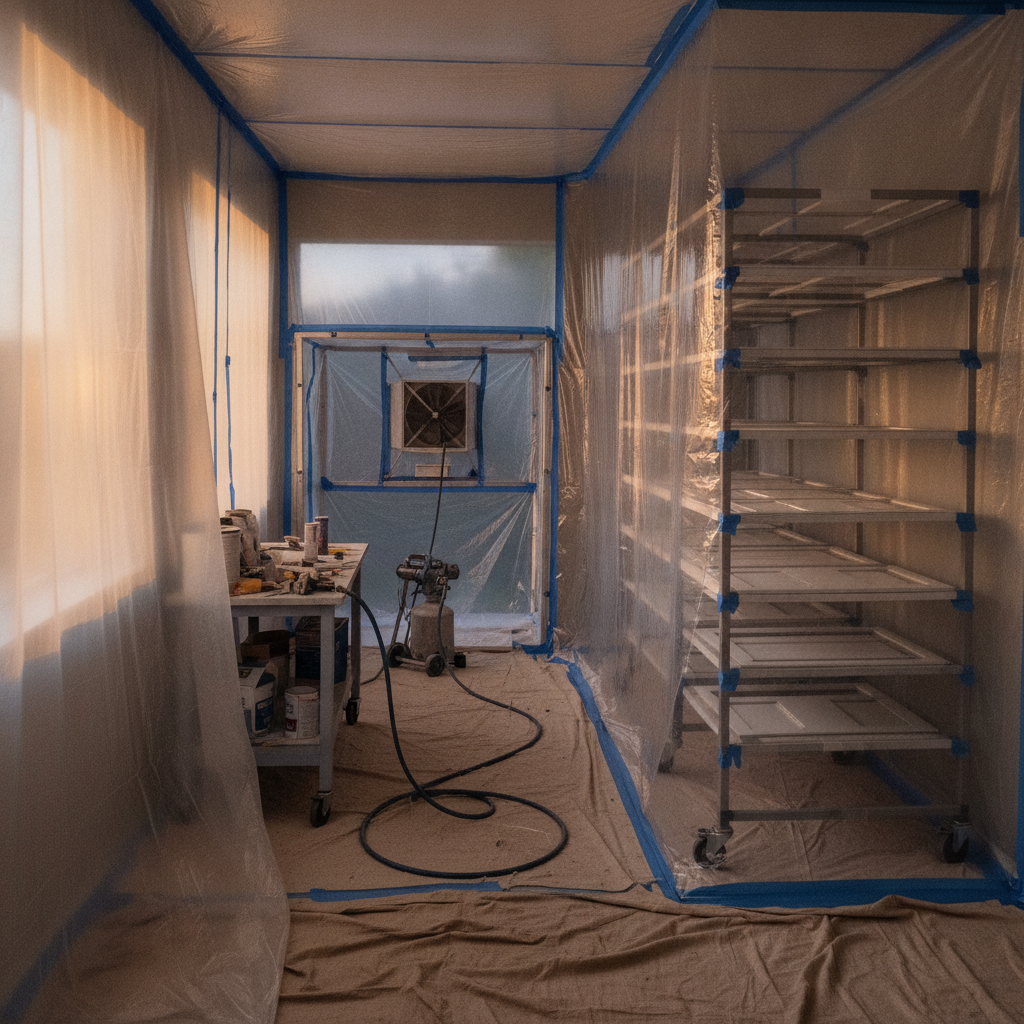
- Protection and masking: Seal appliances, counters, and floors; isolate the work zone with plastic containment.
- Degreasing and cleaning: Remove cooking residues so primers and topcoats bond properly.
- Surface prep: Scuff-sand, fill dings, caulk gaps, and vacuum dust; prep drives finish quality.
- Priming: Use adhesion-promoting primer compatible with the chosen topcoat.
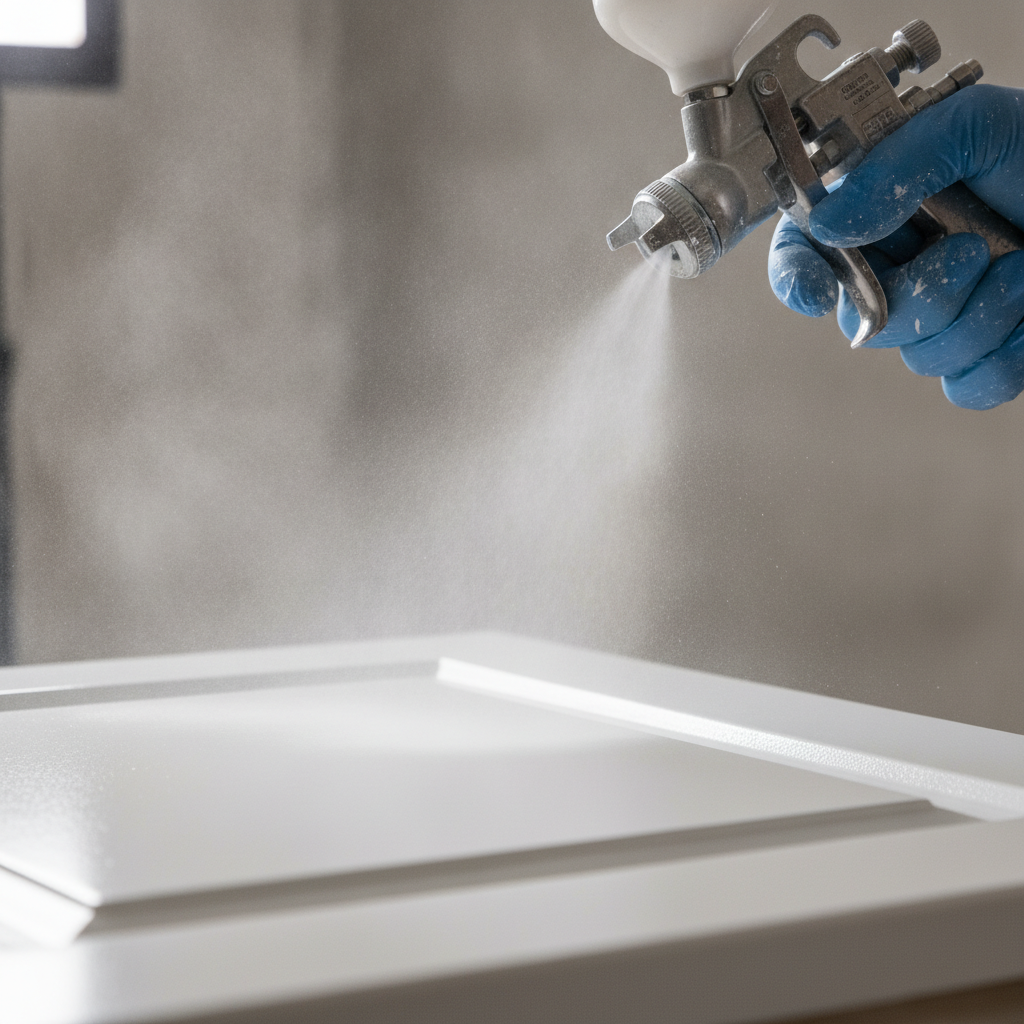
- Topcoating: Apply two or more coats by HVLP sprayer for a smooth, even film.
- Curing: Typical professional systems reach dust-free in 30–60 minutes, handle-ready within 12–24 hours, and a full cure around seven days.
- Reassembly and adjustments: Reinstall doors and hardware, verify reveals, and fine-tune hinges.
We manage airflow and filtration so overspray and dust don’t reach adjacent rooms. A dedicated drying rack and schedule prevents smudges and imprints during cure.
Methods and Approaches (Spraying, Brushing, and Hybrid)
Professional cupboard refinishing often favors HVLP spraying for its factory-smooth finish. Brushing/rolling is viable for frames or tight spaces. Hybrid approaches—sprayed doors with rolled frames—balance quality, access, and schedule for occupied homes.
Finish uniformity comes from atomization, film-build control, and steady gun travel. Frames can be brushed or rolled, then back-brushed for leveling. The choice depends on access, ventilation, and whether the home can support a temporary spray booth.
- HVLP spraying: Best for doors and drawer fronts; produces consistent, refined texture.
- Brushing/rolling: Useful on cabinet frames in tight or sensitive areas.
- Hybrid plan: Spray movable parts; roll frames in place to reduce setup time.
- Sheen options: Matte to semi-gloss; satin is the most kitchen-friendly balance.
Our team adapts the method to your space, ensuring clean air handling and predictable curing.
Refinishing vs. Refacing vs. Repainting vs. Replacement
Refinishing renews existing surfaces; refacing swaps door/drawer fronts and adds new veneers; repainting is a lighter refresh; replacement rebuilds everything. Choose based on cabinet condition, layout satisfaction, and desired design change without introducing demolition.
Choosing the right path starts with box integrity. If boxes are solid and the layout works, refinishing or refacing shine. If you only need a color shift with minimal wear, repainting may be enough. Replacement is reserved for failing boxes or major layout changes.
| Path | What Changes | Disruption | When It Fits | Finish Options |
|---|---|---|---|---|
| Refinishing | Existing surfaces renewed | Low to moderate | Boxes sound; style update desired | Wide color/sheen choices |
| Refacing | New doors/veneers | Moderate | Want new door style without rebuild | Extensive (door profiles, finishes) |
| Repainting | Color-only refresh | Low | Minimal wear; quick uplift | Color and sheen |
| Replacement | New boxes/doors | High (demolition) | Boxes failing; layout change | Unlimited |
For deeper context on alternatives, see our internal primer on cabinet refacing and our step-by-step kitchen cabinet refinishing guide.
Best Practices for Durable Results
Durability comes from disciplined prep, compatible coatings, dust control, and measured cure times. Proper degreasing, thorough sanding, bonding primer, and controlled spraying deliver a hard, washable finish that resists moisture, stains, and everyday impacts.
- Degrease twice: Kitchens accumulate oils; clean until white cloths stay clean.
- Mechanical profile: Scuff-sand to promote primer adhesion; vacuum dust meticulously.
- Bonding primer: Use a primer formulated for cabinetry and your topcoat chemistry.
- Film build: Multiple thin coats beat one heavy pass for leveling and hardness.
- Environment: Control temperature, humidity, and airflow during spraying and cure.
- Hardware plan: Consider soft-close hinges or new pulls when reassembling.
We detail these moves in our Toronto-focused walkthrough on kitchen cabinet refinishing and our contractor insights in what refinishing contractors recommend.
Tools, Materials, and Resources
Refinishing success relies on the right tools and materials: degreasers, abrasives, bonding primer, cabinet-grade topcoats, HVLP sprayers, drying racks, and plastic containment. These components improve finish quality and keep lived-in kitchens clean during the project.
- Surface prep: Degreaser, Scotch-Brite pads, 120–220 grit sandpapers, tack cloths.
- Coatings system: Cabinet-grade primer and topcoat compatible for adhesion and hardness.
- Application: HVLP sprayer, fine-finish tips, and strainers; mini-rollers for frame touch-ups.
- Containment: Plastic sheeting, zip walls, masking films, floor protection, and filters.
- Organization: Numbered labels, screw bags, and a reassembly checklist.
For a broader renovation perspective, you can review this third-party take on painting kitchen cabinets in Canada for a process overview. While methods vary, the fundamentals—prep, prime, topcoat—are consistent.
Real-World Examples from York and Toronto
In York and across Toronto, we refinish kitchens where the layout still works but finishes don’t. We remove doors for spray finishing, renew frames in place, and reassemble with updated hardware. Homeowners gain a like-new look without demolition or long downtime.
Example 1: A York semi with maple cabinets near the Toronto Public Library – Daniel G. Hill Branch. We degreased, sanded, and sprayed satin white doors, rolled frames in place, and added brushed-nickel pulls. The family cooked the next day while doors cured on racks.
- Challenge: Yellowed clear coat and minor dings on maple doors.
- Approach: HVLP spray doors off-site; hybrid method for frames.
- Outcome: Even, modern sheen; subtle grain telegraph for natural character.
Example 2: A Toronto bungalow bordering Smythe Park. The kitchen needed a color reset and better wipe-ability. We used a bonding primer and a scrub-resistant topcoat in a soft gray, then re-hung doors with soft-close hinges.
- Challenge: Grease accumulation around range and high-touch zones.
- Approach: Intensive degreasing and targeted repairs; controlled booth for doors.
- Outcome: Stain-resistant surfaces and quieter close action.
Local considerations for York
- Schedule spraying on low-humidity days when possible; Toronto summers can spike humidity, which slows curing.
- Aim for weekday setups to avoid weekend bus schedules near Jane St at St Clair Ave West that can increase foot traffic during loading.
- Row-house layouts common in York benefit from compact drying racks and hybrid methods to keep hallways clear.
Planning, Timeline, and Living Through the Work
Most occupied-home refinishing projects follow a 5–10 day rhythm: preparation and masking, door removal, priming, topcoats, and reassembly. Kitchens remain partially usable during frame work; doors cure on racks to reach full hardness before everyday use.
- Pre-visit: Walkthrough, color selection, door count, and hardware plan.
- Day 1–2: Protection, masking, degreasing, and sanding.
- Day 3–4: Priming and first topcoat on doors and frames.
- Day 5–7: Final coats, cure management, and touch-ups.
- Day 8–10: Reassembly, hinge adjustments, and hardware install.
We stage work to keep sinks and appliances accessible where possible. Clear daily communication helps you plan meals and traffic patterns around the space.
Thinking about starting? Our Toronto overview on kitchen cupboard refinishing outlines the decisions, from color to hardware, that shape your project goals.
Maintenance and Care After Refinishing
Care is simple: allow a week for full cure, wipe with mild soap and water, and avoid harsh chemicals. Use soft cloths, add bumper pads where doors meet frames, and address drips quickly to keep the finish looking new for years.
- First week: Treat gently; the coating is still hardening.
- Cleaning: Mild soap, water, and microfiber; no abrasives or ammonia-heavy products.
- Hardware: Tighten hinge screws seasonally to maintain alignment.
- Moisture: Ventilate after cooking and dishwashing; wipe splashes promptly.
For additional third-party perspectives on cabinet upkeep, see these maintenance tips. They echo what we see daily in Toronto homes.
Common Mistakes to Avoid
Skipping degreasing, under-sanding, and rushing cure times are top errors. Using non-cabinet paints or ignoring dust control leads to premature wear. A disciplined sequence—clean, prep, prime, topcoat, cure—prevents most finish failures.
- Inadequate cleaning: Residual oils block adhesion; prep until surfaces are squeaky clean.
- Wrong products: Wall paints won’t hold up; choose cabinet-rated systems.
- Heavy coats: Thin passes level better and reduce runs/sags.
- Dust drift: Use containment and air filtration to keep particles off wet coats.
- Premature reassembly: Respect manufacturer cure windows before heavy use.
If you’re weighing alternatives, a third-party comparison of replacing vs. refacing outlines considerations beyond pure aesthetics.
Free Refinishing Assessment (Soft CTA)
If your cabinets are sound but tired, a guided assessment clarifies finishes, timelines, and expectations. We’ll review box condition, discuss color and hardware, and map a clean, low-disruption plan for your Toronto home.
Ready to explore options? Start with our refinishing guide and then connect with our team for a walkthrough in York or anywhere in the GTA.
Frequently Asked Questions
These quick answers address the most common cupboard refinishing questions from Toronto homeowners. Each response is concise, practical, and grounded in how we run projects in lived-in kitchens and bathrooms.
What’s the difference between cupboard refinishing and repainting?
Repainting is a color-only refresh with minimal prep. Refinishing is deeper: thorough degreasing, sanding, repairs, bonding primer, and cabinet-grade topcoats. The goal is a factory-like finish that resists moisture, fingerprints, and daily wear better than a quick repaint.
How long does a typical refinishing project take?
Most occupied-home projects run 5–10 days, depending on kitchen size, access, and drying conditions. Frames are finished in place to keep the kitchen semi-usable, while doors and drawers cure on racks to reach full hardness before daily use.
Will the new finish be durable enough for a busy family kitchen?
Yes. Cabinet-rated primers and topcoats form a hard, washable film that holds up to frequent cleaning and occasional bumps. Proper prep and cure times are critical—done right, the finish resists stains, moisture, and everyday impacts for years.
Do I need to change my cabinet doors to get a new style?
Not always. Refinishing updates color and sheen while keeping your current door profile. If you want a different style—like switching from slab to shaker—refacing swaps doors and adds new veneers while keeping your existing cabinet boxes.
Can you refinish bathroom vanities as well?
Absolutely. The same cabinet-grade systems work well in bathrooms. We focus on moisture resistance and ventilation, then apply a scrub-friendly topcoat so vanities clean easily and stay looking fresh.
Key Takeaways and Next Steps
Cupboard refinishing delivers a like-new look fast when cabinets are structurally sound. The best results come from disciplined prep, compatible coatings, clean air control, and patient curing. If your layout works, start with an assessment and a color plan.
- Refinishing first: If boxes are solid, renew surfaces instead of replacing them.
- Process matters: Clean, sand, prime, spray, and cure—no skipped steps.
- Live-in friendly: Keep kitchens usable with masking, containment, and staging.
- Plan your palette: Test sheen and color in your home’s lighting.
- Explore deeper: Visit our Toronto refinishing guide to map your project.
Ready when you are: Book a friendly walkthrough in York or the GTA. We’ll craft a refinishing plan tailored to your home and timeline.