
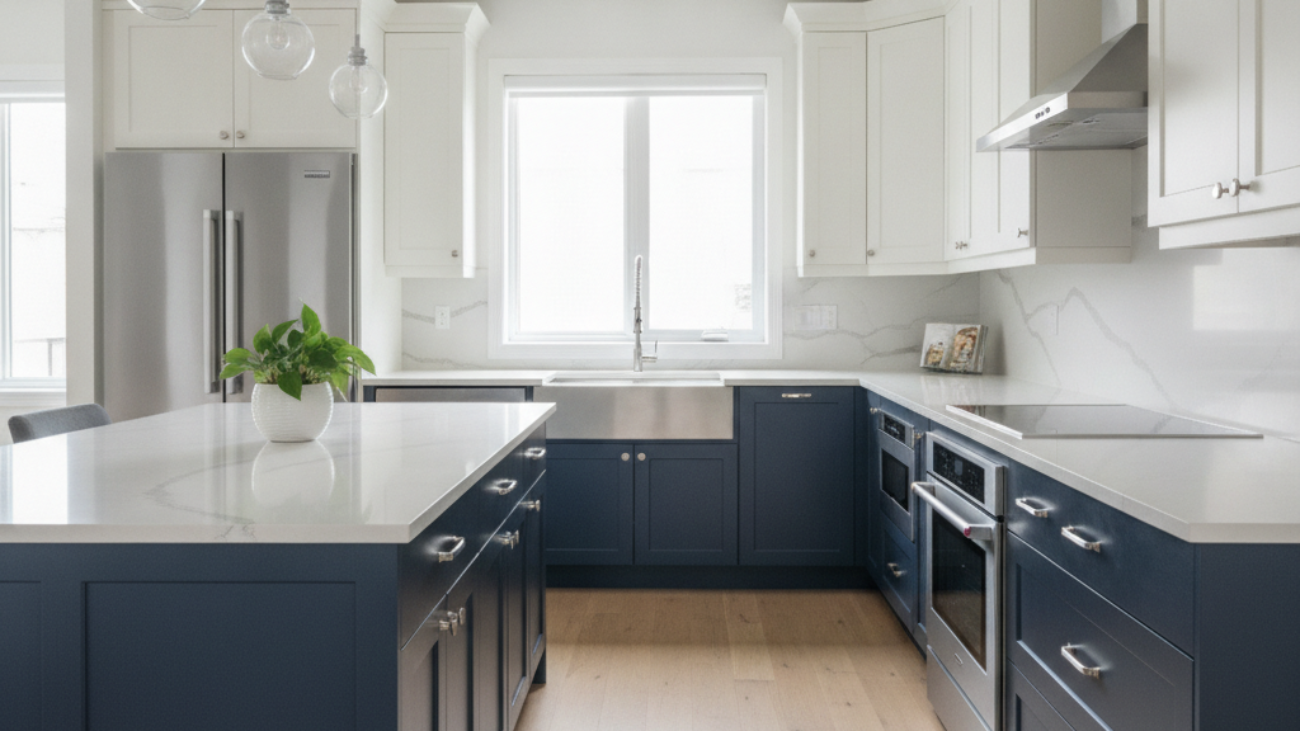
Redoing cabinets is the process of updating existing kitchen or bathroom cabinetry through refinishing, refacing, or professional repainting—without tearing out boxes. For York homeowners at 2710 St Clair Ave W and across Toronto, it delivers a faster, cleaner transformation than full replacement. When done by a specialist like Paint2decor INC, results look new and last for years.
By Paint2decor INC • Last updated: 2026-06-08
Overview and Table of Contents
This complete 2026 guide explains how to redo cabinets—what it means, why it matters, and exactly how it works. You’ll learn methods (refinishing, refacing, respraying), a pro-level step-by-step, tools, best practices, and local York–Toronto tips, plus FAQs. Use the comparison table to choose the right path for your home.
Here’s how to use this guide quickly:
- Understand what “redoing cabinets” includes and when each method fits.
- Follow a clear, pro-informed step-by-step for smooth, durable finishes.
- Compare refinishing vs. refacing vs. replacement at a glance.
- See tools, safety, and maintenance essentials in one place.
- Get York and Toronto-specific planning tips before you start.
At a Glance
- Most common paths: refinishing (sand + repair + spray), refacing (new doors + veneers), pro repainting/respraying.
- Typical coatings: durable 2K urethane or cabinet-grade enamel; many pros apply 2–3 coats with 1–2 primer coats.
- Surface prep: degrease, sand (120–220 grit), dust control, and masking; labeled hardware for easy reassembly.
- Finish timeline: dry-to-touch in hours, recoat in 4–6 hours, full cure often in 7–30 days (follow product specs).
- What Is “Redoing Cabinets”?
- Why Redoing Cabinets Matters
- How Redoing Cabinets Works
- Methods and Approaches
- Step-by-Step Process
- Tools and Resources
- Best Practices and Pro Tips
- Refinish vs. Reface vs. Replace
- Local Guide: York and Toronto
- Case Studies and Examples
- Frequently Asked Questions
- Conclusion and Next Steps
What Is “Redoing Cabinets”?
Redoing cabinets means updating your existing cabinet boxes, doors, and drawer fronts through refinishing, refacing, or professional repainting. It keeps your layout, minimizes demolition, and transforms color, style, and durability. Homeowners choose it to modernize quickly while avoiding the mess, waste, and long timelines of full replacement.
In our experience across the Toronto metro, “redoing” covers three practical paths:
- Refinishing: Clean, repair, sand, prime, and spray a new cabinet-grade finish. Ideal when doors and boxes are solid, especially maple or oak.
- Refacing: Keep boxes, install new doors/drawer fronts, add matching veneer to face frames, and update hardware for a like-new style.
- Professional repainting/respraying: A controlled spray process (often HVLP) for uniform sheen and higher durability than brush-only methods.
Here’s why this matters: your boxes likely account for most of the cabinet structure and are often in good shape. By preserving them, you shorten timelines, reduce material waste, and open up modern color options without revising plumbing or electrical.
Why Redoing Cabinets Matters
Redoing cabinets delivers a high-impact upgrade with less disruption. It lets you change color, style, and hardware while keeping boxes. The result is a faster transformation, fewer trades, and less waste, making it a smart path for busy households and condos in dense city neighborhoods.
For Toronto and GTA homeowners we work with, three outcomes stand out:
- Faster refresh: Redoing typically avoids plumbing or electrical changes, trimming the schedule to days, not weeks. Dry-to-touch times are often measured in hours.
- Cleaner project: Masking, ventilation, and off-site spraying minimize dust and odor. Many projects maintain a functioning kitchen during work phases.
- Design freedom: From soft white uppers to navy lowers, two-tone layouts remain popular. Satin and matte sheens reduce glare and hide minor imperfections better than high gloss.
Homeowners also appreciate that reusing cabinet boxes supports material efficiency. Keeping your layout reduces debris, trucking, and time spent waiting on new casework or long-lead hardware.
How Redoing Cabinets Works
The process starts with assessment, then surface prep and controlled spraying of cabinet-grade coatings. Doors are labeled and removed, boxes masked, and finishes applied in thin, even passes. Hardware is upgraded as needed, and doors are reinstalled after curing for a factory-smooth, durable result.
Here’s the high-level flow we follow in kitchens and bathrooms:
- Assessment: Check substrate (maple, oak, MDF, thermofoil), hinge condition, and any water or grease exposure.
- Disassembly: Label doors/drawers; bag and tag hardware for smooth reassembly.
- Prep and masking: Degrease, sand 120–220 grit, dust control, and isolate work zones with plastic and zipper doors.
- Priming: Bonding primer improves adhesion, especially over slick factory finishes.
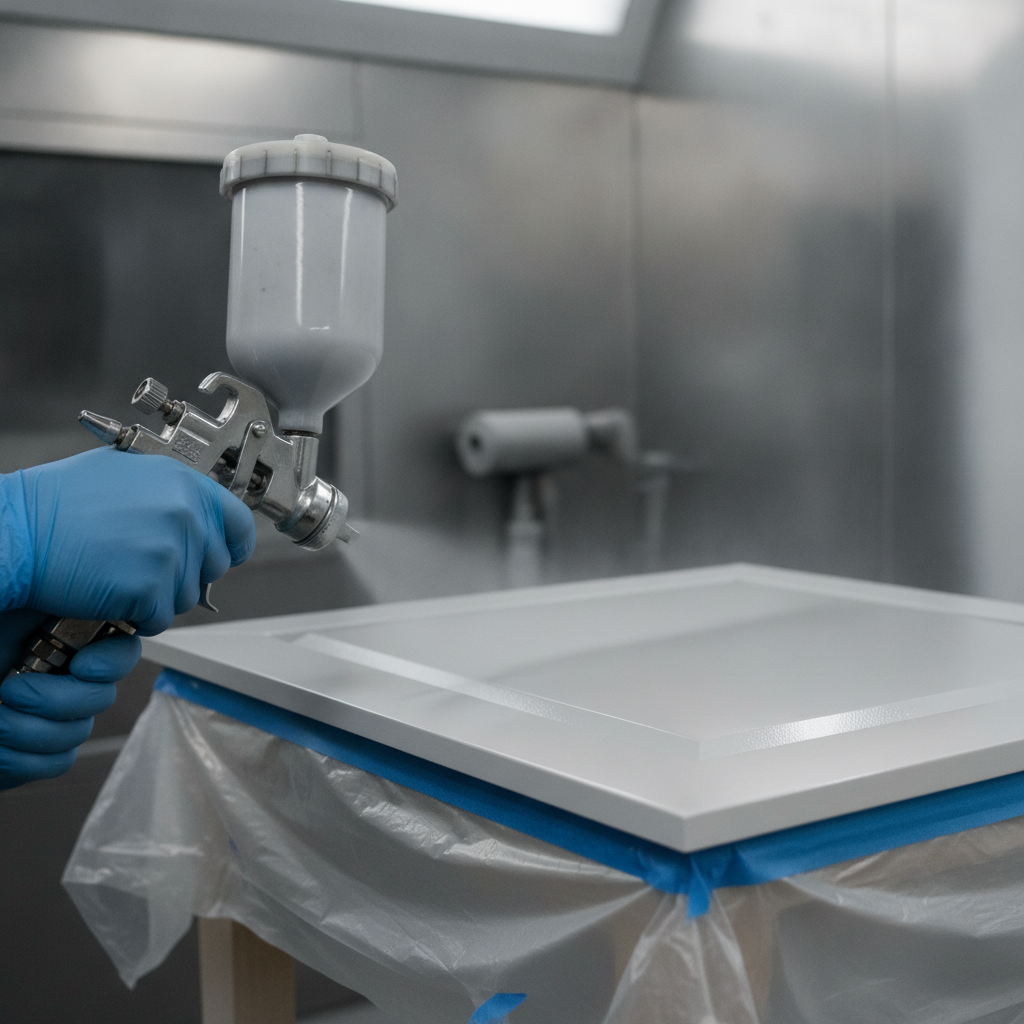
- Spraying: HVLP or air-assisted systems lay down 2–3 thin coats; recoat windows are often 4–6 hours.
- Curing: Surfaces harden over 7–30 days; treat gently during early cure to prevent impressions.
As a local example, our kitchen cabinet refinishing in Toronto projects often pair a bonding primer with a cabinet-grade enamel or 2K urethane topcoat for superior scratch resistance in active homes.
Methods and Approaches
The main approaches are refinishing, refacing, and professional spray painting. Refinishing restores and recolors existing doors; refacing swaps doors and veneers face frames; pro spraying achieves a uniform factory look. Choose based on door condition, style goals, and how much change you want.
Refinishing (restore and recolor)
- Best when: Doors/boxes are structurally sound; you like your door style.
- Prep focus: Degreasing, sanding (120–220 grit), filling divots, bonding primer.
- Finish: 2–3 sprayed color coats; satin or matte sheens are popular in 2026.
- Example: A York kitchen with maple Shakers goes from honey oak to warm white while keeping existing doors and layout.
Refacing (new doors, new look)
- Best when: You want a different profile (e.g., slab to Shaker) or current doors are tired.
- Scope: New doors/drawer fronts, face-frame veneers, edge banding, and updated pulls/hinges.
- Outcome: “Like new” visuals without touching boxes or countertop.
- Example: A Toronto condo keeps its layout but upgrades to shaker doors with concealed, soft-close hinges.
Professional repainting/respraying
- Control: Masking and spray-booth work deliver an even film, consistent sheen, and minimal brush marks.
- Durability: Cabinet-grade coatings resist everyday abrasion better than typical wall paints.
- Example: Our refinishing guide for Toronto outlines how controlled spraying improves edge coverage and hardware clearances.
Not sure which route fits? Review the comparison table, then scan real-world cases below to match your situation.
Step-by-Step Process
A reliable cabinet redo follows a defined sequence: plan, protect, prep, prime, spray, and reassemble. Label everything, manage dust and odor, and respect recoat and cure windows. The result is a smooth, durable finish that feels factory-made and stands up to daily use.
- Plan your scope: Color, sheen, hardware, hinge style, and any layout tweaks. Two-tone schemes (light uppers, darker lowers) remain strong in 2026.
- Empty and protect: Clear cabinets, cover floors and counters, and create a clean staging zone for doors/drawers.
- Remove doors/drawers: Label positions (A1, A2…) and store hinges/handles in marked bags.
- Degrease thoroughly: Kitchens accumulate oils—clean twice for adhesion.
- Sand and fill: Scuff-sand 120–220, fill dings, then final sand for a uniform surface.
- Mask and ventilate: Isolate with plastic and zipper doors; use exhaust fans or filtered air movers.
- Prime for bonding: Apply a cabinet-rated bonding primer; spot-prime repairs to seal filler.
- Spray color coats: 2–3 thin coats; typical recoat windows are 4–6 hours (check product label).
- Cure and handle gently: Dry-to-touch in hours; full hardness often develops over 7–30 days.
- Reinstall and adjust: Align doors to consistent reveals; upgrade to soft-close hardware if desired.
For a deeper walkthrough and photos, explore our cabinet refinishing and painting overview.

Tools and Resources
Successful redoes rely on clean prep, accurate masking, and cabinet-grade coatings. You’ll need degreasers, sanders, bonding primer, an HVLP sprayer, strainers, and proper PPE. A labeled hardware system and a dust-controlled staging area prevent rework and keep timelines on track.
Core tools
- HVLP sprayer with 1.3–1.5 mm needle/nozzle for fine finishes.
- Random-orbit sander and sanding blocks (120–220 grit).
- Shop vac with HEPA filter and tack cloths for dust removal.
- Masking film, painter’s tape, zipper-door containment.
- Bonding primer, cabinet-grade enamel or 2K urethane.
- Quality strainers, mixing sticks, and clean metal paint cups.
- Nitrile gloves, respirator with organic vapor cartridges, safety glasses.
Pro resources
- Set clear recoat intervals and target film builds—many coatings perform best at 2–3 thin coats.
- Create a parts map and label every hinge and door to keep reveals uniform on reassembly.
- Test adhesion on the back of a door before committing to the full color application.
If you want hands-on help choosing the right method, our cabinet refacing guide and kitchen makeover overview outline options side by side.
Best Practices and Pro Tips
Great results come from disciplined prep, thin coats, and patient cure times. Degrease twice, sand uniformly, spray light passes, and let coatings cure fully before heavy use. Keep a parts map, number doors, and upgrade hinges and pulls while everything’s off for a sharper finished look.
Surface prep and coating control
- Wash twice with a degreaser; kitchens accumulate invisible oils that weaken adhesion.
- Feather-sand repairs and scuff-sand door profiles—aim for a uniformly dull surface.
- Strain every batch and keep viscosity consistent; adjust with approved reducers only.
- Apply 2–3 light coats; heavy passes risk sags and orange peel.
Hardware and alignment
- Consider soft-close, concealed hinges for a quiet, premium feel.
- Standardize reveals: 2–3 mm gaps look clean and avoid binding.
- Use a hinge template to keep drilling consistent across a set.
Care and maintenance
- Wipe spills promptly; avoid harsh abrasives that can dull sheen.
- Many coatings reach full cure in 7–30 days—treat gently during that window.
- Inspect high-touch areas every 6–12 months and spot-tune as needed.
Want more pro context? This third-party overview of painting kitchen cabinets explains the importance of prep and product choice for lasting finishes.
Refinish vs. Reface vs. Replace
Refinishing keeps your doors and boxes, refacing installs new doors and veneers, and replacement rebuilds everything. Choose refinishing for solid doors in good shape, refacing for a style reset, and replacement only when layout or structural issues demand new cabinetry.
| Approach | What Changes | Timeline | Best For | Notes |
|---|---|---|---|---|
| Refinishing | Color/finish on existing doors, drawer fronts, and boxes | Days | Solid doors, sound boxes | Strong when you like your current profile |
| Refacing | New doors/drawers + veneer on face frames | Days to a week | Style overhaul with stable layout | Opportunity to add soft-close hardware |
| Replacement | New boxes, doors, and often layout | Weeks | Damaged boxes or major layout changes | Involves more trades and coordination |
If you’re weighing options, our kitchen cupboard refinishing primer and repainting walkthrough show what to expect before day one.
Local Guide: Redoing Cabinets in York, Toronto
For York and the broader Toronto metro, plan projects around building logistics, condo rules, and winter ventilation needs. Work with a local refinishing specialist who understands containment, spray-booth workflows, and fast turnarounds that keep your kitchen usable during the process.
When we work in busy York streets or high-rise Toronto condos, we focus on tight scheduling and contained work zones. Off-site spraying for doors reduces odor and overspray in small spaces, and zipper-door containment keeps cooking areas available. Many homeowners maintain daily routines while we handle sections in sequence.
Local considerations for York
- Library days are popular for families—schedule work blocks when you’ll be out near the Toronto Public Library – Daniel G. Hill Branch to minimize disruption.
- Cold snaps make ventilation tricky; plan spray days on milder forecasts or use filtered air movers to balance airflow and temperature.
- Deliveries near Jane St at St Clair Ave West run steady—coordinate loading and parking windows to streamline door pickup and drop-off.
For York projects specifically, we stage doors by zone (A, B, C) and reinstall in batches. This sequencing helps families keep essentials accessible while finishes cure to handling strength.
Case Studies and Examples
Three snapshots show how redoing cabinets adapts to different needs: a maple refresh with refinishing, a style reset with refacing, and a compact condo respray. Each project kept boxes, controlled timelines, and delivered a clean, modern look that feels factory-finished.
Case 1: York maple refresh
- Situation: Solid maple Shaker doors with yellowed finish; layout worked well.
- Approach: Degrease, sand to 180–220, bonding primer, two sprayed color coats in warm white; satin sheen.
- Outcome: Brighter space, improved light bounce, and upgraded pulls. Doors handled gently for two weeks as coatings cured.
Case 2: Toronto style reset
- Situation: Slab doors felt dated; homeowner wanted transitional Shaker and soft-close action.
- Approach: Refacing with new Shaker doors, concealed hinges, and matching frame veneer; color-sprayed to a rich navy for lowers and soft white uppers.
- Outcome: Like-new visuals, quieter operation, and consistent 2–3 mm reveals for a tailored appearance.
Case 3: Compact condo respray
- Situation: Small downtown kitchen; must keep space usable.
- Approach: Off-site door spraying, on-site box masking, zipper-door containment, and staggered reinstall.
- Outcome: Minimal downtime; dry-to-touch in hours and a smooth, even sheen that hides slight substrate variation.
If these match your goals, our team’s Toronto refinishing projects show how we build timelines around real life—kids, work, and all the day-to-day details.
Frequently Asked Questions
Homeowners ask about methods, timelines, durability, and what they can do during the project. These concise answers cover the essentials—from whether refinishing or refacing fits your situation to how long coatings take to cure before normal kitchen use.
What does redoing cabinets include?
It includes refinishing (restore and recolor), refacing (new doors and veneer), or professional respraying. You keep your cabinet boxes and layout while updating color, style, hardware, and sheen for a factory-smooth look with less disruption than full replacement.
How long does a typical project take?
Most cabinet redos wrap in days, not weeks. Dry-to-touch times are often within hours, recoat windows are commonly 4–6 hours, and full cure for cabinet-grade coatings typically falls between 7–30 days. Your exact timeline depends on scope, ventilation, and product specs.
Is refinishing or refacing better?
Choose refinishing if your doors are solid and you like the profile. Pick refacing if you want a new style or your doors are worn. Replacement is best when boxes are damaged or you plan major layout changes. Our comparison table summarizes each path.
Will the new finish be durable?
Yes—when surfaces are properly degreased, sanded, and primed, and when cabinet-grade coatings are sprayed in thin, even coats. Many systems harden significantly over 7–30 days. Treat gently during early cure and clean with non-abrasive products.
Can I use my kitchen during the project?
Often, yes. Off-site door spraying, on-site masking, and zipper-door containment let you keep parts of the kitchen usable. We sequence boxes so you can access essentials while finishes dry and cure.
Conclusion and Next Steps
Redoing cabinets modernizes your kitchen or bath without demolition. Start with a clear method—refinish, reface, or respray—then follow disciplined prep, thin coats, and patient cure times. With a York-based specialist who works across Toronto, you’ll get a factory-smooth look and a faster, cleaner transformation.
Key takeaways
- Refinishing, refacing, and pro respraying are the core paths to “redo” cabinets.
- Prep and thin, even coats matter more than any single tool.
- Recoat windows are commonly 4–6 hours; full cure often takes 7–30 days.
- Sequence work so parts of your kitchen stay usable throughout.
Ready to explore your options? Review our Toronto refinishing guide and refacing overview, then tap our kitchen makeover page to see finish ideas and next steps.
For insights on common pitfalls, this third-party list of cabinet remodel mistakes is a helpful pre-check. If you’re comparing door types, see this overview on standard vs. custom doors for style planning.
Book a friendly walkthrough in York. We plan projects around your schedule and space, from Home Smith Park-area homes to downtown Toronto condos, with staged spraying that keeps life moving. When you’re ready, our team will map options and timelines that fit your goals.