
Professional kitchen cabinet painting cost refers to the total investment behind prep, products, and workmanship that deliver a durable, factory-smooth finish. For York and Toronto homeowners near 2710 St Clair Ave W, the right partner prevents rework, protects indoor air, and extends cabinet life—often competing favorably with refacing or full replacement when value is the priority.
By Paint2decor INC
Last updated: 2026-05-06
At a Glance
Cabinet painting value hinges on careful prep, pro-grade primers and topcoats, controlled spray technique, and post-cure protection. Projects often span several days, with doors sprayed off-site for consistency. Choose a Toronto specialist with a documented process, durable finishes, and clear communication to avoid scope creep and premature wear.
Here’s the quick view so you can scan, compare, and plan with confidence.
- Scope drivers: door/drawer count (often 20–40), wood species, existing finish, and layout complexity.
- Quality levers: bonding primer, catalyzed enamel or urethane, HVLP spray application, and dust control.
- Timeframe: common timelines run 3–7 working days, with 7–14 days for full cure before heavy use.
- Durability: pro finishes resist chips and stains better than DIY latex; touch-ups are easier within the first 12 months.
- Alternatives: refinishing (keep wood grain), refacing (new doors/veneers), or full replacement (most disruptive).
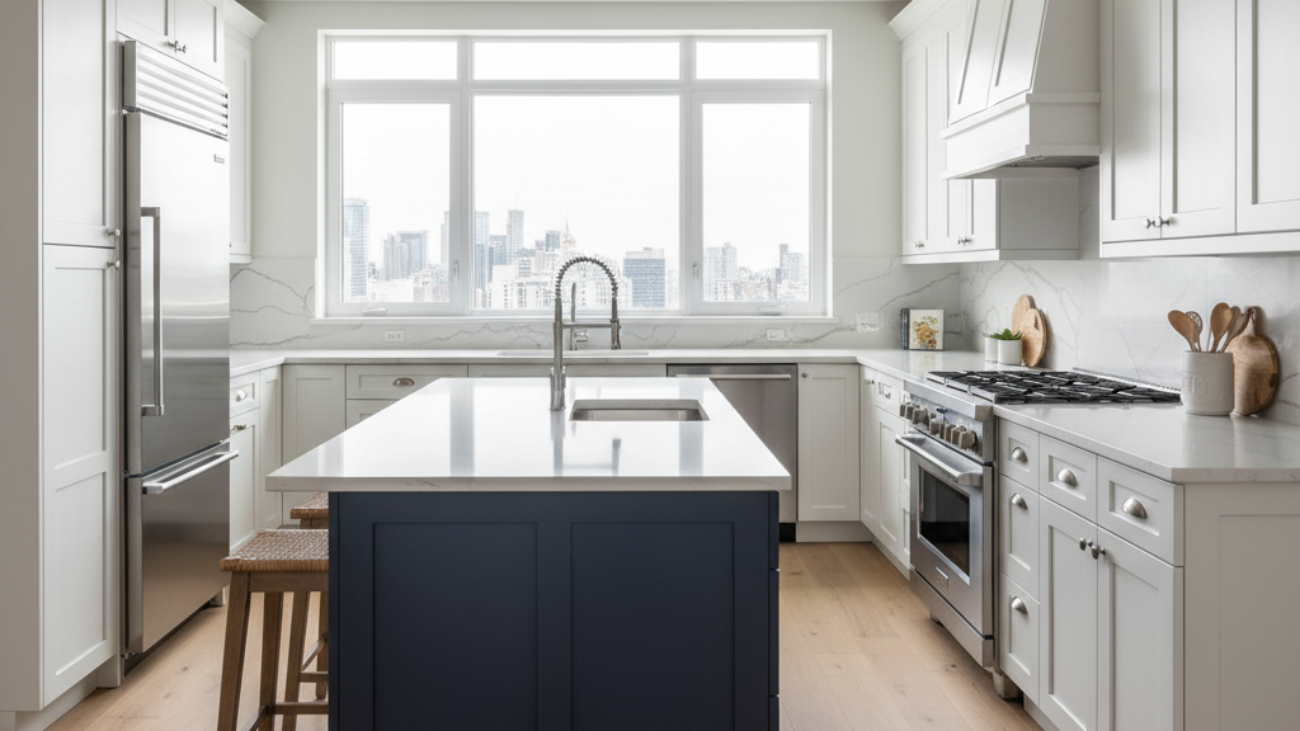
What Is Professional Kitchen Cabinet Painting?
Professional cabinet painting is a controlled, multi-step process that cleans, repairs, sands, primes, and spray-applies durable coatings to cabinet doors, drawers, and frames. The goal is a uniform, furniture-grade finish that cures hard, resists daily wear, and updates style without replacing cabinets.
In our experience across Toronto homes, “professional” means repeatable results. That includes prep standards, spray technique, and coating systems that hold up under family traffic, cooking humidity, and daily cleaning.
- System-based approach: cleaning, degreasing, sanding, caulking, priming, and multiple color coats.
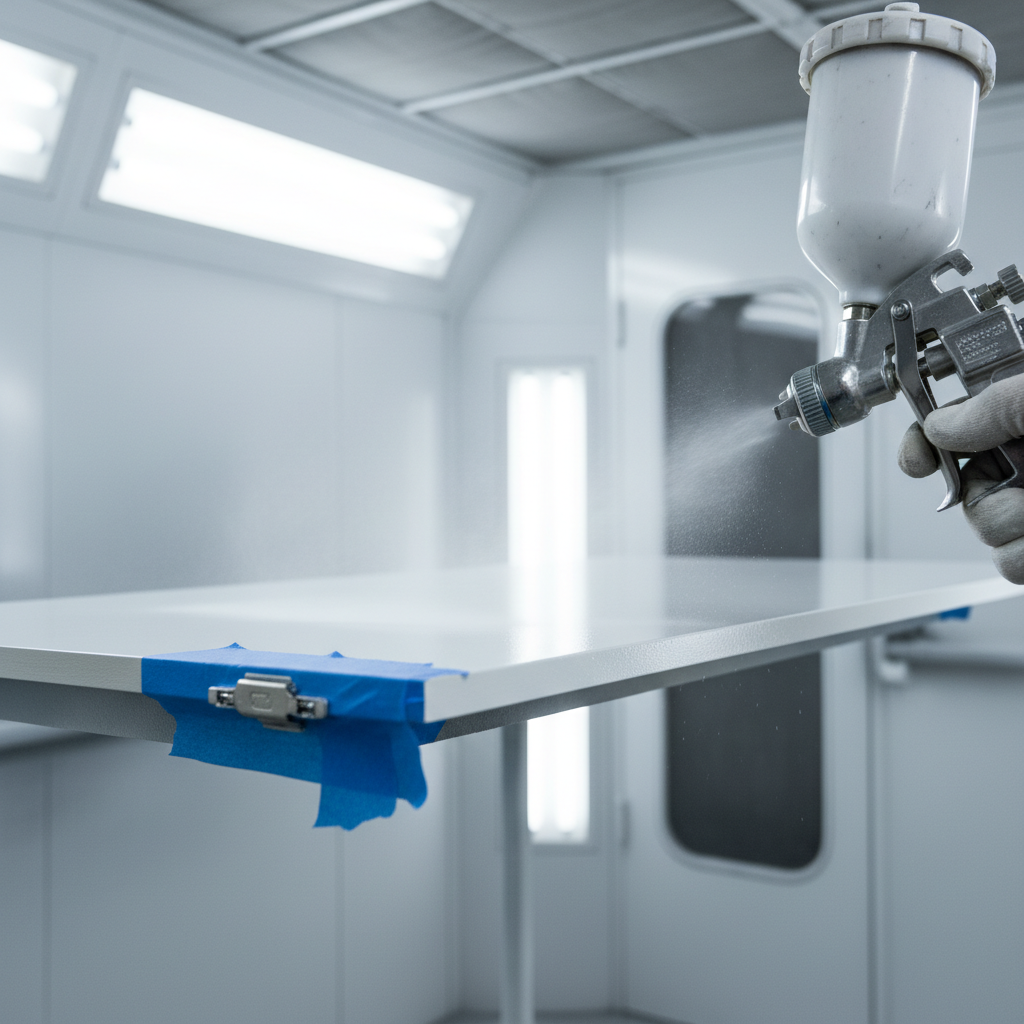
- Spray over brush/roller: HVLP spray systems deliver finer atomization and reduced orange peel—often achieving 60%+ transfer efficiency for less overspray and a more consistent film.
- Shop control: doors and drawers move off-site for dust-controlled spraying; frames are masked and sprayed in-place.
- Cure schedule: while doors feel dry to the touch within hours, full hardness can take 7–14 days depending on product chemistry and humidity.
Paint2decor INC focuses on kitchens and bathrooms, so we account for high-moisture zones, frequent touch points, and cleaning chemicals. That’s why we often recommend catalyzed enamels or urethane-modified finishes for tougher film build.
Curious how painting compares to other options? Explore our kitchen cabinet refinishing overview and our refacing guide for context on grain-preserving and door-replacement routes.
Why Cabinet Painting Value (Not Just Price) Matters
Focusing on long-term value prevents overspending. The best cabinet painting outcomes combine tough coatings, meticulous prep, and controlled spraying, which extend finish life and reduce touch-ups—often outperforming quick-roll jobs that chip within months.
Shortcuts are expensive. A weak bond or thin film can lead to chips along high-touch edges in weeks, not years. We’ve seen homeowners repaint within 6–12 months after “fast” jobs. A stronger system with proper cure time pays back through durability and fewer service calls.
- Risk reduction: correct adhesion work minimizes failures on slick thermofoil or old oil-based coatings.
- Family-ready finishes: harder films handle scrubbing; a typical kitchen sees hundreds of door touches daily.
- Cleaner air planning: low-odor, low-VOC products reduce disruption during school or workweeks.
- Predictable timeline: a documented process stays on schedule—common scopes complete in 3–7 working days.
Value shows up in the details you touch every day—drawer fronts that don’t stick, edges that don’t fray, and sheens that stay consistent under LED and daylight.
Professional Kitchen Cabinet Painting Cost Factors (No Prices)
Your investment is driven by scope (door/drawer count), prep intensity, coating system, access, and scheduling. Kitchens with 20–40 fronts, heavy grease, or intricate profiles require more hours and material. Selecting durable enamels and controlled HVLP spraying improves longevity and lowers lifetime maintenance.
While we never publish numbers, we do map the drivers so you can plan smart and avoid scope creep.
- Door/drawer count: most Toronto kitchens range from 20–40 fronts; large layouts can exceed 50.
- Existing finish: oil-based, lacquer, or glossy melamine needs stronger bonding primers and more sanding.
- Wood species: oak grain filling adds steps; maple or MDF sprays smoother with less filling.
- Damage + repairs: chips, water swell, and hinge blowouts add repair cycles before paint.
- Color + sheen: deep hues or ultra-matte sheens can add coats to achieve even coverage.
- Access + masking: open-concept homes with features like built-ins need expanded dust protection.
- Timeline + season: winter humidity and holiday rush can affect scheduling and cure windows.
If you’re comparing options, our kitchen cabinet painting service and spray painting process pages show how we control dust, overspray, and cure for consistent results.
How Professional Cabinet Painting Works (Step-by-Step)
A proven workflow removes doors, labels hardware, completes repairs, sands, primes, and spray-applies multiple coats under dust control. Doors cure off-site while frames and fixed panels are sprayed in-home. Typical active work spans 3–7 days, with full cure in 7–14 days.
Our York team follows a documented sequence so nothing falls through the cracks.
- Assessment + labeling: verify counts (often 20–40 fronts), note repairs, and label doors for reassembly.
- Degrease + sand: kitchens near stoves build film; thorough cleaning and scuff sanding improve adhesion.
- Masking + protection: zip walls, floor protection, and venting reduce dust migration to adjacent rooms.
- Bonding primer: high-adhesion primer locks to slick substrates; stain-blockers stop tannin bleed.
- Spray color coats: HVLP application lays a fine film; 2–3 coats build durability and evenness.
- Hardware check: hinges, pulls, and bumpers are inspected; soft-close adjustments are common.
- Cure + reassembly: doors cure off-site for uniform hardness; frames cure in-place before rehang.
Keeping rooms livable matters. We plan daily wrap-ups so you can function between meals—fridges and sinks stay accessible, and pathways stay clear.
Methods and Finish Options (When to Paint, Refinish, or Reface)
Choose painting to update color and sheen on solid boxes; choose refinishing to showcase wood grain; choose refacing when doors are dated or damaged. Pro spray systems yield a uniform sheen; catalyzed enamels and urethane-modified coatings increase scratch and moisture resistance.
Picking the right path prevents unnecessary spend and aligns with your style goals.
| Approach | Best For | Surface Result | Disruption | Notes |
|---|---|---|---|---|
| Spray Painting | Sound cabinets; style or color update | Smooth, uniform, modern | Low–Medium | 2–3 color coats; 7–14 day full cure |
| Refinishing | Quality wood you want to see | Visible grain; stained or clear | Medium | Grain prep; strong topcoat needed |
| Refacing | Outdated or damaged doors | New doors, veneers | Medium | Refreshes style without changing layout |
Not sure which box you’re in? Compare our refinishing services with refacing options to see how grain, door style, and timelines align with your goals.
Best Practices to Avoid Overspending
Prevent rework by aligning scope, finish, and scheduling upfront. Confirm door counts, primer type, spray method, and cure time in writing. Ask for dust-control steps, sample sprays, and a punch-list walkthrough. Durable systems and clear expectations reduce callbacks and lifetime maintenance.
Here are the field-tested habits we use to protect your budget and outcome.
- Define scope in numbers: list every box, side panel, and island face—counts reduce change orders later.
- Request a sample door: a 12–18 inch sample sprayed in your color confirms sheen and texture under your lights.
- Specify products: identify primer and finish by brand and chemistry to ensure durability expectations match.
- Schedule intelligently: allow 7–14 days before heavy use; drawer organizers and bumpers cut early wear.
- Edge protection: early in the cure window, use gentle closing and avoid harsh cleaners.
- Punch-list ritual: a final walk with raking light catches nibs or drips before sign-off.
We also encourage keeping 1–2 labeled touch-up jars for future micro repairs along kid-height rails and trash pull-outs.
Tools, Materials, and Resources Homeowners Should Know
Professional outcomes come from system-grade materials and controlled environments: degreasers, bonding primers, HVLP turbines, fine filters, and catalyzed finishes. Off-site spray racks, labeled hardware bins, and zip-wall containment keep work efficient and your home clean during the project.
Here’s what typically shows up on a pro truck in Toronto.
- Prep kit: citrus degreaser, denatured alcohol, sanding sponges (120–320), fillers, caulk, and tack cloths.
- Primers: high-adhesion bonding primer; stain blockers for tannin-heavy species like oak.
- Spray system: HVLP turbine or compressor setup with 1.3–1.5 mm tips for fine cabinetry finishes.
- Filtration + safety: floor-to-ceiling plastic, zip doors, exhaust fans with filters, and respirators.
- Topcoats: catalyzed enamel or urethane-modified coatings designed for cabinets.
- Organization: labeled hardware bags, door maps, and color/finish logs for reorders.
For a deeper look at how we prepare spaces, see our cabinet refinishing preparation walkthrough. If you’re weighing spray specifics, our cabinet spraying overview details booth-style controls we bring into homes.

Health, Indoor Air, and Home Use During Painting
Plan for ventilation, low-odor coatings, and safe traffic paths. Professional teams isolate the kitchen, run filtered exhaust, and advise light use during cure. Children, pets, and allergy-sensitive family members benefit from low-VOC systems and clear “back-to-use” timelines.
Home rhythm matters. We coordinate cooking access and set expectations for light vs. heavy use throughout the cure cycle.
- Ventilation plan: exterior venting plus filtration lowers odor and airborne particulates.
- Cleaner choices: gentle, non-abrasive cleaners preserve sheen—avoid ammonia during the first weeks.
- Pet + kid zones: baby gates and temporary barriers reduce accidental contact with tacky surfaces.
- Touch-points: trash pull-outs and spice doors get opened dozens of times per day—add bumpers early.
For neighborhood logistics in York and the broader Toronto metro, our crews stage parking and access to keep hallways clear and safe during work hours.
Local Toronto–York Context: Timing, Access, and Expectations
In York and across Toronto, plan for condo access rules, winter humidity, and holiday schedules. Skilled teams coordinate elevators, protect flooring in shared halls, and stage materials nearby. Park rules near Smythe Park or Magwood Park can affect vehicle access during peak hours.
Local homes bring local rhythms. We’ve tuned our routines for the neighborhood and the city’s seasonality.
Local considerations for York
- Condo moves and elevator bookings are strict in Toronto; secure time slots early if your building is near Smythe Park or Magwood Park.
- Winter humidity dips can extend cure times; spring and fall often offer the most balanced conditions for finishing.
- Transit and street parking near Jane St at St Clair Ave West can be busy; we stage gear to minimize hallway time.
Case Examples: What Drives Value in Real Toronto Kitchens
Value shows up when scope, prep, and finish align. In Toronto, we see smoother results and fewer callbacks when bonding primers, HVLP spray, and a 7–14 day cure are non-negotiable. Repairs before paint and labeled reassembly protect edges and hinges for the long term.
Three quick stories (names omitted) illustrate the patterns.
- York shaker update: 28 doors/drawers, heavy cooking zone. Degrease cycles, bonding primer, and a satin enamel produced a uniform finish; a 10-day cure minimized early micro-scuffs.
- Toronto condo galley: 18 fronts with high-gloss melamine. Extra scuff sanding and adhesion primer prevented peeling along finger pulls; edges stayed crisp after 90 days of daily use.
- Family mudroom add-on: 12 built-in fronts matched to kitchen color. Labeling and hardware maps cut reassembly time by 25% and kept alignment tight.
When comparing outcomes across dozens of projects, we’ve found that documented steps correlate with smoother film and fewer nibs—especially on island panels and end gables that catch raking light.
The Pricing Conversation Without Numbers: How to Protect Your Budget
Skip the race to the lowest quote. Instead, verify the process, coatings, and cure plan. Align scope in writing, ask for a sample spray, and get a punch-list walkthrough. Clarity on details and materials lowers lifetime spend far more than squeezing day-one labor.
Here’s a practical way to compare proposals while keeping numbers off the table.
- Match scopes line-by-line: door/drawer counts, panels, crown, light valences, and island faces.
- Confirm chemistry: primer and topcoat identified by name, sheen, and cure expectations.
- Check control steps: containment, filtration, and off-site racks for doors.
- Ask for a sample: a sprayed sample door reduces surprises (color shifts under your LEDs are common).
- Plan downtime: a 7–14 day cure window is common; organize your kitchen flow accordingly.
If you’re comparing to wood-preserving routes, our cabinet refinishing services page shows when stain-and-clear beats paint for long-term satisfaction.
Frequently Asked Questions
Homeowners ask about durability, timelines, cleaning, and choosing between painting, refinishing, and refacing. The short answers: prioritize adhesion and cure, plan a week of active work, clean gently for 2–4 weeks, and pick the method that fits your cabinet condition and style goals.
How long does a professional cabinet painting project take?
Most kitchens see 3–7 working days of active work. Doors and drawers typically cure off-site for consistency, while frames cure in place. Plan light use during the first week, then normal use after a full 7–14 day cure depending on product and humidity.
What makes a painted finish last in a busy family kitchen?
Durability comes from surface prep, bonding primer, and a hard-wearing enamel or urethane topcoat. HVLP spraying builds an even film that resists chipping. Gentle cleaners and soft-close habits during the first weeks protect edges while the coating reaches full hardness.
Is painting better than refacing or refinishing?
It depends on goals and cabinet condition. Painting shines when boxes are sound and you want a new color. Refinishing is ideal when you love natural wood grain. Refacing is smart when doors are dated or damaged and you want a style change without replacing boxes.
Can I stay in my home during the project?
Yes. Pros isolate the workspace with containment, run filtered exhaust, and tidy daily so you can function. You’ll have access to essentials like the fridge and sink. Expect reduced use while frames cure and plan normal routines after the 7–14 day hard-cure window.
How to Choose a Toronto Provider (Checklist)
Vet cabinet painters by process, coatings, and proof of results. Ask for a step-by-step plan, product specs, sample door, and references. Toronto specialists with award recognition and service focus provide consistent scheduling, dust control, and durable finishes that keep kitchens looking new longer.
Use this quick checklist when you’re calling or meeting pros.
- Local focus: ask for Toronto and York project examples similar to your layout and door style.
- Shop + in-home control: look for off-site spray racks and on-site containment plans.
- Product transparency: primer and finish chemistry named and documented.
- Proof of quality: sample doors, photos under raking light, and clear warranty language.
- Awards + reviews: third-party recognition signals consistency over time.
Want a deeper dive into the painting path? Start here: kitchen cabinet painting in Toronto. If you’re debating a grain-forward look, compare cabinet refinishing as well.
Thinking About a Color Change? Let’s Map Your Scope
A 10-minute scope call can confirm counts, repair needs, and finish options—so you avoid surprises later. We’ll recommend a coating system and timeline matched to your routine, then provide a clear, no-pressure proposal.
Tell us about your kitchen, your timeline, and your ideal finish. We’ll walk you through surface prep, spray controls, and cure planning so your family can keep moving while the work happens.
Start here: explore our spray painting overview and painting service page, then send a few photos with door counts.
Resources and Third-Party Context
Independent perspectives can help you plan. Review third-party overviews of cabinet painting processes, planning tips, and common decision points. Use them to sanity-check scopes and timelines, then tailor choices to your Toronto home and family routine.
For background reading on process and planning, see these overviews: an industry process overview for painting cabinets, an article on key repainting factors, and a guide on planning a kitchen renovation. Cross-check any advice with your home’s layout, ventilation, and usage.
Key Takeaways
Professional cabinet painting value comes from prep, chemistry, spray control, and cure. Map scope in numbers, confirm coatings, and schedule with cure time in mind. In Toronto, a documented process prevents callbacks and extends finish life—often making painting the fastest path to a refreshed kitchen.
- Count doors and drawers; align scope before proposals.
- Insist on bonding primer and hard-wearing topcoats.
- Plan a 7–14 day cure window before heavy use.
- Use sample doors to confirm sheen and texture.
- Pick a Toronto specialist with dust control and off-site spray capacity.
Conclusion and Next Steps
Avoid overspending by prioritizing process over price. Define scope in writing, verify coatings, and choose a Toronto specialist with controlled spray and clear cure plans. That combination delivers factory-smooth results and fewer touch-ups—turning a color change into a long-term upgrade.
Here’s the simplest path to a confident decision:
- Walk your kitchen and tally all fronts, panels, and island faces.
- Decide on look: painted, stained, or new doors.
- Review our cabinet painting and refacing pages for fit.
- Message us photos and a rough count; we’ll outline prep, coatings, and schedule.
Ready to refresh your space in York or anywhere in Toronto? We’d be glad to help map your scope and finishes around your routine.