
Kitchen cabinet repainting is the professional process of cleaning, repairing, priming, and finishing existing cabinet surfaces with durable coatings to achieve a factory-smooth update. At Paint2decor INC in York (2710 St Clair Ave W, Toronto metro), we repaint kitchens daily so homeowners refresh style fast with minimal disruption.
By Masoud Kakar — Paint2decor INC
Last updated: May 26, 2026
Quick Summary
Kitchen cabinet repainting gives your existing boxes, doors, and drawers a brand-new look without replacing cabinetry. This complete guide explains how it works, the prep you need, pro-approved methods, troubleshooting tips, and local considerations for York and Toronto homeowners working with Paint2decor INC.
- What you’ll learn: the full repainting workflow, finish options, and durability timelines.
- Who it’s for: Toronto and GTA homeowners comparing repainting, refacing, or replacing.
- Why it matters: minimal demolition, shorter timelines, and strong style impact.
- When to repaint: sturdy boxes, solid/veneer doors, and fixable wear.
- What’s included here: step-by-step process, prerequisites, common fixes, and maintenance.
Navigation
- What is repainting?
- Why repaint vs. replace
- Step-by-step process
- Prerequisites & suitability
- Methods & finishes
- Best practices (GTA)
- Tools & resources
- Troubleshooting
- Compare options
- Local service focus
- Case studies
- Value factors
- Maintenance
- FAQ
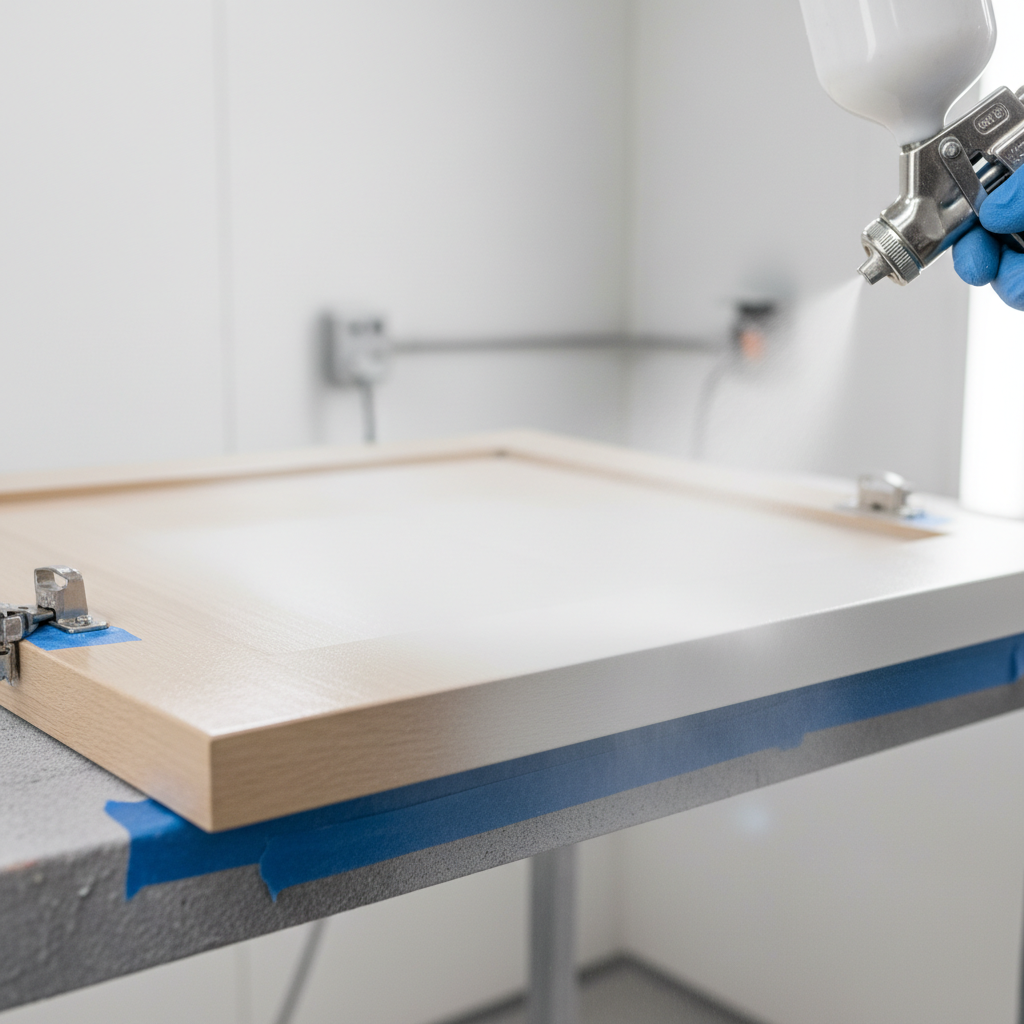
What Is Kitchen Cabinet Repainting?
Kitchen cabinet repainting is the pro-grade renewal of existing cabinet surfaces using repair, sanding, bonding primer, and high-durability topcoats for a smooth, uniform finish. It preserves your layout and boxes while transforming color and sheen to modernize the space without full replacement.
Repainting targets doors, drawer fronts, face frames, and visible panels. The core goal is a seamless, factory-like finish that stands up to daily use. Most projects involve 2–3 coats: a bonding primer plus one or two topcoats for color and protection.
- Surfaces addressed: wood, engineered wood (MDF), and some laminates with correct primers.
- Core stages: degreasing, sanding (often 120–220 grit), priming, and finishing.
- Finish aim: a consistent film build with even sheen (matte, satin, or semi-gloss).
- Durability: modern cabinet coatings typically become handle-dry within hours and reach a practical cure in 7–14 days.
At Paint2decor INC, we tailor methods to Toronto homes—oak grain filling for smoother lines, or MDF-friendly primers to prevent swelling. The outcome is a refreshed kitchen that complements countertops, backsplashes, and lighting—without structural changes.
Why Kitchen Cabinet Repainting Matters
Repainting cabinets updates style and protection while avoiding demolition, landfill waste, and weeks of disruption. It’s ideal when boxes are sturdy, the layout works, and you want modern colors that coordinate with existing finishes in Toronto-area homes.
Why does it matter? Because your boxes often have years of life left. Repainting leverages that value while aligning the color palette with today’s trends. Many Toronto homeowners pair warm whites with natural wood floors for contrast, or go bold with navy and forest green on islands.
- Less disruption: doors travel to a spray facility or onsite booth; your kitchen remains functional with brief downtimes.
- Resource-smart: reuse solid boxes and hardware where appropriate; fewer materials head to landfill.
- Fast visible change: color shifts immediately elevate perceived brightness; lighter tones reflect more light.
- Flexible styling: harmonize with quartz, stone, or butcher-block tops without altering layout.
For homeowners debating refacing or replacing, repainting can be the most practical bridge between design goals and timeline. If you’re exploring advanced options, see our cabinet respraying guide for the ultra-smooth spray approach we use across the GTA.
How Kitchen Cabinet Repainting Works: Step-by-Step
The repainting process follows a proven workflow: document and label, remove doors, degrease, sand, repair, prime, finish-coat, cure, and reassemble. Professionals control dust, humidity, and airflow to achieve a durable, factory-smooth finish that wears well in busy kitchens.
- Assess & document: photograph zones, count doors/drawers, and plan labeling. Clear countertops; create a staging area.
- Protect & isolate: mask floors, appliances, and adjacent rooms; set up plastic barriers and air filtration.
- Remove hardware: label hinges/handles in bags; mark door positions. Consistent reinstallation preserves alignment.
- Degrease thoroughly: use a cabinet-safe degreaser to remove cooking films. Residue-free surfaces improve adhesion.
- Sand for profile: scuff with 120–220 grit to create a mechanical tooth. Vacuum and tack-cloth dust.
- Repair defects: fill dings and painter’s-nail holes; spot-sand. For oak, apply grain filler when a glass-smooth look is desired.
- Prime to bond: use a bonding or stain-blocking primer (e.g., shellac-based for tannin bleed). Aim for full, even coverage.
- Finish coats: apply 1–2 coats of cabinet-grade enamel or lacquer. Maintain wet edges for uniform sheen.
- Control environment: keep temperature stable (roughly 65–75°F) and manage humidity near 40–55% for reliable cure.
- Cure & handle: allow adequate dry times between coats; plan a 7–14 day practical cure before heavy wear.
- Reinstall hardware: upgrade to soft-close hinges or new pulls if desired; align reveals and test drawers.
- Final QA: inspect angles and edges under raking light; touch up as needed; walk through care instructions.
We follow this same sequence in York homes, often staging doors in a mobile spray setup while face frames are finished in place. For a deeper dive into spray-only workflows, review our professional cabinet painting overview.
Prerequisites & Suitability Checks
Before repainting, confirm boxes are structurally sound, surfaces can accept primer, and environmental controls are feasible. Address water damage, delamination, and greasy residues first to protect adhesion and finish quality.
- Structure: check for loose joints, sagging shelves, or pulled screws; reinforce or replace damaged sections.
- Moisture history: look for swollen MDF under sinks; replace compromised doors or panels.
- Surface type: solid wood and MDF repaint well; laminates need specific primers; thermofoil requires careful evaluation.
- Grease zones: hoods and range-adjacent doors need extra degreasing; consider two-stage cleaning.
- Ventilation: enable crossflow with filtered air; manage dust via extraction and tack cloths.
If any prerequisite fails—like widespread delamination or severe water damage—consider targeted refacing for those doors while repainting the rest. Our kitchen cupboard refinishing primer outlines hybrid solutions we deploy across the GTA.
Methods & Finish Options
Two delivery styles dominate: spray-applied finishes for the smoothest, most uniform film, and brush/roll systems for in-place updates. Finish chemistry (waterborne enamel or lacquer) and sheen (matte, satin, semi-gloss) shape final look, cleanability, and durability.
Application methods
- HVLP/LVLP spray: delivers fine atomization, minimal orange peel, and fast, even coverage on profiles.
- Brush/roll hybrids: modern enamels level well; micro-fiber rollers can achieve a near-spray look with practice.
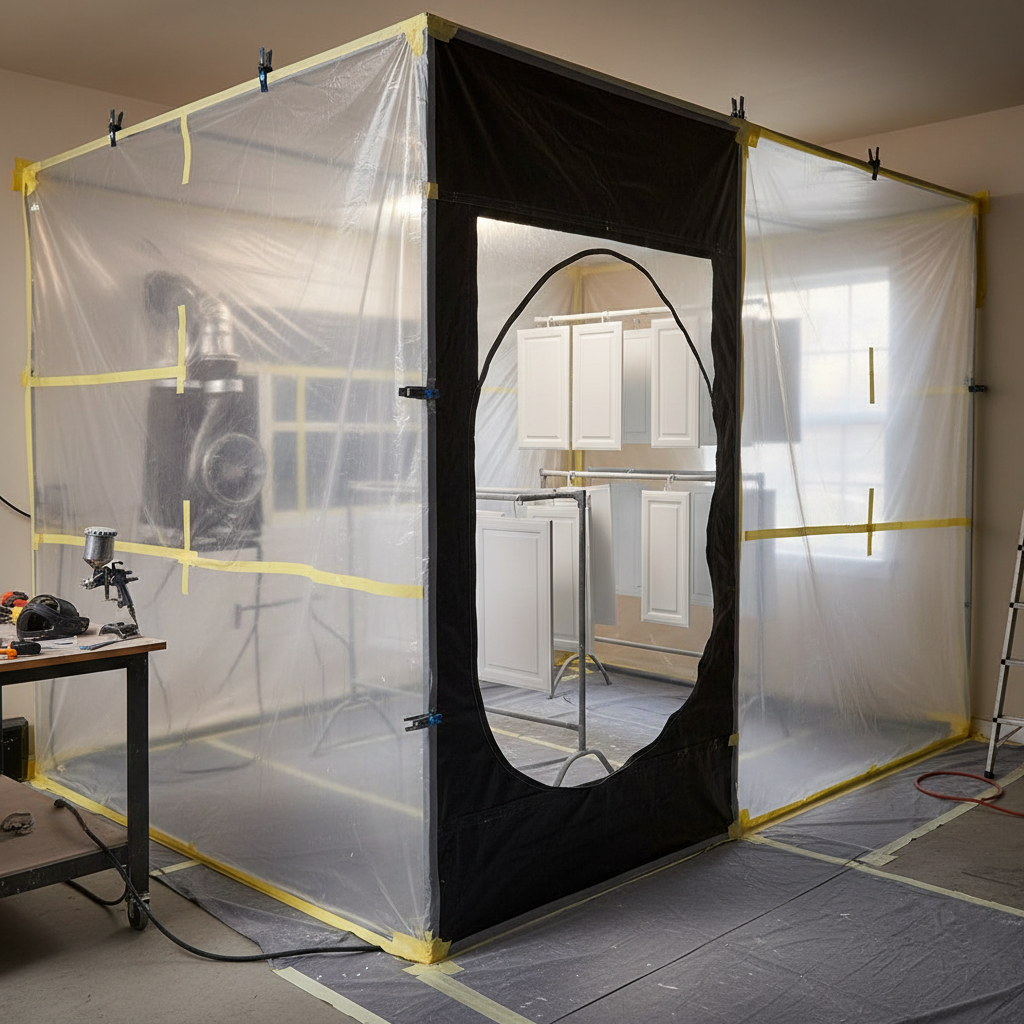
- Facility vs. onsite: doors often spray in a controlled booth; frames finish onsite with masking and filtration.
Finish chemistries
- Waterborne enamel: low odor, quick recoat, hard-wearing; excellent for occupied homes.
- Pre-catalyzed lacquer: fast dry and a glassy look; requires strict ventilation and pro handling.
- Hybrid urethanes: combine hardness with flexibility; good for high-traffic kitchens.
Sheen selection
- Matte: design-forward, hides minor texture; slightly less wipeable.
- Satin: balanced, most requested; hides fingerprints better than semi-gloss.
- Semi-gloss: highest reflectance and cleanability; shows surface prep the most.
Color planning ties everything together. Many Toronto homeowners choose warm whites, greige, or two-tone schemes (e.g., white uppers, darker island). For inspiration and planning context, explore this kitchen renovation before/after overview.
Best Practices from GTA Specialists
Winning repaints hinge on surface prep, dust control, and environmental consistency. In the GTA, we also tailor primers to wood species and manage seasonal humidity to reduce grain raise, ensuring a flatter, longer-lasting finish.
- Clean twice: deglossers remove hand oils and cooking films; a second pass prevents fisheyes in primer.
- Prime with purpose: bonding primers for slick surfaces; shellac for tannin-prone oak, cherry, or maple knots.
- Sand between coats: light 220–320 grit scuffing levels dust nibs and ensures mechanical adhesion.
- Control climate: target ~70°F and 40–55% RH; sudden swings can telegraph defects or slow cure.
- Edge discipline: hit door edges first to avoid runs; maintain wet edges on wide rails and stiles.
- Hardware upgrade window: fill old handle holes and redrill for a modern layout before final coats.
We detail these practices further in our cabinet refinishing guide and kitchen cabinets makeover overview. The same discipline delivers consistent results project after project.
Tools & Resources We Rely On
Professional outcomes require pro tools: quality sprayers, dust extraction, and bonding primers designed for cabinetry. Equally important are labeling systems, clean zones, and checklists that keep dozens of doors and drawers organized from start to finish.
- HVLP/LVLP sprayer: fine atomization for smooth films on profiles and edges.
- HEPA dust extraction: keeps sanding debris from contaminating wet coats.
- Bonding/stain-block primers: adhesion to slick laminates; block tannin bleed on woods.
- High-build fillers: grain fillers for oak; lightweight putties for dings and nail holes.
- Labeling kits: numbered tape and door maps prevent mix-ups on reassembly.
- Clean room setup: plastic sheeting, zippered doors, filtered fans, and tack cloths.
Want a process snapshot before starting? Our professional kitchen cabinet painting explainer shows the workflow Toronto homeowners can expect when we arrive.
Troubleshooting: Fixes That Save Finishes
Most repainting flaws trace back to surface contamination, rushed cure times, or missed repairs. The good news: with the right primers, fillers, and sanding, many issues are reversible without starting from scratch.
- Fisheyes or craters: usually oils or silicone. Solution: deep clean, scuff, spot-prime with shellac, and recoat.
- Peeling edges: weak profile or moisture. Solution: sand to sound paint, use bonding primer, seal edges.
- Orange peel: atomization or viscosity mismatch. Solution: adjust tip/pressure, add flow extender, light sand, re-spray.
- Blocking (sticking doors): insufficient cure. Solution: extend cure window; apply furniture wax after full cure.
- Visible grain (oak): expected unless filled. Solution: apply grain filler, sand smooth, prime again.
- Tannin bleed: yellowing through light colors. Solution: shellac primer; avoid water intrusion.
When in doubt, stop, sand lightly, and reprime. A controlled reset typically preserves 80–90% of prior work while restoring a uniform base for topcoats.
Repaint vs. Reface vs. Replace
Repainting changes color and sheen; refacing swaps door styles and veneers; replacement rebuilds everything. Choose the path that fits your cabinet structure, design goals, and timeline—without overcommitting to demolition if boxes are solid.
| Option | What Changes | Timeline | Disruption | Design Flexibility | Eco Impact |
|---|---|---|---|---|---|
| Repaint | Color, sheen | Short | Low | Moderate (hardware, two-tone, accents) | Reuse boxes; minimal waste |
| Reface | New doors + veneers | Moderate | Medium | High (new styles, rails/stiles) | Reuse layout; modest waste |
| Replace | All-new cabinetry | Longest | High | Highest (full redesign) | New materials; more waste |
Not sure which path fits? Our kitchen cabinets makeover explainer compares visual impact across approaches, while this third-party replacement planning overview offers general context on the complexity of full rebuilds.
Local Kitchen Cabinet Repainting in York and Toronto
Serving York and the Toronto metro, Paint2decor INC repaints kitchens with onsite masking, controlled airflow, and pro-grade coatings tailored to local humidity. Our shop staging and mobile spray setups help York homeowners minimize downtime while achieving smooth, uniform finishes.
We’re based at 2710 St Clair Ave W, within minutes of most York neighborhoods. That proximity lets us schedule efficiently, coordinate color samples, and handle service requests quickly—even during busy spring and fall repainting windows.
Local considerations for York
- Plan access and parking near Jane St at St Clair Ave West to streamline material loading and setup.
- Book around peak humidity swings; early summer and late fall often give the most predictable cure conditions.
- If you need a quiet spot to review samples, the Toronto Public Library – Daniel G. Hill Branch is a calm, nearby option.
Curious how spray booths look in a residential setting? The image below shows a tidy, filtered setup that keeps dust out and finish quality in.
Case Studies & Real-World Examples
Across York and greater Toronto, we’ve repainted hundreds of kitchens—often in 3–5 working days onsite plus cure time. These snapshots show how color, sheen, and hardware choices combine to modernize spaces without changing layouts.
- Rockcliffe-Smythe refresh: honey oak to satin white; filled grain on doors; new black pulls; brighter room feel.
- Stockyards condo: thermofoil doors evaluated; replaced a few, repainted the rest with bonding primer for a unified look.
- Junction triangle home: two-tone—white uppers, navy island; satin finish balances wipeability and warmth.
- York bungalow: MDF shaker fronts with minor swelling under sink; replaced two doors, repainted the suite to soft greige.
- Weston kitchen: added soft-close hinges during reassembly; mapped hardware to keep reveals consistent.
- Etobicoke border: strong degreasing near range; shellac primer blocked slight tannin bleed on rails.
- Midtown family: schedule split—doors sprayed offsite; frames painted onsite to keep the kitchen usable.
- High-traffic rental: opted for hybrid urethane enamel in satin; touch-up kit left with tenant guidance.
For a technical view of our spray-first approach, see the cabinet respraying guide and our Toronto cabinet painting page.
Value Factors (No Pricing)
Several inputs shape timelines and scope: cabinet material, door count, repairs, color change, and finish chemistry. Evaluating these up front helps set expectations without publishing general pricing that rarely fits real projects.
- Material & condition: solid wood vs. MDF vs. laminate; dents, chips, or water exposure increase prep.
- Door/drawer quantity: more faces to clean, sand, and coat extends booth time and labeling logistics.
- Color shift: drastic moves (e.g., espresso to white) usually require extra primer build.
- Finish selection: waterborne enamel vs. lacquer; sheen affects perceived flatness and cleaning.
- Add-ons: hardware layout changes, soft-close upgrades, or added trim work.
- Access & staging: condo vs. detached home; elevator bookings and parking influence setup efficiency.
If you’re comparing pathways, this third-party process overview outlines how repainting fits into broader renovation planning—useful context as you frame timelines and scope (again, without numbers).
Maintenance & Care After Repainting
Treat freshly repainted cabinets gently for the first 7–14 days as coatings reach a practical cure. Clean with a soft cloth and mild soap; avoid harsh chemicals, scouring pads, and heavy moisture during the early window.
- Early-care window: let doors rest a few days before heavy cooking; add bumpers to reduce sticking during cure.
- Cleaning routine: microfiber cloth + diluted dish soap; dry promptly to protect edges.
- Heat & humidity: use range hoods and vent fans; avoid steam directly on door edges.
- Touch-ups: keep a labeled jar of finish for tiny nicks; apply with an artist brush after light scuffing.
- Hardware check: retighten handles and soft-close hinges after a few weeks of use.
Handled well, repainted finishes stay attractive for years. If wear appears on high-touch edges, targeted touch-ups usually restore a uniform appearance in minutes.
Considering a repaint? We specialize in cabinet repainting, refinishing, and respraying across Toronto. Get a no-pressure assessment and a tailored plan that fits your layout, material, and finish goals.
Frequently Asked Questions
These quick answers address the top questions Toronto homeowners ask about cabinet repainting. If you don’t see yours, reach out—we’re happy to help with a fast, practical answer based on your kitchen’s specifics.
How long does kitchen cabinet repainting take?
Most projects wrap in several working days onsite, plus a cure period before heavy use. Timelines depend on door count, repairs, and color changes. We keep your kitchen functional where possible and stage work to minimize downtime.
Will repainting work on laminate or thermofoil doors?
Yes for many laminates when prepped correctly with bonding primers. Thermofoil is case-by-case; if the foil is peeling or heat-damaged, selective replacement is often smarter, then repaint for a seamless match.
Which paint finish is best for busy kitchens?
Satin strikes a great balance: it hides minor texture better than semi-gloss and still wipes clean. If you want max cleanability and don’t mind seeing more surface detail, semi-gloss is a durable choice.
Do I need to replace hardware when repainting?
Not required, but repainting is the perfect time to upgrade. We can fill old holes and drill for new handles or soft-close hinges, giving your refreshed color a matching modern feel.
How durable is the finish compared to factory?
With proper prep, pro-grade primers, and cabinet-specific topcoats, repainted finishes are highly durable for everyday use. They’re designed to resist common kitchen wear, especially when cured fully and maintained with gentle cleaning.
Key Takeaways
If your cabinet boxes are solid and the layout works, repainting delivers a big visual upgrade quickly. Success rides on prep, primers, dust control, and patient cure times—areas where experienced GTA specialists make the difference.
- Repainting preserves layout, speeds timelines, and reduces waste.
- Prep and primers decide adhesion; satin is the most forgiving sheen.
- Humidity control and dust extraction protect finish quality.
- Hybrid projects are common: replace a few doors, repaint the rest.
- Local pros streamline logistics and environmental control.
Conclusion
Kitchen cabinet repainting modernizes color and sheen without heavy renovation. With the right prep, primers, and application method, Toronto homeowners can achieve a factory-smooth finish that lasts—often in a fraction of the time of replacement.
In our experience across York and the GTA, repainting is the sweet spot for many homes: strong visual impact, limited disruption, and flexible styling. If you’re weighing repainting against refacing or replacement, we’re here to help you choose the right path for your cabinets and timeline.
Ready to discuss your kitchen? Explore our Toronto cabinet painting page or get started with our refinishing guide for next steps.
{
“@context”: “https://schema.org”,
“@type”: “Article”,
“headline”: “Kitchen Cabinet Repainting: Avoid Replacement Costs in 2026”,
“description”: “A complete guide to kitchen cabinet repainting in Toronto: steps, methods, prerequisites, troubleshooting, comparisons, and maintenance from Paint2decor INC (York).”,
“image”: [
{
“@type”: “ImageObject”,
“url”: “https://res.cloudinary.com/dmboo1nu1/image/upload/v1779761222/ai-images/s0eqx95cfcmfarsadqz1.png”,
“width”: 1200,
“height”: 630,
“caption”: “Bright modern Toronto kitchen with freshly repainted shaker cabinets in satin white”
},
{
“@type”: “ImageObject”,
“url”: “https://res.cloudinary.com/dmboo1nu1/image/upload/v1779761223/ai-images/la8pceu1mpe8jkrqd9rm.png”,
“width”: 1200,
“height”: 800,
“caption”: “Close-up of HVLP spraying a satin cabinet finish during repainting”
},
{
“@type”: “ImageObject”,
“url”: “https://res.cloudinary.com/dmboo1nu1/image/upload/v1779761224/ai-images/rzag1z93tfyhunmzoqrd.png”,
“width”: 1200,
“height”: 800,
“caption”: “Onsite garage spray booth with drying racks and filtration for cabinet doors”
}
],
“author”: {
“@type”: “Person”,
“name”: “Masoud Kakar”,
“url”: “https://paint2decor.com/blogs/”,
“jobTitle”: “Cabinetry Refinishing Specialist”,
“knowsAbout”: [
“kitchen cabinet repainting”,
“cabinet refacing”,
“cabinet respraying”,
“kitchen cabinet painting”
],
“sameAs”: []
},
“publisher”: {
“@type”: “Organization”,
“name”: “Paint2decor INC”,
“url”: “https://paint2decor.com/”,
“logo”: {
“@type”: “ImageObject”,
“url”: “https://paint2decor.com/wp-content/uploads/2022/03/website-1.png”,
“width”: 512,
“height”: 512
}
},
“mainEntityOfPage”: “https://paint2decor.com/blogs/”,
“datePublished”: “2026-05-26T08:00:00-04:00”,
“dateModified”: “2026-05-26T08:00:00-04:00”,
“keywords”: [
“kitchen cabinet repainting”,
“Toronto cabinet painting”,
“cabinet refacing”,
“cabinet respraying”,
“GTA cabinetry refinishing”
],
“speakable”: {
“@type”: “SpeakableSpecification”,
“cssSelector”: [
“.featured-snippet-answer”,
“.faq-answer”
]
}
}
{
“@context”: “https://schema.org”,
“@type”: “ProfilePage”,
“mainEntity”: {
“@type”: “Person”,
“name”: “Masoud Kakar”,
“url”: “https://paint2decor.com/blogs/”,
“description”: “Toronto/GTA cabinetry refinishing specialist focused on repainting, refinishing, and respraying kitchens and bathrooms.”,
“knowsAbout”: [
“kitchen cabinet repainting”,
“cabinet refacing”,
“cabinet respraying”,
“kitchen cabinet painting”
],
“sameAs”: []
}
}
{
“@context”: “https://schema.org”,
“@type”: “FAQPage”,
“mainEntity”: [
{
“@type”: “Question”,
“name”: “How long does kitchen cabinet repainting take?”,
“acceptedAnswer”: {
“@type”: “Answer”,
“text”: “Most projects wrap in several working days onsite, plus a cure period before heavy use. Timelines depend on door count, repairs, and color changes. We keep your kitchen functional where possible and stage work to minimize downtime.”
}
},
{
“@type”: “Question”,
“name”: “Will repainting work on laminate or thermofoil doors?”,
“acceptedAnswer”: {
“@type”: “Answer”,
“text”: “Yes for many laminates when prepped correctly with bonding primers. Thermofoil is case-by-case; if the foil is peeling or heat-damaged, selective replacement is often smarter, then repaint for a seamless match.”
}
},
{
“@type”: “Question”,
“name”: “Which paint finish is best for busy kitchens?”,
“acceptedAnswer”: {
“@type”: “Answer”,
“text”: “Satin strikes a great balance: it hides minor texture better than semi-gloss and still wipes clean. If you want max cleanability and don’t mind seeing more surface detail, semi-gloss is a durable choice.”
}
},
{
“@type”: “Question”,
“name”: “Do I need to replace hardware when repainting?”,
“acceptedAnswer”: {
“@type”: “Answer”,
“text”: “Not required, but repainting is the perfect time to upgrade. We can fill old holes and drill for new handles or soft-close hinges, giving your refreshed color a matching modern feel.”
}
},
{
“@type”: “Question”,
“name”: “How durable is the finish compared to factory?”,
“acceptedAnswer”: {
“@type”: “Answer”,
“text”: “With proper prep, pro-grade primers, and cabinet-specific topcoats, repainted finishes are highly durable for everyday use. They’re designed to resist common kitchen wear, especially when cured fully and maintained with gentle cleaning.”
}
}
]
}