
Refinishing your kitchen cabinets is the professional process of cleaning, repairing, prepping, and coating existing cabinet doors and frames to restore a durable, like-new finish. For York homeowners, it delivers a fresh kitchen without demolition. It’s ideal when your cabinet boxes are sound and you want a faster, cleaner makeover.
By Masoud Kakar — Paint2decor INC
Last updated: 2026-06-25
At a Glance: Summary
Cabinet refinishing renews solid cabinet boxes and doors with professional prep and high-performance coatings. It avoids the mess of full replacement, shortens downtime, and supports a modern color change or wood-tone update. If your cabinet structure is sound, refinishing is usually the fastest path to a kitchen that feels new.
Here’s what you’ll learn in this complete guide from Paint2decor INC, the GTA’s cabinetry refinishing specialists based in York:
- What cabinet refinishing is and when it’s the right call
- Step-by-step process we use to deliver smooth, factory-like finishes
- Methods and finishes: spray vs. brush, paint vs. stain, and low-VOC options
- Refinish vs. reface vs. replace: comparison with pros and cons
- York-specific planning tips and seasonal considerations
- Best practices, tools, and a readiness checklist you can use today
As local, award-recognized specialists, we focus on cabinet refacing, kitchen cabinet refinishing, cabinet spray painting, and kitchen cabinet painting for Toronto and the broader GTA.
What Is Cabinet Refinishing?
Cabinet refinishing is a surface renewal process for existing cabinets that preserves the boxes and doors while updating the finish. Professionals deep-clean, repair, sand, prime, and apply durable coatings to achieve factory-level smoothness, extending cabinet life without the disruption of replacement.
Refinishing your kitchen cabinets keeps what works—the boxes and layout—while transforming how everything looks and wears. It targets surfaces, not structure, delivering major visual impact with minimal disruption.
When refinishing makes sense
- Boxes are structurally sound: No sagging, rot, or severe water damage.
- You like your layout: Appliances, plumbing, and workflow stay as-is.
- You want a color or sheen change: From orange oak to modern white, greige, or rich green.
- Doors are reusable: Minor dings can be filled; heavy warping signals other options.
In our experience with York homes, most 10–20 year-old kitchens qualify. If doors are beyond saving or styles feel dated, we’ll discuss refacing or new doors as part of a smart makeover path.
Why Cabinet Refinishing Matters for York Homes
Refinishing delivers a high-impact makeover with less waste, less mess, and shorter downtime than a full renovation. It’s ideal for York homeowners who want modern style, better durability, and a healthier home environment without changing their kitchen’s footprint.
Here’s the thing—many kitchens don’t need demolition. When cabinet frames are strong, a professional finish system gives you:
- Speed and simplicity: Typical projects wrap in days, not weeks of disruption.
- Lower waste: Keeping boxes out of landfill is the greener choice.
- Design freedom: Color shifts, two-tone looks, or wood-tone restorations.
- Durability: Professional coatings resist everyday wear better than DIY latex.
We’ve found that families in York value limited downtime—especially in busy school and work seasons. A refinishing plan keeps your kitchen usable between stages, and we stage work to limit household interruption.
How Cabinet Refinishing Works: Step-by-Step
A proven refinishing workflow removes doors, labels hardware, deep-cleans, sands, primes, and sprays high-performance topcoats. On-site masking protects your home while shop-sprayed doors cure in controlled conditions. The result is a smooth, durable finish that looks factory-made.
- Assessment and planning: We inspect boxes, doors, and hinges, confirm target colors and sheen, and plan a staged schedule.
- Documentation and labeling: Doors and drawers are numbered; hinge positions are marked for perfect reassembly.
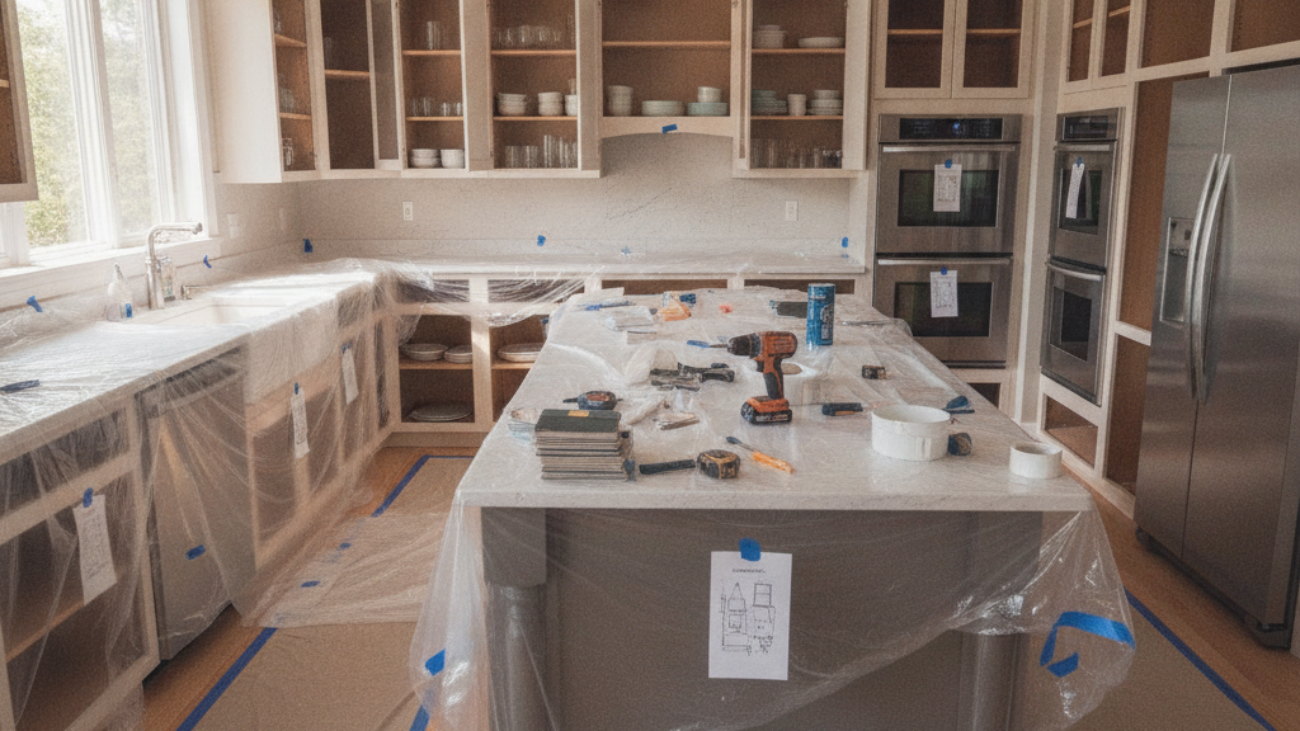
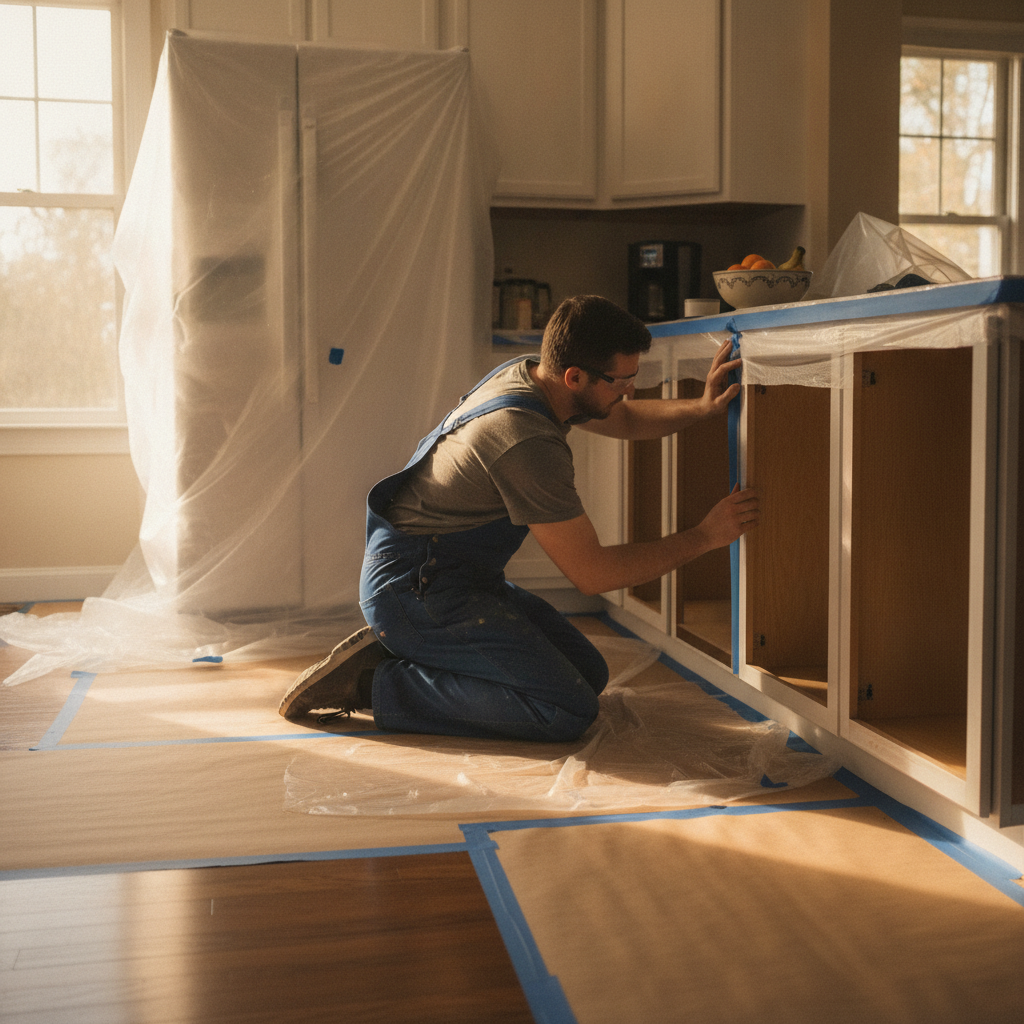
- Removal and protection: Doors, drawers, and hardware come off. Floors, counters, and appliances are protected.
- Degrease and clean: Kitchens accumulate oils; proper cleaning ensures adhesion.
- Repairs: Fill dings, caulk hairline seams, and spot-fix veneer lift.
- Sanding and dust control: Progressive sanding (with dust extraction) creates a ready-to-prime surface.
- Priming: Bonding or stain-blocking primers lock in tannins and improve topcoat grip.
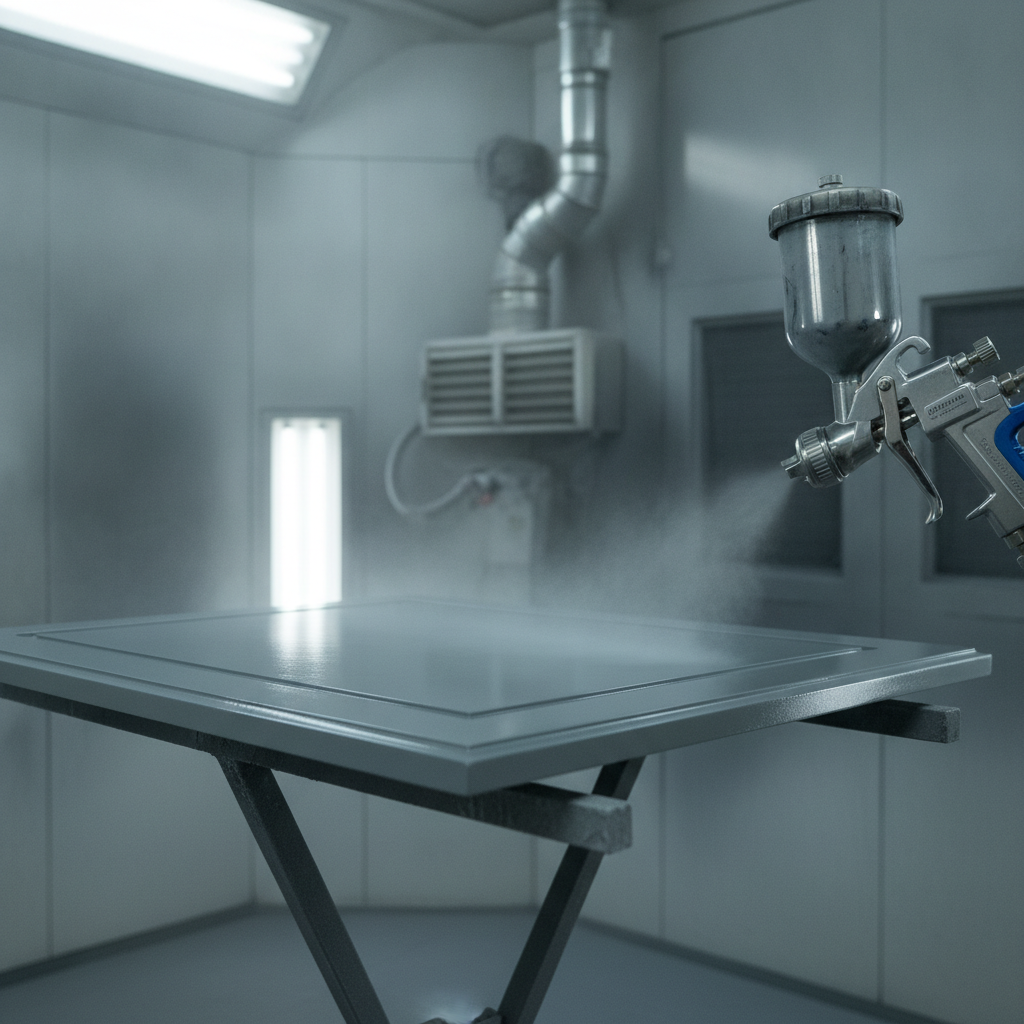
- Topcoats: HVLP-sprayed waterborne lacquers or urethanes lay down a smooth, durable shell.
- Cure and reassembly: Components cure, then doors are reinstalled with adjusted hinges and new bumpers.
- Final quality check: We inspect sheen, edges, and door reveals for a consistent, professional result.
| Stage | Typical Duration | Home Access |
|---|---|---|
| Prep & Protection | Half to 1 day | Kitchen partly usable |
| Cleaning & Repairs | Half to 1 day | Limited use |
| Priming & Topcoats | 1–2 days | Ventilated, limited access |
| Cure & Reassembly | 1–2 days | Back to normal |
Want more detail on our approach to redoing cabinets? Our complete redoing cabinets guide explains how we stage projects to minimize family downtime.
Methods and Finishes: Spray, Brush, Paint, or Stain
Professional HVLP spray delivers the most uniform finish on doors and panels, while brush-and-roll suits in-place frames. Waterborne lacquer and urethane systems balance hardness with low odor; stains and clear coats revive wood grain when you want a natural look.
Spray vs. brush-and-roll
- HVLP spray (doors/panels): Factory-smooth, consistent sheen, excellent edge coverage.
- Brush-and-roll (frames): Practical for fixed frames; advanced rollers minimize texture.
- Hybrid approach: We often spray doors in the shop and finish frames on-site.
Paint systems we trust
- Waterborne lacquer/urethane: Durable, easier odor profile, fast recoat and cure cycles.
- Bonding primers: Critical on thermofoil, MDF, or glossy factory finishes.
- Low-VOC options: Better for families, pets, and closed-window seasons.
Stain and clear-coat routes
- Restaining real wood: Sand to fresh substrate, even out blotch-prone species, seal, then topcoat.
- Clear finishes: Satin or matte sheens resist fingerprints while highlighting grain.
- Color-in-grain effects: For maple and oak, tinted clears or glazing can modernize tone without hiding wood.
Not sure which approach fits your kitchen? Our cabinet refinishing guide breaks down finish options for Toronto homes and when we recommend each.
Best Practices for a Factory-Level Finish
The best results start with meticulous prep: labeling, cleaning, sanding with dust control, and bonding primer. Controlled spray technique, proper film build, and patient curing lock in a smooth, durable surface that resists everyday wear and cleans easily.
Prep and protection
- Label everything: Doors, drawers, and hinges get a unique number and position.
- Degrease thoroughly: Even “clean” doors carry oils that cause adhesion failure.
- Masking matters: Protect floors, counters, and appliances with purpose-made materials.
Application & curing
- Thin, even coats: Two to three color coats over a quality primer beat one thick layer.
- Watch the environment: Temperature and humidity influence leveling and cure speed.
- Respect cure windows: Handle gently in the first days; full hardness follows later.
Hardware and hinge alignment
- Upgrade opportunity: Soft-close hinges and new pulls enhance daily use.
- Consistent reveals: Adjust doors for even gaps; felt bumpers prevent paint rub.
We align our on-site process with the methods outlined in our Toronto refinishing guide, which shows how small details compound into a showroom result.
Tools, Materials, and Helpful Resources
A successful refinish pairs quality tools—HVLP sprayer, bonding primer, and waterborne lacquer—with smart surface prep and dust control. Homeowners benefit from planning checklists, color samples, and process guides that clarify decisions before work starts.
Core tools and materials we use
- HVLP sprayer and tips: For smooth, consistent atomization on doors and panels.
- Bonding/stain-block primer: Ensures adhesion and blocks bleed-through.
- Waterborne lacquer/urethane: Durable, easy-clean topcoats in satin, matte, or semi-gloss.
- HEPA sanding and dust extraction: Keeps air and surfaces clean.
- Professional masking: Zip walls, paper, plastic, and tape designed for clean edges.
Want to dig deeper into methods and decision points? This practical cabinet painting guide explores common prep and application choices many homeowners consider before starting.
Thinking about refinishing your kitchen cabinets? Get a fast, friendly assessment from Paint2decor INC. We’ll confirm whether refinishing, refacing, or replacement fits your goals—and map a schedule that limits downtime. Request your free refinishing overview.
Refinish vs. Reface vs. Replace: What’s Right for You?
Choose refinishing when your boxes are solid and you want color or sheen changes. Pick refacing when you also want new door styles and veneers. Consider replacement when boxes are failing or you’re changing the layout—plumbing, appliances, or walls.
| Option | Best When | Scope | Design Flexibility | Typical Timeline |
|---|---|---|---|---|
| Refinish | Boxes are solid; keep layout | Clean, repair, sand, prime, paint/stain | High color/sheens; keep door style | Days |
| Reface | Boxes solid; want new doors | New doors + veneers on frames | Very high; new profiles | Days to a week+ |
| Replace | Boxes failing or layout change | New boxes, doors, and often counters | Unlimited; full redesign | Weeks+ |
If you’re weighing options, see our detailed cabinet refacing guide and our cabinet resurfacing explainer for how hybrid makeovers come together.
For outside perspective on reface vs. replace, this comparison article outlines typical trade-offs homeowners review during planning.
Case Studies and Real-World Examples
York projects often benefit from a hybrid plan: spray doors in our controlled shop environment and finish frames on-site. This limits downtime, controls dust, and delivers that sought-after, factory-smooth finish on the most visible surfaces.
- York family kitchen color shift: We transformed mid-2000s maple from amber to a satin warm white. Doors and drawers were sprayed; frames brush-and-rolled with low texture rollers. Hardware refreshed with brushed nickel pulls created a modern, cohesive look.
- Two-tone makeover in a compact space: For a smaller York semi, we used a deep navy on base cabinets and a soft white on uppers. Careful masking kept walls pristine. The contrast made the room feel taller without moving a single wall.
- Wood-tone revival: An oak kitchen with good bones regained character through stain and clear topcoats. Strategic filling and sanding evened grain for a refined, contemporary feel while preserving the warmth of wood.
These examples reflect typical GTA homes: solid frames, doors worth keeping, and smart upgrades to hinges and pulls. When doors are too dated or damaged, refacing integrates cleanly into the plan.
Value, Durability, and Timing (Without Pricing)
The value of refinishing comes from preserving structure, upgrading finishes, and minimizing downtime. Professional coatings level and cure faster than DIY paints, and a staged schedule keeps your kitchen functional while work progresses.
- Durability: Waterborne lacquer and urethane systems are engineered for kitchens—resisting scratches, moisture, and daily cleaning.
- Timing: Most projects complete in days; full hardness develops after curing. We plan gentle use guidance to protect edges early on.
- Upgrades: Consider soft-close hardware and interior organizers while doors are off.
- Scope control: Keep counters and layout; reface if you also want a new door profile.
For a broader renovation perspective, this overview of kitchen remodel vs. cabinet replacement outlines common decision points beyond finishes.
Local Planning Tips for York
York homes benefit from scheduled, staged refinishing that respects weather, school schedules, and building access. We plan ventilation, curing, and logistics so your daily routine stays intact while your cabinets get a showroom finish.
Local considerations for York
- Plan site access and parking near Jane St at St Clair Ave West during busy hours; we coordinate delivery windows to reduce disruption.
- Winter and humid summer days affect curing; we manage airflow and temperature so coatings level and harden reliably in any season.
- If you need quiet work blocks (remote work, kids studying), we stage sanding and spraying around your schedule—library visits to Smythe Park trails are a popular break.
As a York-based team, we’ve streamlined protection and airflow setups for compact semis and larger detached homes alike. The goal: consistent finishes and a kitchen you can keep using between stages.
Readiness Checklist Before We Start
A little prep goes a long way. Clear counters, empty drawers, and choose colors and hardware early. Label any specialty items and confirm pet plans. We’ll handle protection, masking, and the pro-level steps that deliver a flawless finish.
- Decide on color, sheen, and any two-tone combinations; order samples if needed.
- Choose hardware and soft-close upgrades; confirm hole spacing for re-use or new drilling.
- Clear countertops and relocate counter appliances and decor.
- Empty drawers and the most-used lower cabinets for faster staging.
- Plan pet and child zones on spray or sanding days.
- Share any prior paint or stain details if available.
When you’re ready, our kitchen cupboard refinishing guide pairs this checklist with a detailed color planning walkthrough.
Frequently Asked Questions
Homeowners ask about durability, timelines, and when refinishing beats refacing. Below are concise answers that help you decide quickly—and know what to expect from a professional process.
How do I know if refinishing is better than refacing?
If your cabinet boxes are sturdy and you like the layout, refinishing is usually the fastest, least disruptive option. Choose refacing when you also want a new door style or when doors are damaged beyond repair. We evaluate both options during an on-site assessment.
How long does a typical kitchen take to refinish?
Most projects wrap in several days, with doors sprayed in our shop and frames finished on-site. You’ll get guidance for gentle use during early cure. We stage tasks so your kitchen stays partially usable between steps.
Will the finish feel smooth like factory cabinets?
Yes—our HVLP spray process and waterborne lacquer or urethane systems produce a smooth, uniform surface. Proper cleaning, sanding, priming, and controlled application are key to achieving that factory-level feel and consistent sheen.
What about odors and indoor air quality?
We use low-odor, low-VOC professional coatings and manage airflow during on-site stages. Masking, dust extraction, and controlled ventilation reduce smells and keep the workspace clean and safe for families and pets.
Conclusion and Next Steps
If your cabinet boxes are in good shape, refinishing is the fastest way to a like-new kitchen. With pro prep and coatings, you’ll get a durable, stylish finish—without the disruption of a full remodel. A short assessment confirms if refinishing or refacing fits best.
Key takeaways
- Refinishing your kitchen cabinets transforms look and durability without layout changes.
- Pro prep, HVLP spraying, and quality primers/topcoats create factory-level results.
- Use refinishing when boxes are solid; choose refacing for new door styles.
- York projects benefit from staged schedules and low-VOC systems.
Ready to see what’s possible? Explore our cabinet refinishing guide, then book a quick assessment. We’ll confirm scope, finishes, and a smooth plan tailored to your York home.
Related Articles
If you’re comparing options, our in-depth Toronto refinishing guide and this concise refacing overview pair well with the redoing cabinets pillar for a complete perspective.