
Renuit cabinet refacing is a branded method that replaces cabinet doors and drawer fronts while veneering existing boxes for a like-new look. For York and greater Toronto homeowners near 2710 St Clair Ave W, Paint2decor INC delivers refacing and refinishing alternatives that reduce disruption, keep layouts intact, and upgrade style without a full tear-out.
By Masoud Kakar · Last updated: 2026-06-13
Above-Fold: Hook, promise, and quick table of contents
You want a modern kitchen without weeks of demolition. This guide shows how Renuit-style refacing compares to specialist services in Toronto, what lasts, and how to avoid mess, delays, and regrets. Use the checklist and examples to choose the right path with confidence.
Here’s the thing—most kitchens don’t need a rebuild to feel brand new. If your cabinet boxes are sound, refacing or refinishing can deliver the update you want in days, not weeks. This guide is built for Toronto homeowners who value durability, style, and a clean process.
- What Renuit cabinet refacing is—and isn’t
- Why refacing matters for York and Toronto homes
- How the process works step-by-step
- Brand systems vs. local specialists (comparison)
- Best practices that make finishes last
- Tools, materials, and resources to know
- Real GTA examples and a homeowner checklist
Quick Summary
Refacing replaces doors and veneers boxes; refinishing restores and resprays existing materials. Choose refacing for a style change with minimal layout disruption; choose refinishing when wood is solid and you want a factory-level sprayed finish. Local Toronto specialists align materials and methods to Canada’s climate and your daily use.
- Fast transformation: Many kitchens finish in 3–5 working days with staged activity and protected walkways.
- Minimal waste: Existing boxes stay, often reducing landfill and material lead times.
- Durable coatings: Pro sprayers use cabinet-grade systems designed for moisture, cleaning, and daily handling.
- Design control: From Shaker to slab, hardware and sheen level shape the new look without moving walls.
- Local expertise: Paint2decor INC tailors solutions for Toronto homes and condo rules.
What Is Renuit Cabinet Refacing?
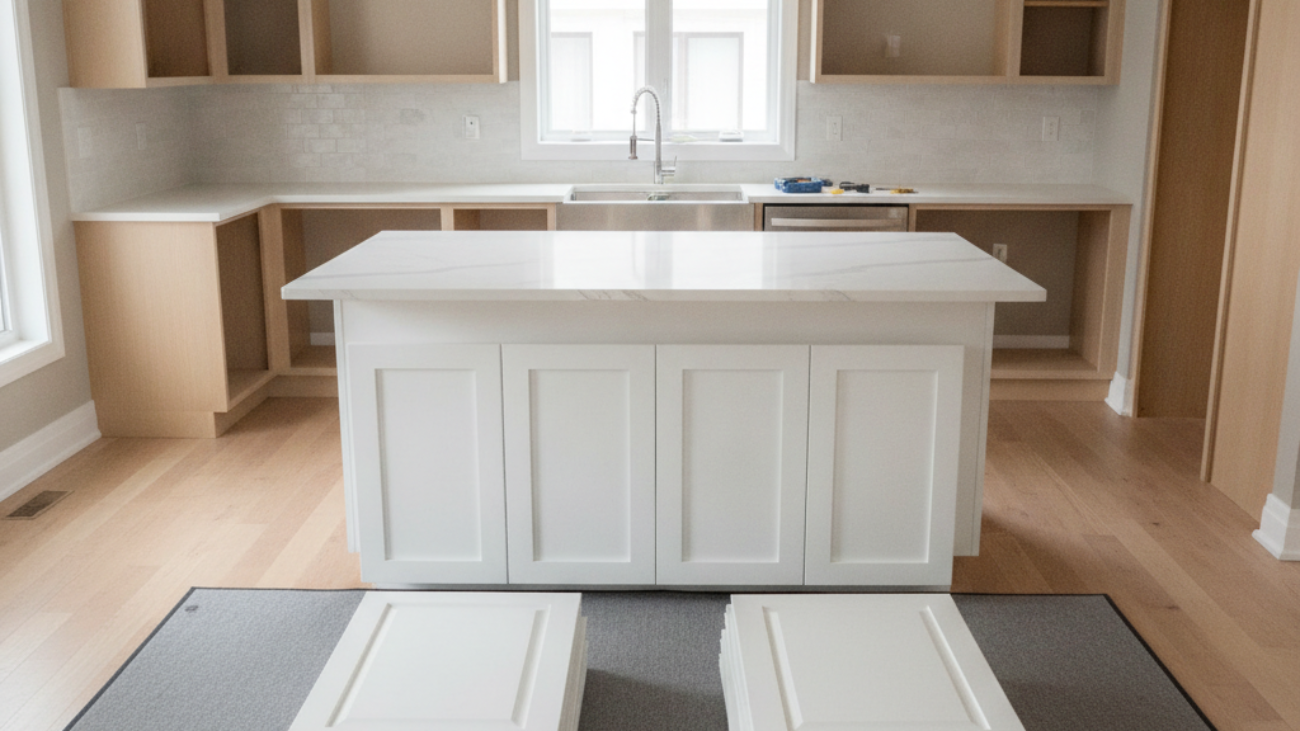
Renuit cabinet refacing refers to a branded system that installs new doors and drawer fronts while applying matching veneer to existing cabinet boxes. It keeps your layout, upgrades style fast, and avoids demolition. The result mimics a new kitchen when boxes are structurally sound.
In plain terms, refacing keeps the cabinet skeleton and swaps the visible skin. Doors, drawer fronts, and often hinges and pulls are replaced. Exposed frames receive a matching veneer or laminate, and seams are edge-banded for a seamless look.
Core elements
- New doors/drawers: Typically Shaker, slab, or raised-panel, painted or laminated for a consistent face line.
- Veneered boxes: Adhesive-backed wood veneer or rigid thermofoil applied to face frames and visible sides.
- Hardware refresh: Soft-close hinges and slides improve feel and longevity.
- Finishing touches: Toe-kicks, light valances, and filler panels close gaps and amplify symmetry.
When is it a good fit? If your boxes are square, plumb, and dry, the surface treatment bonds well and doors hang true. If boxes are swollen, sagging, or moldy, address structure first. That single decision protects every hour of finish work that follows.
Why Refacing Matters for York and Toronto Homes
In York and metro Toronto, refacing cuts downtime, controls dust, and fits condo rules while delivering a like-new style. It preserves floorplans, trims landfill, and aligns with busy city schedules. Homeowners get modern doors, clean lines, and durable coatings without a disruptive rebuild.
Toronto households juggle school, commutes, and compact spaces. A long tear-out can upend routines. Refacing contains activity to measured phases—labeling, veneering, door installation, and a final spray session—so cooking and cleaning patterns resume quickly. Moreover, building rules often favor lower-noise, lower-waste work.
- Less demolition: Fewer haul-outs mean fewer elevator bookings and truck trips.
- Predictable sequence: Staged work helps plan around school pickups and meetings.
- Design flexibility: From matte whites to walnut-look grains, doors and hardware recast the kitchen’s character.
- Sustainable angle: Reusing boxes reduces bulk waste and lead times for materials.
We’ve found many Toronto kitchens fall into the “strong bones, dated face” category. For those spaces, refacing or refinishing is the shortest path to a home that looks updated in photos and feels solid in daily use.
How Cabinet Refacing Works (Step-by-Step)
Refacing follows a defined sequence: assess boxes, remove and label doors, prep and clean frames, apply veneer to exposed areas, install new doors and hardware, then align and finish. The process protects floors, seals off dust, and delivers a consistent, like-new face line.
1) Assessment and planning
- Confirm box integrity, check for humidity damage, and photograph layouts for later alignment.
- Decide door style, edge profiles, and sheen; map hinge locations and hardware hole patterns.
- Note appliance clearances and crown heights to avoid hinge collisions and drawer rub.
2) Prep, protection, and removal
- Mask floors and counters; set up a parts table; number every door and drawer front.
- Degrease frames and sides—finish systems only bond to clean surfaces.
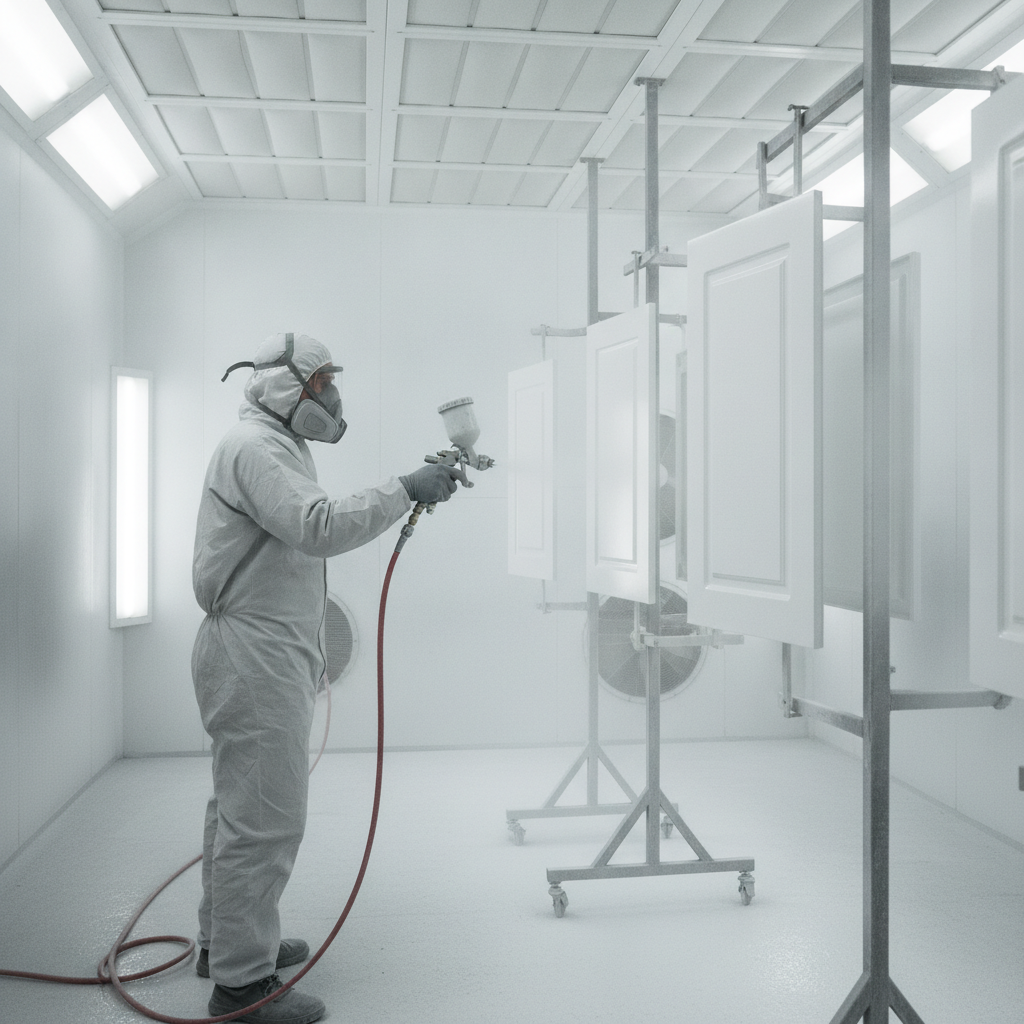
- Set up a negative-air zone if spraying on-site; stage a spray booth for doors.
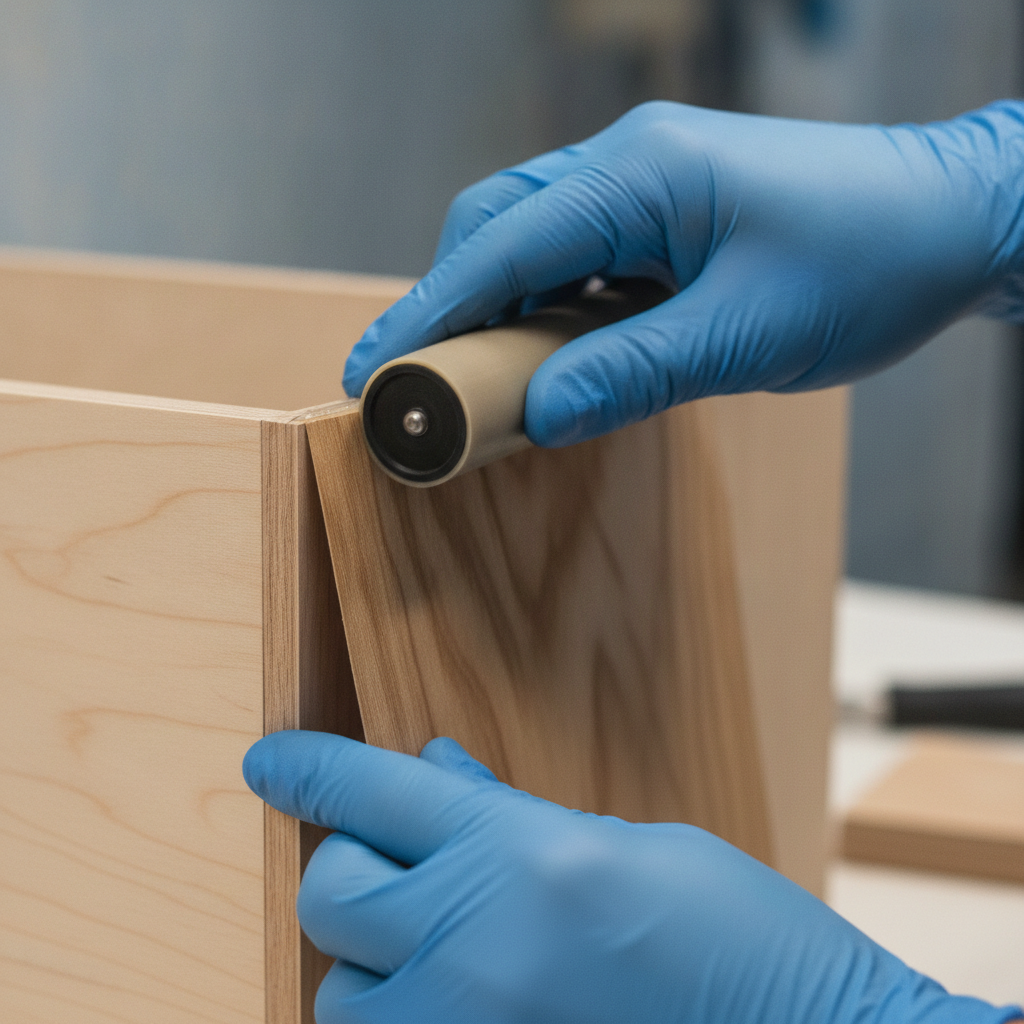
3) Veneer and edge work
- Apply adhesive-backed veneer to face frames and exposed panels with pressure rollers.
- Trim flush with razor-fine cuts; seal edges to prevent moisture wicking.
- Align grain direction across banks for a furniture-grade look.
4) Door, drawer, and hardware install
- Hang new doors, set reveals to even gaps, and adjust soft-close hinges.
- Install slides and pulls; confirm drawers clear oven handles and dishwasher lips.
- Test every moving part; torque fasteners to spec so nothing loosens prematurely.
5) Finish and QA
- Final clean, caulk where needed, and color-match fillers and toe-kicks.
- Walkthrough with a punch list; note any micro-adjustments for day-two touchups.
- Provide care guides for curing time, cleaning, and pad placement under small appliances.
Most projects run on a 3–5 day rhythm in lived-in homes, with high-traffic hours minimized. That tempo keeps kitchens usable between phases while controlling dust and noise.
Types and Approaches: Brand Systems vs Local Specialists
Brand refacing systems standardize door catalogs and veneer kits; local specialists tailor materials, spraying, and details to your exact kitchen. If you want tight control over color, sheen, and hardware, a Toronto specialist like Paint2decor INC offers broader customization with the same layout-saving benefits.
Choosing between a branded system and a specialist is less about “better” and more about fit. Some homeowners love curated catalogs; others want a specific white, a low-sheen finish, or matching a nearby vanity. The right partner balances discipline with flexibility.
Comparison at a glance
| Feature | Branded system (e.g., Renuit) | Local specialist (Paint2decor INC) |
|---|---|---|
| Door catalog | Preset styles and finishes for fast selection | Shaker, slab, raised panel, custom colors and sheens |
| Veneer approach | Matched veneer kits designed for speed | Wood veneer or laminate chosen for your traffic and climate |
| Finish control | Factory defaults | Cabinet-grade spray systems, fine-tuned for durability and feel |
| Hardware | Bundled options | Soft-close hinges/slides, pulls sized to hand feel and reach |
| Site logistics | Standardized | Condo-friendly staging, elevator timing, family schedules |
| Integration | Kitchen only | Coordinate with vanities or built-ins for whole-home cohesion |
Take an example from York: a shaker-door refacing paired with a color-matched bathroom vanity creates a visual thread from kitchen to bath. That cohesion is where a flexible, finish-forward approach shines.
For further context on refacing versus replacing, see this concise refacing vs. replacing overview. It frames the decision points many homeowners weigh when planning updates.
Best Practices for a Durable, Factory-Level Finish
Durability comes from surface prep, adhesion, and controlled spraying. Clean, sand, and de-gloss; choose cabinet-grade coatings; spray doors in a booth; keep dust down; and allow proper cure time. Small details—hinge alignment and hardware torque—protect finishes for years.
Preparation that sticks
- Degrease thoroughly: Oils and cooking residue block adhesion; treat high-touch zones twice.
- Scuff-sand and clean: A uniform tooth improves veneer bonding and coating lock-in.
- Mask with intention: Sharp tape lines and zipper-walled zones keep dust off fresh coats.
Finish systems that last
- Cabinet-grade coatings: Choose products designed for moisture, cleaning, and frequent contact.
- Spray, don’t brush: HVLP application yields even film build and a factory look.
- Measured cure time: Gentle use early on avoids imprints from small appliances and magnets.
Hardware and alignment
- Soft-close everything: Reduces impact and edge wear on freshly coated surfaces.
- Even reveals: Consistent gaps signal square boxes and reduce hinge stress.
- Pull sizing: Match hand reach and drawer width; longer pulls ease daily use.
In our experience, 80% of finish issues trace back to prep shortcuts or rushed cure windows. A disciplined sequence and calm pacing pay dividends every time you open a door.
Tools and Resources Homeowners Should Know
Successful refacing uses pro tools: HVLP sprayers, pressure rollers, precision sanders, and controlled spray spaces. Pair equipment with a clear plan—labeling hardware, mapping hinge positions, and organizing parts—so installation is quick and aligned the first time.
- HVLP sprayer and tips: Delivers even film build; match tip size to coating viscosity.
- Pressure roller and edge bander: Vital for veneer adhesion at corners and seams.
- HEPA sanding and extraction: Keeps particulates low, especially in lived-in condos.
- Labeling workflow: Number every component; bag hinges and screws per opening.
- Care and cleaning guide: Microfiber, non-abrasive cleaners, and felt pads under appliances.
Want a deeper dive into refacing choices? Our cabinet refacing guide outlines styles, veneer types, and common pitfalls to avoid. If you’re comparing services in Toronto, see our refacing contractors overview for selection criteria and timelines.
For broader renovation context, this independent kitchen renovation guide walks through factors that influence planning and scheduling across typical projects.
Case Studies and GTA Examples
GTA kitchens often have solid boxes and dated faces. By pairing new doors with a controlled spray finish, homeowners get the “new kitchen” feel quickly. These York and Toronto examples show refacing and refinishing paths that protected layouts and kept daily routines intact.
York, St Clair Ave W — Family hub refresh
- Starting point: Good maple boxes, yellowed varnish, mixed hardware.
- Approach: Shaker doors, veneered frames, soft-close hinges, satin spray finish.
- Outcome: Even reveals, brighter counters, and a quiet-close feel that changed the room’s rhythm.
Toronto condo — Elevator-friendly schedule
- Starting point: High-rise kitchen, limited staging space, strict quiet hours.
- Approach: Off-site door spraying, evening masking, daytime installs within building rules.
- Outcome: 4-day cadence with zero neighbor complaints and a clean handoff.
Rowhouse galley — Cohesive finishes
- Starting point: Narrow galley, busy cooking pattern, scuffed lowers.
- Approach: Refacing on uppers, refinishing lowers to match, hardware sized for grip.
- Outcome: Unified look without moving a single box or appliance.
Local considerations for York
- Plan staging and parking near Jane St at St Clair Ave West to streamline load-in and protect timelines.
- Winter projects benefit from tight climate control; summer humidity calls for longer cure windows before heavy use.
- Quiet prep near the Toronto Public Library – Daniel G. Hill Branch area keeps dust and noise minimal for neighbors.
If you’re weighing options, scan our Toronto refinishing guide and the resurfacing vs. refacing explainer for deeper comparisons tailored to GTA homes.
Checklist: Decide Between Refacing, Refinishing, or Replacing
Decide by testing structure, layout, and design goals. If boxes are square and the layout works, refacing or refinishing wins. If water damage, sagging, or major reconfiguration is needed, consider replacement. Match finish durability and hardware to daily traffic.
- Structure: Boxes plumb and dry? Hinges hold? Shelves level?
- Layout: Do current clearances and workflows fit how you cook and clean?
- Finish goals: Painted, stained, or wood-look laminate? Matte, satin, or semi-gloss?
- Hardware: Soft-close, pull length, and handle geometry for grip and comfort.
- Logistics: Elevator bookings, masking zones, pet gates, and weekday schedules.
When in doubt, book a short consult. A 15-minute walk-through often clarifies path, sequence, and any repair prep that protects the final finish.
Frequently Asked Questions
Homeowners ask how long refacing takes, when refinishing makes more sense, and whether condo rules allow spraying. These quick answers cover timing, fit, durability, and coordination so you can plan with confidence.
How long does cabinet refacing usually take?
Most lived-in kitchens finish in 3–5 working days. Doors are sprayed off-site while frames are prepped and veneered on-site. Install and alignment follow, with a short punch list after light use to fine-tune hinges and pulls.
When is refinishing better than refacing?
Choose refinishing when your existing doors are solid and you like the profiles. A cabinet-grade spray system restores color and sheen, often with fewer material deliveries. Refacing is better when you want a new door style or need to correct uneven gaps.
Can condo rules in Toronto allow spraying?
Yes, with planning. Doors are typically sprayed off-site in a booth, and on-site work uses masking, HEPA sanding, and controlled hours. Elevator bookings, quiet-hour windows, and clean load-in/out paths keep projects compliant and neighbor-friendly.
What if my boxes have water damage?
Tackle structure first. Replace swollen or mold-prone sections before finishes go on. Refacing and refinishing depend on square, dry, stable boxes. Address plumbing leaks or sink-base damage so veneers bond well and doors hang straight for the long term.
Conclusion and Next Steps
If your boxes are sound, Renuit-style refacing or pro refinishing can deliver a like-new kitchen fast. Match your goals—door style, color, sheen, and hardware—to the method, then schedule a clean, staged install that respects your home and timeline.
Key takeaways
- Refacing changes style fast without moving boxes.
- Refinishing restores solid doors with a factory-level spray.
- Hardware, sheen, and grain direction shape daily feel.
- Discipline in prep and cure time protects results for years.
Action steps
- Review our Toronto refinishing guide and resurfacing vs. refacing explainer.
- Skim this third-party kitchen cabinet guide to visualize door options and planning.
- Explore installers with our contractors overview and companies guide.
Considering a refresh? See our in-depth cabinet refacing guide or request a friendly consult through the contractor overview page. We align finish systems, hardware, and logistics to how your Toronto home actually lives.