
Kitchen cabinet refinishing contractors are specialists who restore existing cabinets with pro-grade sprayed finishes to achieve a factory-level look without replacing boxes. From our York location at 2710 St Clair Ave W, Paint2decor INC serves Toronto homeowners with refinishing, refacing, and spray painting that minimize disruption while delivering modern style and long-term durability.
By Paint2decor INC • Last updated: 2026-06-02
Quick Summary
If your cabinet boxes are solid and you like the layout, refinishing is usually the fastest, lowest-disruption path. If you want a new door style or your fronts are damaged, refacing is smarter. Replacement is best when boxes fail or the layout must change. A brief assessment reveals the right path.
- Refinishing: clean, sand, prime, and spray topcoats on current doors/boxes
- Refacing: replace doors/drawers and apply matching skins to boxes
- Replacement: full tear-out for new layout or failing boxes
- Decision drivers: cabinet condition, style goals, timeline, and daily disruption
- Outcome: modern, durable finish that wipes clean and photographs beautifully
Above-Fold Section: Hook + Table of Contents
Use this complete guide to compare refinishing and refacing, vet kitchen cabinet refinishing contractors, and plan a clean, efficient Toronto project. We map steps, materials, timelines, quality checks, and homeowner duties so your kitchen looks “new” without replacing sound cabinets or derailing your week.
- What kitchen cabinet refinishing is—and isn’t
- Why these methods matter in 2026
- How a professional refinishing workflow runs
- Types, materials, and finishes that last
- How to choose and vet a contractor
- Best practices that prevent callbacks
- Tools and homeowner resources
- York and Toronto nuances + local considerations
- Case studies and examples
- Planning timelines and coordination tips
- FAQ, key takeaways, and next steps
What Is Kitchen Cabinet Refinishing?
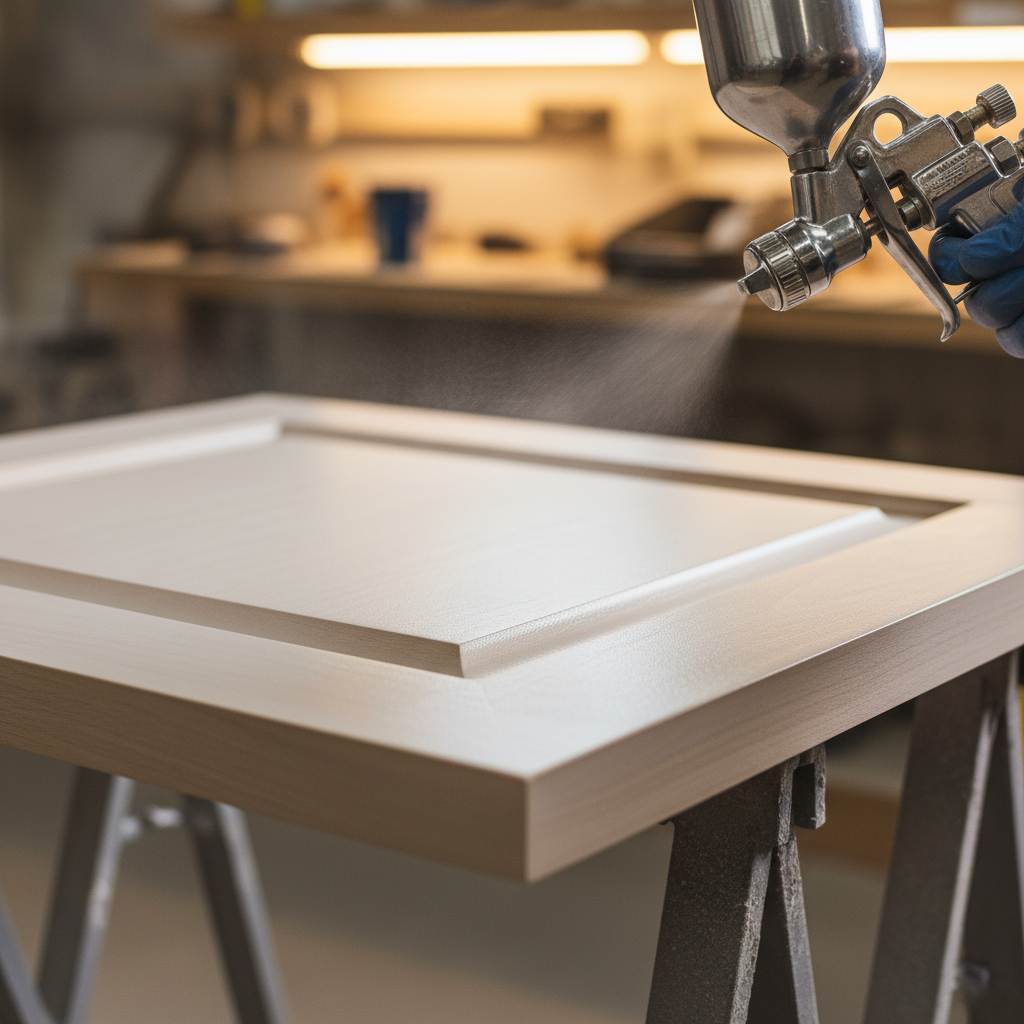
Kitchen cabinet refinishing is the professional preparation and re-coating of existing doors, drawers, and cabinet boxes with durable, spray-applied finishes. It preserves your layout, removes visible wear, and delivers a smooth, factory-like film using bonding primers and hard-curing topcoats designed for daily kitchen use.
Refinishing is about surface science and sequence. Cleaners remove grease, 120/180/220-grit sanding builds “tooth,” and bonding primer blocks tannins on oak/maple. Waterborne 2K polyurethane or catalyzed lacquer cures hard and cleans easily. Typical dry film builds target 3–5 mils across two to three coats for protection and wipeability.
- Scope: doors, drawer fronts, face frames, exposed panels, islands, and crown
- Environment: 65–75°F and 40–60% RH help even coalescence and cure
- Equipment: HVLP sprayers (1.3–1.5 mm tips) for fine, low-texture films
- Timeline: many kitchens finish in 3–5 working days plus a gentle-use cure window
- Deliverable: consistent sheen, crisp edges, and color uniformity under 4000K lighting
Want a deeper primer and topcoat walkthrough? See our Toronto refinishing guide for product families and cure checkpoints.
Why Refinishing or Refacing Matters in 2026
Homeowners want fast, low-odor upgrades that respect busy schedules. Refinishing and refacing keep sturdy boxes out of landfills, deliver modern colors in days, and add soft-close comfort. With pro masking and dust control, families can keep life moving while finishes harden to durable, cleanable films.
The layout in many Toronto homes works well. Keeping boxes while changing the finish—and possibly the door style—protects your routine and reduces waste. Low-VOC waterborne topcoats reduce smell. Soft-close hinges and 75–100 lb undermount slides boost daily comfort. A refreshed satin surface photographs well and signals care to buyers.
- Less demolition waste: preserve strong cabinet boxes
- Project speed: 3–7 working days for typical kitchens
- Modern palettes: satin whites, warm grays, navy, and two-tone islands
- Hardware wins: soft-close hinges, dampers, and smooth glides
- Resale benefit: clean, uniform sheen reads “move-in ready”
Curious about whether to keep, reface, or repaint your doors? Our resurfacing vs refacing guide breaks down style and material choices.
How Kitchen Cabinet Refinishing Works
A proven refinishing workflow protects your home, catalogs doors, deep-cleans, sands, primes, sands again, and sprays topcoats in controlled conditions. The finish cures to a hard film, then doors are reinstalled and hardware aligned. A simple care guide covers gentle use and safe cleaning in week one.
- Protection: zip walls, floor paper, masked registers, and airflow planning
- Cataloging: number each door/drawer; map locations for perfect reassembly
- Degreasing: alkaline cleaners and scuff pads prevent fisheyes and craters
- Repairs: fill dings, caulk hairline seams, and spot-sand profiles
- Sanding: 120/180/220 grit sequences build reliable mechanical adhesion
- Priming: bonding primer and, on oak, stain-blocking to tame tannin bleed
- Mid-sand: light 220–320 pass for flatness before topcoats
- Topcoats: two to three HVLP passes to reach 3–5 mils dry film in satin/semi
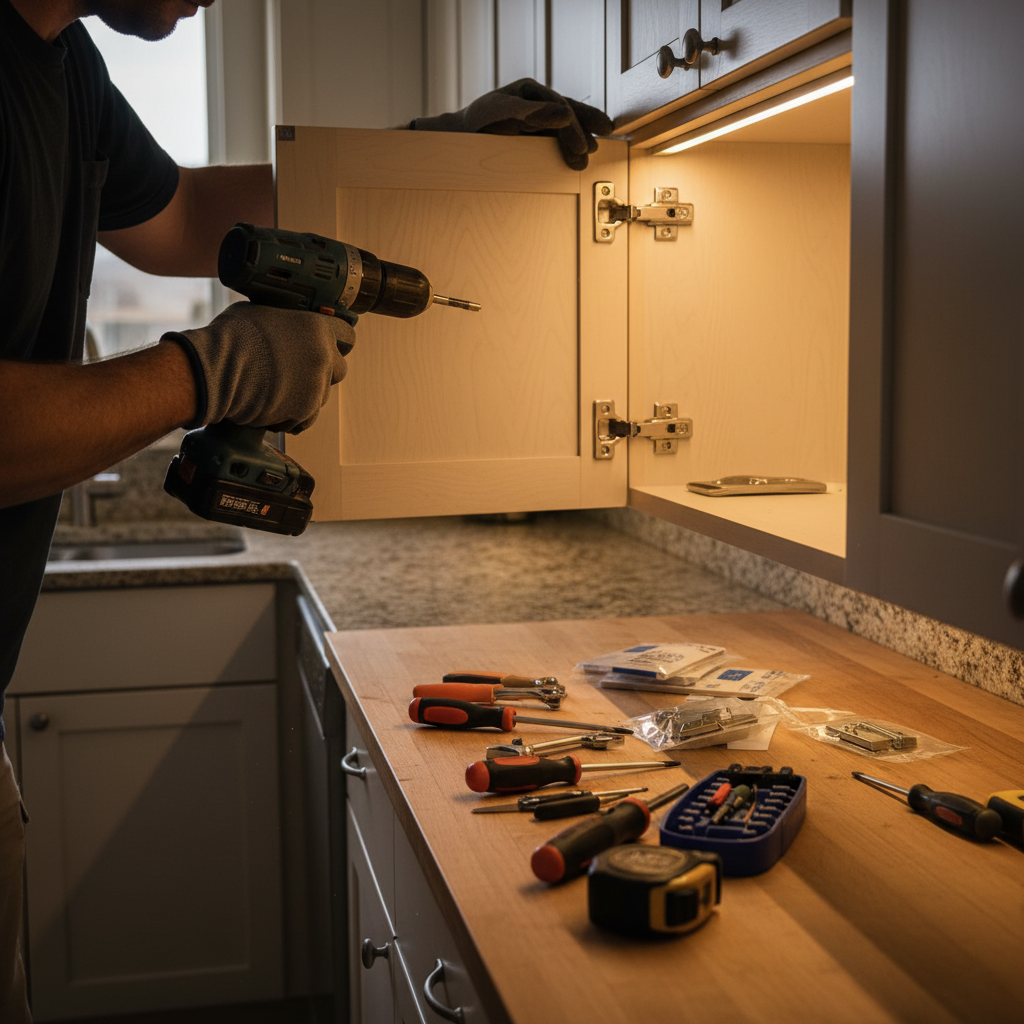
- Hardware: hinges tuned to 2–3 mm reveals; pulls set with a square jig
- Handoff: 5–7 day gentle-use window; microfiber cleaning only at first
Most doors are sprayed off-site for glass-flat results while boxes are sprayed on-site with fine-finish tips. Good shops run air scrubbers at 400+ CFM and maintain 65–75°F temperatures to support even coalescence of waterborne systems.
For a step-by-step homeowner checklist, bookmark our refinishing prep guide.
Types, Methods, and Approaches
Refinishing relies on bonding primers and durable topcoats; refacing swaps doors and skins boxes to match. Both can integrate hardware and storage upgrades. Choose the route that fits your cabinet condition, style goals, and how much change you want to see when you walk in.
Finish systems (refinishing)
- Primers: adhesion and stain-blocking primers to control tannins on oak/maple
- Topcoats: waterborne 2K polyurethane for chemical resistance; catalyzed lacquer for speed
- Sheens: matte (10–20 GU), satin (25–35 GU), semi-gloss (45–55 GU) for wipeability
- Colors: whites/off-whites, warm grays, deep blues/greens; two-tone islands trending
Refacing components
- New doors/drawers: Shaker, slab, or raised-panel built to match openings
- Box updates: real-wood veneer skins or laminate/thermofoil panels for sides
- Trim: crown, light rail, and end panels sharpen lines and hide transitions
Hardware and storage
- Hinges: soft-close with 35 mm cup boring; overlay style matched to face frames
- Slides: undermount soft-close glides rated 75–100 lb for smooth travel
- Accessories: roll-outs, trash pull-outs, spice pull-outs, tray dividers for function
If you’re weighing new door construction, this standard vs custom door overview helps frame the decision while you align styles with your finish plan.
Choosing Kitchen Cabinet Refinishing Contractors
Vet contractors by their spray process, surface prep standards, documentation, and on-site protection. Request a sample door, finish system data sheets, and a workmanship warranty. The best teams show consistent shop results, clean masking, and clear care instructions tailored to busy Toronto homes.
- Ask for: a sample door sprayed in the contractor’s standard finish system
- Verify: dedicated spray area/booth, HVLP gear, air scrubbers, and HEPA extraction
- Standards: written prep steps, grit sequence, primer type, and target film build
- Documentation: product TDS/SDS, care guide, and warranty terms in plain language
- Portfolio: even sheen, crisp edges, and zero overspray in before/after sets
- Professionalism: daily cleanup and tidy protection in occupied homes and condos
Prefer partners who educate. Our cabinet refacing guide and professional painting overview show the standards we follow on every project.
Best Practices and Quality Standards
Great outcomes come from disciplined prep, dust control, and measured films. Demand labeled doors, 120/180/220 sanding, bonding primer, two–three HVLP topcoats to 3–5 mils DFT, and a 5–7 day gentle-use window. Bright, neutral lighting (around 4000K) helps verify color and sheen before sign-off.
- Protection: mask to 1/16″ edges; no paint creep or halo lines on walls/ceilings
- Adhesion: scuff-sand profiles and edges; avoid “burn-through” with light passes
- Cleanliness: air scrubbers 400+ CFM; change filters before topcoat day
- Consistency: gun pressure and tip kept constant; test spray panels each morning
- Hardware: hinge reveals 2–3 mm; pulls aligned within ±1 mm across banks
- Care handoff: microfiber cloths only; avoid ammonia/abrasives in week one
New to coordinating trades? This contractor planning overview offers helpful sequencing notes to keep cabinetry finishing in sync with counters and backsplashes.
Tools and Homeowner Resources
Expect pro-grade HVLP sprayers, HEPA dust extraction, clean booths, low-odor finishes, and proper PPE. Homeowners should receive care guides, color samples, and product data sheets so cleaning and light touch-ups stay simple and safe long after the crew leaves.
- Application: HVLP/turbine sprayers with 1.3–1.5 mm tips; fine filters reduce nibs
- Prep: orbital sanders with HEPA vacuums; sanding sponges shape profiles
- Protection: zip walls, register covers, slip-resistant floor protection
- Safety: respirators (organic vapor), gloves, and eye protection
- Care: non-abrasive cleaners, microfiber cloths, and felt bumpers for doors
For a broad look at cabinet-painting sequences in Canada, this process overview outlines the typical steps from cleaning through final cure. And when you’re ready to compare makeover routes, our painting contractors guide is a practical next read.
Planning, Timelines, and Coordination
Plan cabinet work before new counters and backsplashes, and confirm appliance clearances for overlays. Toronto’s spring and fall book quickly; lead times of a few weeks are common. Maintain 40–60% indoor RH and 65–75°F for even cures, then budget 60–90 minutes for punch-list sign-off.
- Sequence: finish cabinets before templating countertops to prevent schedule collisions
- Appliances: verify door swing and wall-oven clearance with new overlay choices
- Lighting: neutral 4000K LEDs aid color approval and sheen checks
- Seasonal: higher humidity slows cures; plan light use for 5–7 days
- Final: walkthrough, hinge tweaks, and touch-up kit handoff
Balancing sustainability and schedule? Explore our sustainable refinishing tips for low-waste practices and finish selection.
York and Toronto Project Nuances
In York and across Toronto, we often see strong oak or maple frames—great candidates for refinishing or refacing. Condo bylaws, parking, and access shape protection and airflow plans. A clear day-by-day schedule keeps neighbors happy while finishes cure to hard, cleanable films.
Prewar homes lean toward inset doors; newer builds favor full-overlay Shaker. Townhomes often have efficient galleys that require tighter masking and airflow. Condo work usually means posted hours and elevator pads—plan material moves and quiet tasks within those windows.
Local considerations for York
- Plan loading and short-term parking near Jane St at St Clair Ave West to cut carry distance and speed setup.
- Spring/fall humidity around Smythe Park can slow cures; keep indoor RH near 40–60% during finishing.
- Book library or park time for family breaks during spray windows; brief getaways make the day smoother.
Case Studies and Real Examples
These Toronto-area scenarios show when refinishing or refacing wins. Each started with sturdy boxes and a homeowner who liked the layout. The finish system, hardware, and sequence created fast turnarounds with clean, durable results that photographed like new.
- York galley refresh: golden oak to satin white. Doors/boxes sprayed, hinges upgraded to soft-close. Four workdays plus a 7‑day gentle-use window.
- Ranch-style near parks: maple frames stayed; new Shaker doors for a refacing look. Added roll-outs and a trash pull-out for daily function.
- Condo kitchenette: off-site door spraying + on-site box work. Tight masking, HEPA vacuums, and a 400+ CFM scrubber controlled airflow.
- Heritage inset doors: stain-grade island kept natural; perimeter sprayed warm gray. Two-tone scheme modernized without losing character.
- Townhome U-shape: full-overlay hinges verified for appliance clearances; pulls aligned within ±1 mm across drawer banks.
For more makeover ideas, skim our concise cupboard refinishing explainer.
Frequently Asked Questions
Homeowners often ask how to decide between refinishing and refacing, how long the process takes, and what makes a pro spray finish different. These quick answers cover the essentials so you can plan confidently and keep your kitchen running.
How do I know if refinishing will work for my cabinets?
If your boxes are sturdy and doors aren’t swollen or cracked, refinishing is often ideal. You’ll keep the layout, get a factory-like spray finish, and finish in days. If doors are damaged or you want a new style, refacing may be the better fit.
What’s different about a pro spray finish versus brushing?
Pros use HVLP sprayers and controlled environments to lay down even, thin coats with minimal texture. Brushing can leave marks and uneven sheen. A booth-sprayed door with on-site sprayed boxes produces a consistent, durable look.
How long before I can use my kitchen normally?
Most kitchens are functionally back within a few days. Finishes continue to harden for about a week, so use doors and drawers gently and avoid harsh cleaners at first. Your contractor should provide a simple care sheet.
Do I need to replace hardware when refinishing?
Not always. Many homeowners keep existing pulls. However, soft-close hinges and new slides add daily comfort. If hole spacing changes with new pulls, your finisher can fill and re-drill for clean alignment.
What’s the difference between refinishing and refacing?
Refinishing keeps your doors and boxes but renews the coating. Refacing replaces doors/drawers and applies matching skins to boxes. Choose refinishing for color/sheen updates on sound doors, and refacing for a new door style or when fronts are worn.
Conclusion, Key Takeaways, and Next Steps
If your boxes are strong and your layout works, start with refinishing. Want a new door style or have worn fronts? Consider refacing. For failing boxes or layout changes, plan a replacement. A 10–15 minute assessment clarifies the best route for your kitchen.
- Refinish first when boxes are sturdy and you like the layout
- Reface to change door style and refresh box faces without demolition
- Replace only when boxes fail or you need a new layout
- Vetting matters: sample doors, TDS/SDS, and a documented workflow
- Protect the schedule: finish cabinets before counters and tile
Soft CTA: Want a pro opinion from a local team? Paint2decor INC can review cabinet condition, confirm species, bring a sample door, and map your timeline. Call +1 (416)-831-8489 or request a quick assessment via our website.
{
“@context”: “https://schema.org”,
“@type”: “Article”,
“headline”: “Refinishing vs Refacing: What Cabinet Refinishing Contractors Recommend”,
“description”: “Complete, Toronto-focused guide to hiring kitchen cabinet refinishing contractors, comparing refinishing vs refacing, and planning timelines, finishes, and best practices.”,
“author”: {
“@type”: “Person”,
“name”: “Masoud Kakar”,
“url”: “https://paint2decor.com/blogs”,
“jobTitle”: “Cabinetry Refinishing Specialist”,
“knowsAbout”: [“kitchen cabinet refinishing”, “cabinet refacing”, “spray finishing”, “HVLP”, “Toronto home renovations”],
“sameAs”: []
},
“publisher”: {
“@type”: “Organization”,
“name”: “Paint2decor INC”,
“url”: “https://paint2decor.com/blogs”,
“logo”: {
“@type”: “ImageObject”,
“url”: “https://paint2decor.com/wp-content/uploads/2022/03/website-1.png”,
“width”: 512,
“height”: 512
}
},
“image”: [
{
“@type”: “ImageObject”,
“url”: “https://res.cloudinary.com/dmboo1nu1/image/upload/v1780366209/ai-images/gmdjrqoolhgfz1f56dha.png”,
“width”: 1200,
“height”: 630,
“caption”: “Modern Toronto kitchen with freshly refinished cabinet doors in satin white and natural wood accents”
},
{
“@type”: “ImageObject”,
“url”: “https://res.cloudinary.com/dmboo1nu1/image/upload/v1780366209/ai-images/v1o9cvjhih05k5fwy9ta.png”,
“width”: 1200,
“height”: 630,
“caption”: “HVLP spray gun applying satin finish during kitchen cabinet refinishing in Toronto”
},
{
“@type”: “ImageObject”,
“url”: “https://res.cloudinary.com/dmboo1nu1/image/upload/v1780366208/ai-images/alg11socixg6tn2l3pue.png”,
“width”: 1200,
“height”: 630,
“caption”: “Installing soft-close hinges during cabinet refacing as part of a Toronto kitchen upgrade”
}
],
“speakable”: {
“@type”: “SpeakableSpecification”,
“cssSelector”: [“.featured-snippet-answer”, “.faq-answer”]
},
“datePublished”: “2026-06-02”,
“dateModified”: “2026-06-02”,
“mainEntityOfPage”: {
“@type”: “WebPage”,
“@id”: “https://paint2decor.com/blogs”
},
“keywords”: [“kitchen cabinet refinishing contractors”, “cabinet refacing”, “Toronto”, “HVLP”, “spray painting”]
}
{
“@context”: “https://schema.org”,
“@type”: “FAQPage”,
“mainEntity”: [
{
“@type”: “Question”,
“name”: “How do I know if refinishing will work for my cabinets?”,
“acceptedAnswer”: {“@type”: “Answer”, “text”: “If your boxes are sturdy and doors aren’t swollen or cracked, refinishing is often ideal. You’ll keep the layout, get a factory-like spray finish, and finish in days. If doors are damaged or you want a new style, refacing may be the better fit.”}
},
{
“@type”: “Question”,
“name”: “What’s different about a pro spray finish versus brushing?”,
“acceptedAnswer”: {“@type”: “Answer”, “text”: “Pros use HVLP sprayers and controlled environments to lay down even, thin coats with minimal texture. Brushing can leave marks and uneven sheen. A booth-sprayed door with on-site sprayed boxes produces a consistent, durable look.”}
},
{
“@type”: “Question”,
“name”: “How long before I can use my kitchen normally?”,
“acceptedAnswer”: {“@type”: “Answer”, “text”: “Most kitchens are functionally back within a few days. Finishes continue to harden for about a week, so use doors and drawers gently and avoid harsh cleaners at first. Your contractor should provide a simple care sheet.”}
},
{
“@type”: “Question”,
“name”: “Do I need to replace hardware when refinishing?”,
“acceptedAnswer”: {“@type”: “Answer”, “text”: “Not always. Many homeowners keep existing pulls. However, soft-close hinges and new slides add daily comfort. If hole spacing changes with new pulls, your finisher can fill and re-drill for clean alignment.”}
},
{
“@type”: “Question”,
“name”: “What’s the difference between refinishing and refacing?”,
“acceptedAnswer”: {“@type”: “Answer”, “text”: “Refinishing keeps your doors and boxes but renews the coating. Refacing replaces doors/drawers and applies matching skins to boxes. Choose refinishing for color/sheen updates on sound doors, and refacing for a new door style or when fronts are worn.”}
}
]
}
{
“@context”: “https://schema.org”,
“@type”: “ProfilePage”,
“mainEntity”: {
“@type”: “Person”,
“name”: “Masoud Kakar”,
“url”: “https://paint2decor.com/blogs”,
“description”: “Toronto-based cabinetry refinishing specialist creating durable, factory-level finishes for kitchens and bathrooms across the GTA.”,
“image”: “https://paint2decor.com/wp-content/uploads/2022/03/website-1.png”,
“sameAs”: []
}
}