
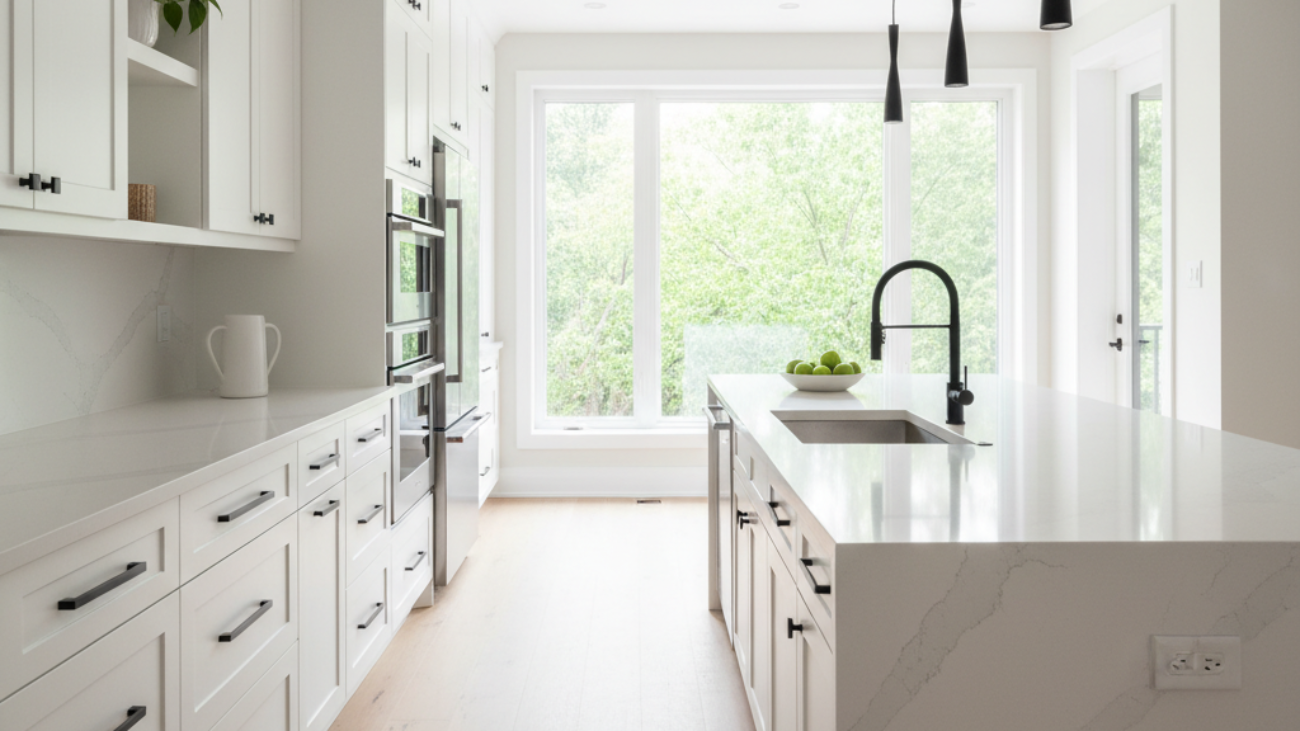
Resurfacing kitchen cabinets is the process of renewing cabinet exteriors through refinishing, refacing, or spray-painting to achieve a like-new look without replacing boxes. In York, Toronto (2710 St Clair Ave W), Paint2decor INC specializes in this work, helping homeowners modernize kitchens faster with durable, professional finishes that align with current design trends.
By Paint2decor INC · Last updated: May 22, 2026
Your 2026 Guide to Resurfacing Kitchen Cabinets
This complete guide explains what cabinet resurfacing includes, when to choose refinishing vs refacing, and how pro spray systems deliver a factory-grade finish. You’ll learn the step-by-step workflow we use in Toronto homes and get practical checklists, tool tips, and local planning advice for York.
Homeowners often use “resurfacing” to describe multiple approaches: sanding and coating (refinishing), new doors/veneers (refacing), or professional spray painting. We cover all three, with clear definitions, benefits, and best-fit scenarios—grounded in how Paint2decor INC executes projects across Toronto and the GTA.
At a Glance
- Resurfacing can mean refinishing, refacing, or spray painting—each has different scope and outcomes.
- Choose based on cabinet condition, style goals, and timeline; boxes must be structurally sound.
- Professional HVLP spray systems and controlled curing create durable, uniform results.
- Expect a clean site setup, labeled doors, dust control, and a staged workflow to minimize disruption.
- Internal resources for deeper dives include our cabinet refinishing guide and cabinet respraying walkthrough—both map directly to how we work in Toronto homes.
What Is Cabinet Resurfacing?
Cabinet resurfacing refers to renewing visible cabinet surfaces without replacing sound boxes. It includes refinishing (prep + coatings), refacing (new doors and veneer), and professional spray painting. In York and the broader Toronto area, it’s a faster, cleaner way to modernize kitchens while keeping existing layouts.
Resurfacing focuses on doors, drawer fronts, face frames, and end panels. Cabinet boxes remain if they’re square, dry, and robust. The three common tracks are:
- Refinishing: Clean, sand, prime/seal, and apply high-performance coatings.
- Refacing: Replace doors/drawer fronts and add matching veneer to frames/sides.
- Spray painting: Professional HVLP application for a smooth, uniform finish.
For example, Toronto homeowners with high-quality oak boxes often choose refinishing to highlight grain with modern color, while those craving a door-style change (e.g., slab to Shaker) lean to refacing. When surfaces are solid but color is outdated, spray-applied coatings offer a crisp, factory-like update.
Local considerations for York
- Plan door pickups and returns around neighborhood traffic near Jane St at St Clair Ave West to keep install days efficient.
- Toronto’s spring humidity swings affect curing; we target 65–75°F and relative humidity under 60% inside the home during coating.
- If you’re scheduling around family time at Smythe Park, we can stage work so your kitchen remains partially usable between phases.
Why Resurfacing Matters in 2026
Resurfacing kitchen cabinets preserves solid boxes while delivering a modern look and durable finish. It reduces demolition, shortens timelines, and lets you redirect effort into high-impact upgrades like counters, lighting, and hardware—ideal for Toronto homeowners balancing design ambition with everyday schedules.
Here’s the thing: most kitchens have good bones. Boxes are often plywood or high-quality particle board and remain square for decades. Resurfacing leverages that structure. Rather than disrupt plumbing or electrical, we focus on visible surfaces and hardware that you touch every day.
- Less disruption: Doors and drawers are labeled and removed; your layout stays intact.
- Design flexibility: Change color, sheen, and door style (with refacing) without moving walls.
- Material efficiency: Keep serviceable boxes out of landfills and upgrade only what you see.
- Durability: Pro primers, crosslinking topcoats, and controlled cure protocols improve wear resistance.
In our experience across the GTA, homeowners appreciate that resurfacing compresses active workdays. A typical mid-size kitchen has 20–35 doors and 8–15 drawers; a well-planned workflow keeps you cooking between phases and limits dust by isolating zones and using extraction.
How the Resurfacing Process Works (Step-by-Step)
A proven resurfacing workflow starts with inspection and labeling, then deep cleaning, sanding, priming/sealing, and pro spraying of doors and frames. Final steps include reassembly, hardware install, and cure checks. Every phase manages dust, adhesion, and color uniformity.
1) Assessment and Planning
We confirm boxes are dry, square, and well fastened. Soft-close upgrades, hinge hole patterns, and door style goals guide whether refinishing or refacing is the better path.
- Count doors/drawers and note sizes; most Toronto kitchens fall in the 25–45 piece range.
- Check for water stains near sinks/dishwashers; remediate before coatings or veneer.
- Select sheen (matte, satin, or semi-gloss) and color families that coordinate with counters.
- For style changes, see our cabinet refacing overview.
2) Site Protection and Labeling
We map the kitchen, label every component, and create a workstation. Registers, lights, and adjacent rooms are masked to manage overspray and dust.
- Door edges are marked to preserve hinge orientation.
- Zip walls and tack mats reduce dust migration.
- Floor protection extends beyond the work zone to traffic paths.
3) Degreasing and Surface Prep
Adhesion starts with a spotless substrate. We remove oils with a dedicated cleaner, then scuff-sand to the right profile for primer lock.
- Expect targeted sanding at 120–150 grit on doors and frames.
- Glossy factory finishes receive extra abrasion with fine pads for uniform dulling.
- Dust extraction keeps surfaces and air clear before priming.
4) Priming, Sealing, and Repairs
We use bonding primers and sealers suitable for wood species and prior finishes. Open grain and minor dings are addressed now for a smooth topcoat.
- Grain fillers and putties level defects; multiple thin passes beat heavy coats.
- Primer color is tuned to topcoat for optimal coverage and color accuracy.
- Dry times are monitored with temperature and humidity checks.
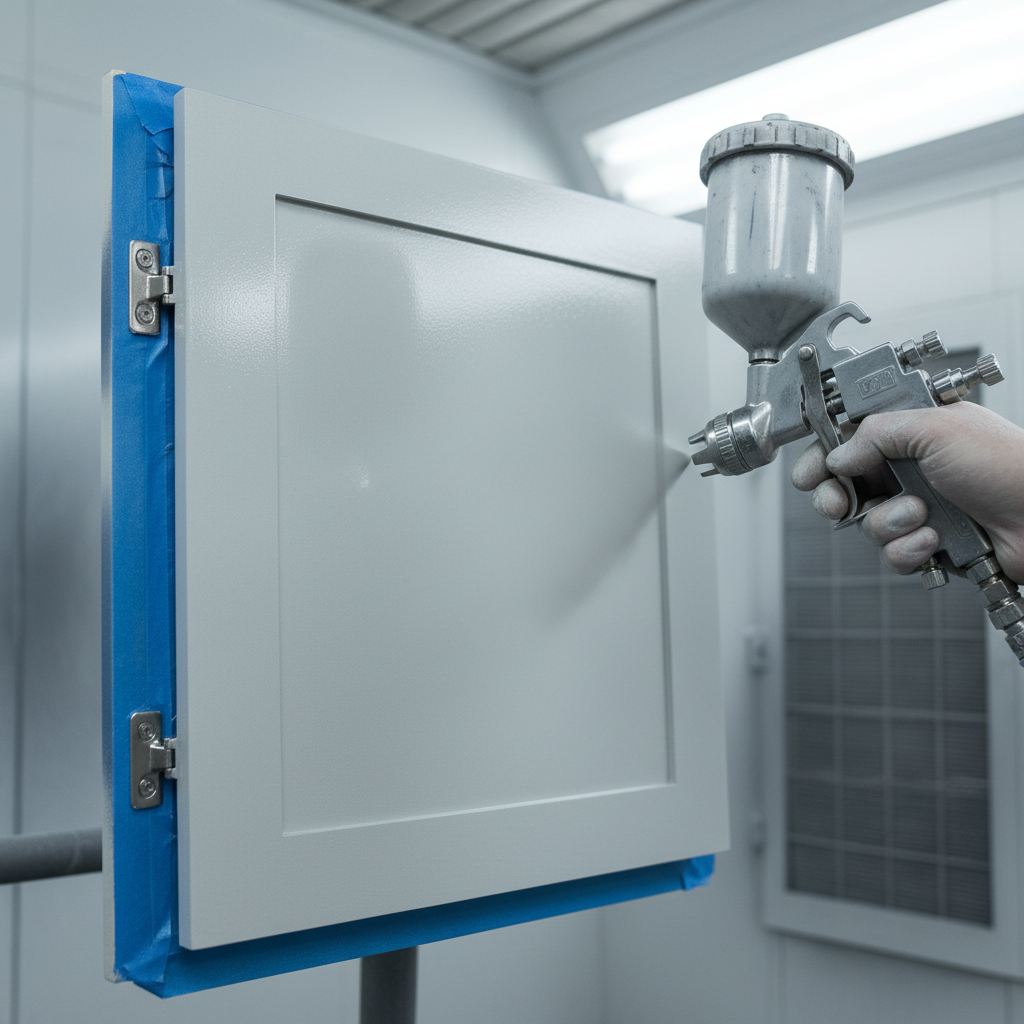
5) Professional Spraying and Curing
Doors travel to a controlled spray environment. Frames and fixed panels are sprayed onsite with HVLP systems for a consistent film build.
- HVLP gun setups typically use 1.3–1.5 mm tips for cabinet coatings.
- We target 2–4 mils per coat and allow proper flash between passes.
- Cure integrity is checked before stacking, wrapping, and transport.
6) Reassembly and Hardware Upgrades
After coatings reach handling strength, we reinstall components, adjust reveals, and add hardware. This is where the transformation becomes real.
- Soft-close hinges and slides add daily comfort; hole patterns are aligned with jigs.
- Knobs and pulls are measured consistently with templates.
- Final fit checks ensure doors sit flat and swing cleanly.

Types of Resurfacing: Refinishing vs Refacing vs Spray Painting
Choose refinishing when your boxes and door style work but color and sheen need updating. Choose refacing when you want a new door profile or to cover heavy wear. Choose professional spray painting to refresh sound surfaces with a clean, uniform factory-like finish.
Each path serves different goals. Here’s a quick comparison you can skim, then we’ll unpack where each shines in real Toronto kitchens.
| Approach | What Changes | Best When | Finish Characteristics | Typical Timeline |
|---|---|---|---|---|
| Refinishing | Color, sheen, surface texture | Boxes solid; you like existing door style | Durable sprayed coatings; smooth feel | Several working days with curing windows |
| Refacing | New doors/drawer fronts + veneer on frames | Want a door-style change or to hide heavy wear | Factory-finished doors; cohesive veneer match | Staged: measure, fabricate, then install |
| Pro Spray Painting | New color on doors/frames | Surfaces are sound; layout and style stay | Uniform HVLP finish; precise color control | Compressed on-site time; booth work offsite |
If you’re weighing a door profile shift—say, to a clean Shaker—our Toronto refacing page outlines how we measure, fabricate, and apply matching veneers. If your doors are sturdy but dated in color, our refinishing process details primers, topcoats, and cure standards we use across the GTA.
Best Practices for a Factory-Grade Finish
Factory-grade resurfacing depends on substrate cleanliness, controlled sanding profiles, compatible primers/topcoats, climate control during cure, and meticulous reassembly. Consistency across these checkpoints is what turns a good job into a great one.
- Adhesion is non-negotiable: Deep-clean first; sand to a uniform profile; choose primers designed for cabinets.
- Thin, even coats: Build film in passes; watch for sags at edges and profiles.
- Climate control: Maintain stable temperature and humidity through cure windows.
- Hardware planning: Pre-plan hole patterns; templates prevent crooked pulls.
- Color sampling: Spray sample doors in your lighting before full production.
Want design inspiration? Our updating oak cabinets primer shows how grain, color, and sheen read differently under warm and cool bulbs. For full makeovers beyond cabinets, scan this kitchen cabinets makeover overview to coordinate counters, backsplash, and fixtures holistically.
Tools, Materials, and Resources
A professional resurfacing kit includes HVLP spray systems, cabinet-grade primers and topcoats, dust extraction, precision sanding, and door/hinge jigs. Clear labeling, part maps, and quality-control checklists keep complex kitchens organized and on track.
Core tools
- HVLP sprayer with 1.3–1.5 mm tip set for cabinet coatings.
- Random-orbit sander, 120–220 grit discs, and detail pads.
- Extraction vacuum with HEPA filter and antistatic hose.
- Drying racks, padded rails, and separators for fresh doors.
- Drill/driver, hinge jigs, and pull templates for reassembly.
Materials
- Bonding primer compatible with existing finishes.
- Cabinet-grade topcoats with strong block resistance and mar resistance.
- Fillers and putties for dings; grain filler when needed.
- Masking paper, film, and clean-release tapes; zip walls.
For a plain-language overview of door construction differences, see this industry explainer on standard vs. custom doors. If you’re comparing replacing vs refacing from a planning perspective, this external primer on replacing vs refacing considerations can help you frame scope before we tailor a solution. For spray process basics, an overview of cabinet painting steps offers extra context.
Thinking about resurfacing your kitchen? If your boxes are solid, you likely qualify. Let’s confirm with photos and a brief call. Our Toronto team can map options—refinishing, refacing, or spray painting—and stage work around your schedule.
Book a quick consultation to get actionable recommendations.
Real-World Examples from Toronto Homes
From grainy oak to clean white, from slab to Shaker, these mini-scenarios show how refinishing, refacing, and spray painting solve different problems—without touching plumbing or layout. Each example comes from common GTA home situations.
Scenario A: Keep the door style, change the color (Refinishing)
A York homeowner loved their sturdy maple doors but wanted a brighter, contemporary look. We degreased, sanded to a consistent profile, applied a bonding primer, then sprayed a satin light gray. Soft-close hinges and matte black pulls finished the update. The existing counters suddenly felt new again.
- Why it worked: High-quality doors + desire for a color refresh only.
- What to watch: Uniform sanding and careful edge coverage on bevels.
Scenario B: Change style and color, keep boxes (Refacing)
A Toronto semi needed a sharper style. We measured for Shaker doors, matched veneer to frames, and installed new soft-close hardware. Color-matched factory doors blended seamlessly with veneered frames, delivering a cohesive, made-for-the-space appearance.
- Why it worked: Owners wanted a profile update without shifting layout.
- What to watch: Consistent reveals, veneer alignment at corners, and hinge calibration.
Scenario C: Fast refresh before hosting (Spray painting)
Hosting in two weeks? We removed doors for booth spraying while prepping frames on-site. The uniform satin finish and new pulls transformed the space, and the family kept their routine with a staged, dust-managed workflow.
- Why it worked: Sound surfaces + compressed on-site time + organized staging.
- What to watch: Schedule coordination for pickup/return, and traffic flow near Jane St at St Clair Ave West.
Maintenance and Longevity Tips
A great finish deserves simple care: gentle cleaners, soft cloths, and felt bumpers. Avoid harsh abrasives and give fresh coatings time to reach full cure before heavy use. Occasional hinge tweaks keep alignment crisp year after year.
- Use non-abrasive, pH-neutral cleaners and microfiber cloths.
- Add felt bumpers to reduce door-to-frame contact noise and wear.
- Wipe spills promptly around sinks and dishwashers to protect edges.
- Check hinge screws annually; small adjustments prevent sagging.
Planning a broader refresh? Our kitchen cabinets makeover guide can help sequence counters, backsplash, and lighting so your resurfaced cabinetry remains the design anchor for years.
Common Mistakes to Avoid
Most resurfacing disappointments trace back to poor prep, wrong primers, uncontrolled climate, or rushed reassembly. Tight processes and patient curing make the difference between “fresh paint” and a factory-grade finish.
- Skipping degreasing: Oils kill adhesion. Clean until white cloths stay clean.
- Under-sanding gloss: Shiny surfaces need a uniform scuff for primer lock.
- Heavy coats: Runs and orange peel appear when film builds too fast.
- Ignoring climate: Temperature and humidity shifts affect leveling and cure.
- DIY hardware holes: Templates and jigs prevent crooked knobs and pulls.
Frequently Asked Questions
These concise answers cover the most common homeowner questions about resurfacing kitchen cabinets in Toronto—what qualifies, timelines, durability, and how to choose between refinishing, refacing, and pro spray painting.
What does “resurfacing kitchen cabinets” include?
It’s an umbrella term for refinishing (prep + new coatings), refacing (new doors and veneer on frames), and professional spray painting. The boxes stay if they’re solid, square, and dry. We choose the best path after inspecting your cabinets and clarifying your style goals.
How long does the process take?
Timelines vary by kitchen size and method. Many projects stage over several working days, with offsite door spraying and onsite frame work to reduce disruption. We plan around family schedules and local logistics in York to keep the kitchen as usable as possible.
When is refacing better than refinishing?
Choose refacing when you want a new door style (like Shaker) or need to cover heavy wear on frames and ends. If your door style still works and you mainly want a color and sheen update, refinishing or pro spray painting is often the cleaner, faster route.
Do I need to replace my countertops first?
Not necessarily. If your counters are staying, we protect them and color-match cabinets accordingly. If you’re upgrading counters, we coordinate sequence so door spraying and reassembly align with templating and install windows for a seamless finish.
Key Takeaways
Resurfacing modernizes your kitchen without replacing good boxes. Pick refinishing for color changes, refacing for new styles, and pro spray painting for a fast, uniform finish. Tight prep, pro primers, and climate control are what make results last.
- Resurfacing spans refinishing, refacing, and pro spray painting—choose based on goals and condition.
- Sound boxes are the foundation; layout stays, disruption drops.
- HVLP spraying and controlled curing deliver the most uniform, durable finishes.
- Plan logistics around York traffic and household schedules for smooth install days.
Next Steps
If your cabinets are structurally sound, resurfacing is likely feasible. Share a few photos, and we’ll confirm whether refinishing, refacing, or spray painting best fits your space, timeline, and style goals—then map a clean, efficient plan for your Toronto home.
- Review our cabinet refinishing process for color-first makeovers.
- Explore kitchen cabinet refacing if you want a new door profile.
- Skim our respraying guide for uniform, factory-like finishes.