
Bathroom cabinet refinishing is the professional renewal of your existing vanity by cleaning, repairing, sanding, priming, and recoating doors, drawers, and boxes for a durable, like‑new finish. For York homes near 2710 St Clair Ave W in the Toronto metro, it’s a fast, low‑disruption way to modernize a bath while preserving your layout.
By Masoud Kakar — Paint2decor INC • Last updated: May 21, 2026
Overview: At a Glance
Bathroom cabinet refinishing renews what you already own—no demolition—by spraying high‑adhesion primers and durable enamels over sound doors and boxes. You keep your vanity footprint and storage, update color and sheen, and finish faster than replacement. This guide explains when it fits, how it works, and how to get pro‑level results.
Here’s how to use this complete guide quickly without missing critical steps or pro insights.
- What refinishing is, why it matters, and how it compares to refacing or replacement
- Step‑by‑step process used by professional refinishers in occupied homes
- Prerequisites to confirm your vanity is a strong candidate
- Methods, coatings, colors, and sheens that last in humid bathrooms
- Best practices and a troubleshooting playbook for common finish issues
- Local planning tips for York and the greater Toronto area
What Is Bathroom Cabinet Refinishing?
Bathroom cabinet refinishing is a surface‑renewal process that cleans, repairs, scuff‑sands, primes, and sprays new topcoats on your existing vanity. It preserves your cabinet boxes and layout while upgrading color, sheen, and durability—without the demolition, dust, or plumbing disruption of full replacement.
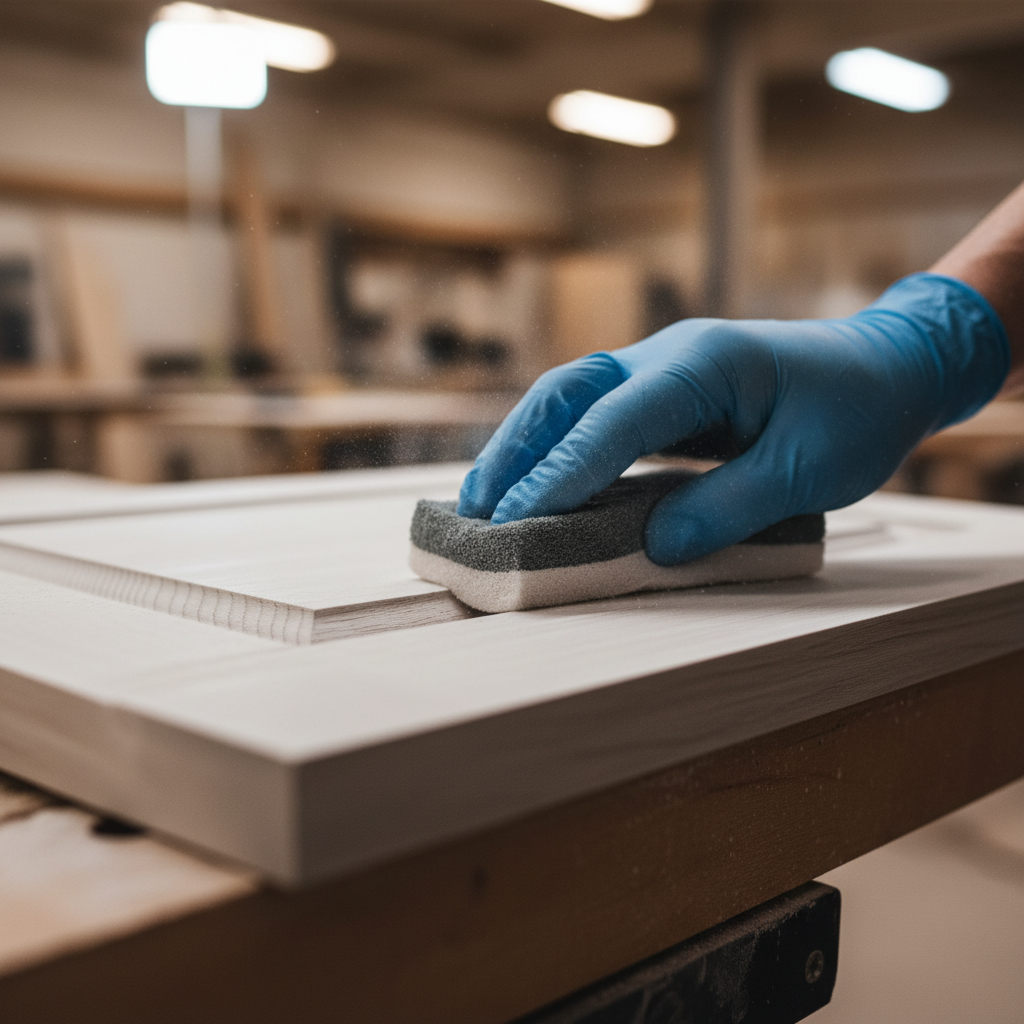
Think of refinishing as a furniture‑grade paint system tailored for bathrooms. Pros remove doors and drawers, label hardware, and deep‑clean to strip soap film and residues. They repair dings, stabilize seams, and sand with 120–180 grit to create “tooth” for primer. A bonding primer grips slick factory coatings; between coats, 220–320 grit de‑nibbing yields that silky smooth touch.
- Core actions: Degrease, repair, sand, prime, sand again, spray 2–3 topcoats, cure, reassemble.
- Typical materials: Quality degreasers, wood filler, caulk, bonding primer, and waterborne or catalyzed enamel.
- Performance targets: Smooth film build (~3 thin coats), stable sheen (satin/semi‑gloss), strong adhesion (no peeling).
In our experience across Toronto homes, this approach reliably upgrades older vanities—especially oak, maple, and paint‑grade MDF—while keeping schedules tight and bathrooms functional.
Why Bathroom Cabinet Refinishing Matters
Refinishing matters because it modernizes style, improves moisture resistance, and avoids demolition. For York and Toronto homeowners, it’s a faster, cleaner path to an updated bath, extending cabinet life and letting you reinvest saved time and effort into counters, lighting, or hardware.
The environmental upside is real: you reuse solid boxes rather than sending them to landfill. Adhesion‑first prep plus moisture‑tough enamels help vanities stand up to daily steam and frequent wipe‑downs. Many GTA homeowners pair refinishing with small upgrades—soft‑close hinges, matte black pulls, new mirrors—for a big visual lift.
- Speed and access: Because plumbing and layout stay intact, projects often finish in days, not weeks.
- Design control: You can shift from yellowed finishes to crisp satin white or warm greige with consistent sheen.
- Durability focus: Modern waterborne enamels resist blocking, fingerprints, and cleaners when applied in thin, even coats.
How Bathroom Cabinet Refinishing Works (Step‑by‑Step)
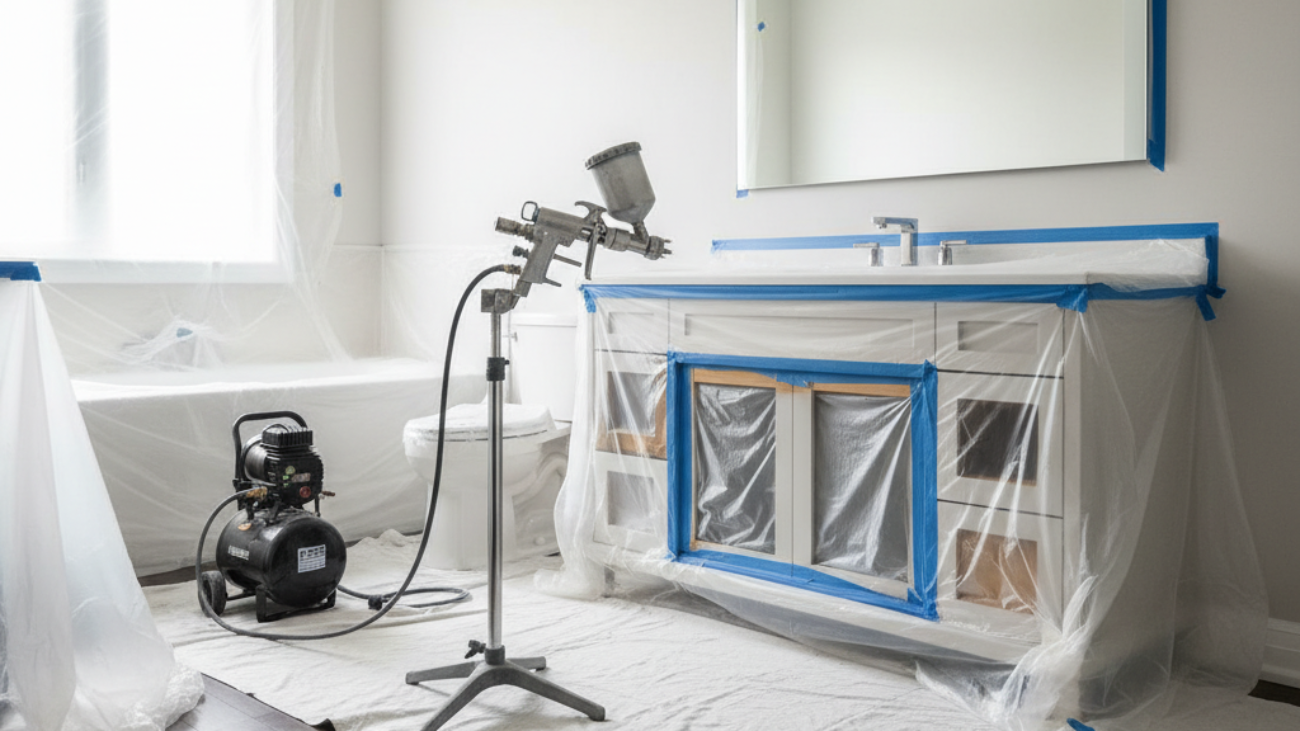
Pros follow a strict sequence: protect the room, remove and label pieces, deep‑clean, repair, scuff‑sand, prime, sand again, spray 2–3 topcoats, cure, and reassemble. Each step builds adhesion and smoothness, producing a durable, furniture‑grade finish that handles bathroom humidity.
- Protect and isolate (30–60 minutes): Mask floors, walls, and vents; install plastic “doors” to contain dust and overspray.
- Remove and label (20–40 minutes): Doors/drawers come off; hinges and screws go into labeled bags for perfect reassembly.
- Degrease (15–30 minutes): Soap film hides around pulls and at 0–4 inches from sink rims; remove it fully.
- Repair and stabilize (30–90 minutes): Fill dings, caulk hairline seams, tighten hinges; check that gaps are even.
- Scuff‑sand (45–90 minutes): 120–180 grit for “tooth”; vacuum and tack‑cloth to a dust‑free surface.
- Prime (1 coat): A high‑bond primer grips slick UV‑cured factory films and woods with tannins (oak, mahogany).
- De‑nib sand (220–320 grit): Light passes remove nibs without cutting through edges.
- Spray topcoats (2–3 coats): HVLP application lays down thin, even films with consistent sheen across doors and rails.
- Cure (hours to days): Handle when “safe‑dry,” but treat gently for several days while full hardness develops.
- Reassemble and adjust: Align doors to even reveals; install new pulls and soft‑close hardware if desired.
Sequencing is everything. Skip cleaning and you’ll see fisheyes; rush cure and you’ll imprint the film. A disciplined checklist keeps the finish uniform from stile to stile and edge to edge.
Before You Start: Prerequisites and Fit
Your vanity is a strong refinishing candidate when the boxes are structurally sound, doors are stable, and you like the current layout. Skip refinishing if there’s active water damage, swollen MDF, or failing substrates that won’t hold a new coating reliably.
Run this quick fitness check before planning colors or hardware.
- Green‑light signs: Solid wood or stable MDF doors; intact boxes; minor cosmetic wear; hinges secure; drawer slides smooth.
- Yellow flags: Past leaks; dark stains near sink bases; active humidity above ~60%; doors that feel “spongy.”
- Red‑light issues: Swollen or crumbling MDF, delaminating thermofoil near sink rims, mold on cabinet backs, rot at toe‑kicks.
- Layout satisfaction: If storage and plumbing layout work today, refinishing preserves that convenience.
If you also want to change door style (for example, from raised panel to shaker), refacing may fit better. Our cabinet refacing guide explains how new doors and matching skins transform the look while reusing good boxes.
Methods, Coatings, and Finish Options
For bathrooms, pair a bonding primer with durable, low‑odor waterborne enamel or a catalyzed system. HVLP spraying produces a smooth, brush‑free film. Satin and semi‑gloss sheens balance cleanability and touch‑up ease while hiding small surface variations.
Finish systems are the engine of longevity. Waterborne enamels dry fast, block sticking, and clean easily—great in rooms that cycle from 40% to 65% RH. Catalyzed coatings cure harder and resist chemicals but demand strict handling and ventilation. Either way, thin, even coats perform better than heavy passes.
- HVLP spraying: Even atomization minimizes orange peel; aim for consistent gun distance (~6–8 inches).
- Waterborne enamel: Low odor; strong blocking resistance; excellent for occupied homes and condos.
- Catalyzed systems: Extra hardness and chemical resistance; follow safety protocols closely.
- Sheens: Satin (soft glow that hides micro‑defects) or semi‑gloss (higher reflectivity, easy wipe‑downs).
Door style still matters. If you want to switch from raised panels to clean shaker or slab, refacing is usually the better route. See how door construction impacts look and maintenance in this overview from RTA & RTI Cabinets.
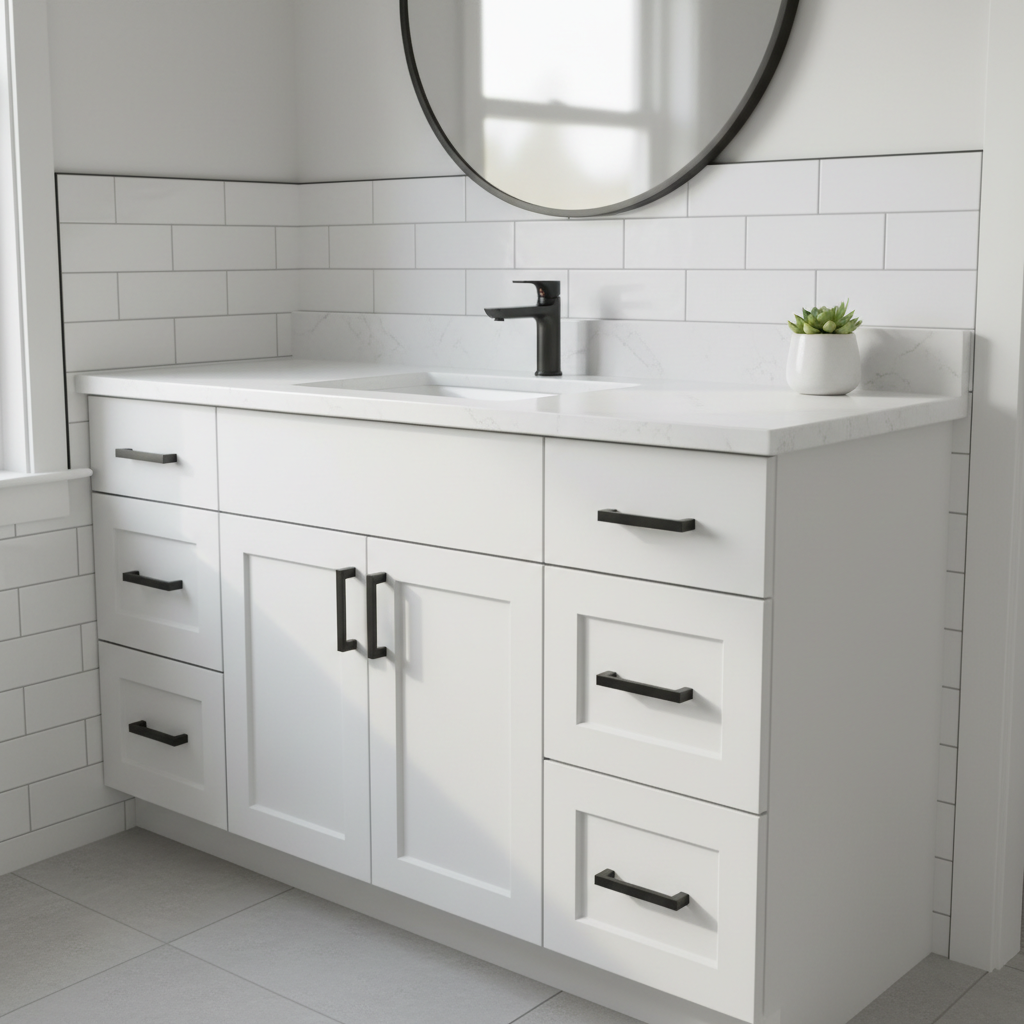
Color trends move in cycles. In 2026, we’re spraying a lot of satin white, warm gray, and deep charcoal on Toronto vanities, paired with matte black or brushed brass hardware. For whole‑room cohesion, match sheen levels across vanity, mirror frame, and any built‑ins.
Best Practices That Extend Finish Life
Meticulous cleaning, mechanical scuffing, a true bonding primer, controlled environment, and thin spray coats deliver the longest‑lasting results. Handle pieces only at safe‑dry, then allow several days of cure before heavy bathroom use to avoid imprints and print‑through.
- Clean twice: Degrease before sanding to strip residues; wipe again after sanding to remove dust.
- Edge insurance: Add one extra light pass to door edges; they take the most wear from hands and towels.
- Film build: 2–3 thin topcoats outperform one heavy coat; aim for uniform coverage at stiles and rails.
- Climate control: Keep temperature and RH stable; bathrooms swing quickly after showers.
- Hardware prep: Plug holes with toothpicks or cone plugs so threads stay clean.
- Labeling: Number doors/drawers; consistent reassembly keeps reveals even within ±1–2 mm.
For homeowners planning ahead, our refinishing preparation checklist outlines room protection, access, and ventilation so work starts smoothly on day one.
Tools, Materials, and Helpful Resources
Successful refinishing relies on clean tools, fine abrasives, bonding primers, and durable topcoats—plus good PPE and airflow. Organize doors and hardware with bins and labels. When unsure, consult manufacturer data sheets and safety guidance for application windows and cure times.
- Prep gear: Degreaser, scrub pads, wood filler, caulk, masking tape/plastic, drop cloths.
- Abrasives: 120–180 grit for scuffing; 220–320 for between coats; sanding blocks for edges.
- Application: HVLP sprayer with correct needle/nozzle, strainers, tack cloths, mixing sticks.
- Coatings: Bonding primer + waterborne enamel or catalyzed finish; match sheen across pieces.
- PPE: Respirator, nitrile gloves, safety glasses, hearing protection; keep a first‑aid kit nearby.
- Airflow: Box fan exhausting to a window; keep negative pressure to reduce dust migration.
Want a deeper dive into pro‑level spraying in the kitchen too? Explore our professional kitchen cabinet painting guide for compatible shop and onsite workflows.
Troubleshooting: Fixes for Common Refinishing Issues
Most finish problems trace back to prep or environment. Address fisheyes by eliminating contamination, stop tannin bleed with a stain‑blocking primer, and prevent peeling with thorough scuff‑sanding and the correct bonding system—then honor cure times before reassembly.
- Peeling/poor adhesion: Increase mechanical scuff; switch to a higher‑bond primer; allow longer primer dry time.
- Tannin bleed (oak/mahogany): Use a dedicated stain‑blocker; apply two thin coats and extend dry intervals.
- Fisheyes/craters: Remove silicones/oils completely; if allowed, add fisheye eliminator per spec.
- Orange peel/brush marks: Adjust viscosity and air pressure; apply thinner coats; maintain 6–8 inch gun distance.
- Dust nibs: Improve containment and filtration; de‑nib with 320 grit before the next coat.
- Print‑through: Avoid stacking or leaning doors until full safe‑handle; give several days before heavy use.
Keep a sacrificial “test door.” Small tweaks to pressure, tip size, or room airflow on that panel can save hours across the full set.
Case Studies and Real‑World Examples (Toronto Area)
From water‑worn oak to yellowed factory films, refinishing restores style without changing layout. These mini case studies from York and Toronto homes show how spray‑applied systems deliver smooth, durable results while families keep daily routines on track.
- York shaker refresh: A late‑1990s oak vanity near St Clair Ave West got stain‑blocking primer and satin white enamel; matte black pulls completed the look.
- Condo glow‑up: Glossy thermofoil doors failed near a sink. We replaced with paint‑grade MDF and sprayed a warm gray; humidity management solved the root cause.
- Family bath rescue: A maple vanity dulled from constant steam. After setting a dehumidifier and refinishing, wipeability and sheen returned.
- Powder room polish: Slab‑style doors in deep charcoal paired with brushed brass pulls modernized a tight space without moving plumbing.
- Bungalow blend: Refinishing a small vanity and adding soft‑close hinges reduced slammed‑door wear; edges got an extra light pass for longevity.
Each scenario avoided demolition and let clients invest energy into lighting, mirrors, and textiles—high‑impact touches that complement a freshly sprayed vanity.
York & Toronto Home Tips for a Smooth Project
Plan refinishing around weather and building access. Choose low‑odor systems for condos, schedule during drier weeks, and coordinate elevator/loading logistics if doors travel to a spray shop. Local planning makes projects smoother and keeps bathrooms usable.
Local considerations for York
- Plan site protection and staging if you’re close to the Toronto Public Library – Daniel G. Hill Branch where event days can change foot traffic and parking.
- Humidity spikes after summer storms can slow drying—run ventilation or a dehumidifier to keep coatings within spec.
- For homes near Jane St at St Clair Ave West, arrange clear access windows so doors can be transported safely without delays.
Curious about timelines? See our notes on scheduling and sequencing in how long cabinet refinishing takes for typical home projects.
Get a pro assessment: Not sure whether to refinish, reface, or replace? We’ll evaluate adhesion risks, humidity patterns, and door construction, then recommend the route that will last. Explore options like cabinet respraying methods to see how our spray systems adapt room‑to‑room.
Bathroom Cabinet Refinishing: Frequently Asked Questions
Homeowners ask about durability, timing, odors, and color choices. With sound substrates and quality coatings, a refinished vanity stands up to daily use. Expect staged access during work, minimal odors from modern waterborne enamels, and color options that align with current Toronto trends.
How long does a refinished vanity last?
With thorough prep and durable coatings, a refinished bathroom vanity serves reliably for years. Gentle, non‑abrasive cleaners, soft‑close hardware, and steady ventilation extend finish life.
Can I change the door style or just the color?
Refinishing changes color and sheen. If you want shaker or slab instead of your current profile, refacing is smarter—new doors and a matching veneer skin on the boxes keep timelines tight.
Will there be strong odors during the work?
Modern waterborne enamels are low‑odor compared to older solvent systems. With masking and active ventilation, most homeowners remain comfortable at home during the project.
How should I prep my bathroom before you arrive?
Clear counters and drawers, remove personal items, and plan alternate sink access. Ensure one openable window or an exhaust route for clean airflow. Our team will bring masking, drop cloths, and ventilation aids.
What colors are popular for 2026?
Satin white, warm grays, and moody charcoals are leading bathroom choices. Matte black or brushed brass hardware pairs well, and soft‑close upgrades add a polished, quiet feel.
Key Takeaways
Refinishing keeps your layout, speeds timelines, and updates style with durable, low‑odor coatings. A bonding primer, thin spray coats, climate control, and patient cure times are the pillars of long‑lasting bathroom results in York and the Toronto metro.
- Confirm substrate health; fix moisture issues before coating.
- Use bonding primer plus 2–3 thin enamel coats for durability.
- Control humidity and let finishes cure before heavy use.
- Consider refacing if you want a new door style, not just color.
Looking for visual ideas? 2026 palettes emphasize light neutrals and strong contrasts—see design trend context from this trends overview.
Related Articles on Cabinet Updates
Want to compare options or plan upgrades beyond the bathroom? These resources expand on refacing, spraying, timelines, and whole‑home cabinet makeovers so you can choose the right path for your space and schedule.
Compare surface renewal with style changes in our cabinet refacing guide, and explore whole‑home options in kitchen cabinets makeover. For spray technique specifics, read the cabinet respraying guide, and plan your sequence with refinishing timelines. Considering kitchen painting too? See our pro painting overview for compatible workflows.
Conclusion & Next Steps
Bathroom cabinet refinishing delivers a fast, durable style upgrade by renewing surfaces you already own. For York and Toronto homeowners, it’s a clean, schedule‑friendly alternative to demolition—freeing time and focus for lighting, mirrors, and small hardware upgrades.
- Verify your vanity qualifies (sound boxes, stable doors, moisture under control).
- Choose color and sheen that coordinate with your tile and countertop.
- Plan airflow and brief downtime while coatings cure to safe‑use.
Prefer a done‑for‑you approach? Paint2decor INC specializes in spray‑applied finishes that look factory‑smooth and stand up to real life in the GTA. We’ll help you decide when to refinish, reface, or replace—so your bathroom feels fresh and functions beautifully.
External context sources referenced: Altima Kitchens & Closets (trends), RTA & RTI Cabinets (door styles), Everest Plumbing (remodel benefits). Hidden note for validators.