
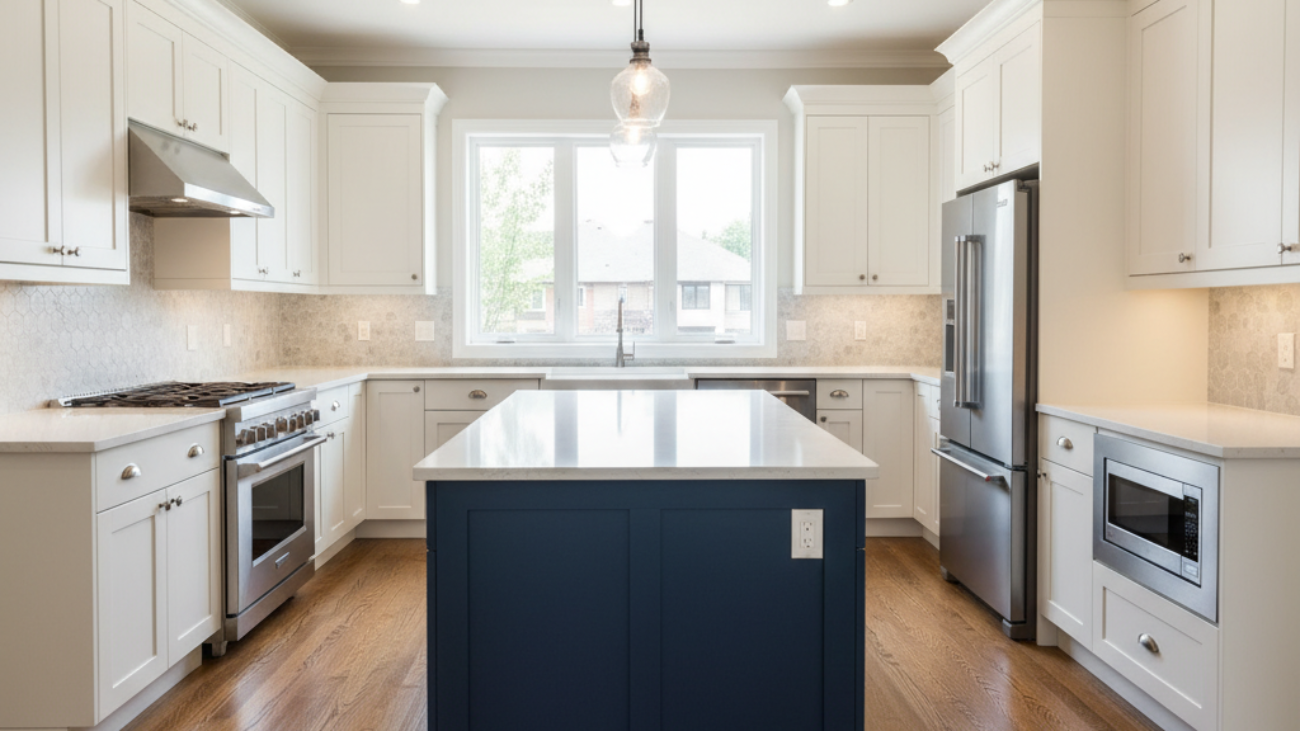
Kitchen cabinet painting service is the professional prep, priming, and spray-finishing of your existing cabinets to deliver a factory-smooth look. At our York shop on 2710 St Clair Ave W, we help Toronto-area homeowners refresh kitchens fast with durable finishes. It’s a smart alternative to replacement when boxes are solid and layouts work.
By Masoud Kakar — Paint2decor INC
Last updated: 2026-06-06
Above-Fold: Why this guide + Table of Contents
Use this complete guide to plan a professional kitchen cabinet painting service from start to finish. You’ll learn what it is, why it matters now, how projects run in York and Toronto, which methods last, and how to prepare your home. Scan the sections below and jump to what you need.
Here’s what you’ll get in a quick, actionable format:
- Plain-English definitions, timelines, and finish options
- York and Toronto–specific planning tips (seasonality, logistics)
- A 10-step pro process you can use to evaluate providers
- Refinishing vs. refacing vs. replacement comparison
- Homeowner prep checklist, maintenance tips, and FAQs
- Quick Summary
- What Is a Kitchen Cabinet Painting Service?
- Why Cabinet Painting Matters in 2026
- How a Professional Service Works
- Methods, Finishes, and Sheens
- Best Practices that Protect Your Investment
- Tools and Resources We Use
- Refinish vs. Reface vs. Replace (Comparison)
- Material-Specific Tips (Maple, Oak, Laminate)
- York & Toronto: Local Considerations
- Homeowner Prep Checklist
- Timeline and Cleanliness
- Maintenance and Care
- GTA Case Studies
- FAQ
- Conclusion & Next Steps
Quick Summary
Cabinet painting revives solid kitchen boxes with professional prep, priming, and spray application for a like-new finish. It’s faster and less disruptive than replacement, especially for York and Toronto homes with sturdy layouts. Expect careful masking, off-site door spraying, and a durable topcoat that cleans easily.
In our experience across the GTA, a well-run project follows a predictable sequence, keeps dust contained, and delivers a smooth, wipeable finish that stands up to daily cooking.
What Is a Kitchen Cabinet Painting Service?
A kitchen cabinet painting service turns your existing cabinetry into a fresh, durable focal point without replacing boxes. In York’s neighborhood homes and the Toronto metro, we remove doors, clean, sand, prime, and spray-finish components to factory-level smoothness while keeping your kitchen usable.
At Paint2decor INC, our focus is cabinetry. We serve homeowners who want a modern look without a full renovation. When boxes are sound and the layout works, painting delivers a fast transformation that aligns with our specialties: kitchen cabinet painting, refinishing, respraying, and related services.
- What it includes: surface cleaning, mechanical sanding/scuffing, high-adhesion priming, professional spray application, and careful hardware reassembly.
- What it doesn’t include: new cabinetry boxes or structural layout changes. If you need new doors/veneers, consider refacing.
- Where it happens: on-site for frames and fixed panels; off-site for doors/drawers to achieve a cleaner, controlled finish.
If you’re weighing alternatives, see our internal primer on options in kitchen cabinet painting in Toronto and this deeper dive into cabinet respraying service.
Why Cabinet Painting Matters in 2026
Painting cabinets modernizes kitchens quickly, supports home value, and reduces renovation waste. In 2026, homeowners favor durable, low-odor finishes and quicker turnarounds. When boxes are sturdy, painting is the most efficient path to a clean, updated look that pairs with new counters, backsplashes, and hardware.
Here’s the thing: lifestyle changes in 2026 continue to prioritize fast, low-disruption upgrades. A pro finish helps you enjoy your kitchen sooner and avoid the complexity of a major demo. Many Toronto homes feature quality hardwood boxes that deserve renewal rather than replacement.
- Value signal for buyers: A cohesive, neutral palette reads move-in-ready and reduces perceived “projects.”
- Lower disruption: Doors off-site for spraying while frames are finished in place with containment keeps daily life manageable.
- Design flexibility: Pair new door color with updated pulls, lighting, and paint for walls to complete the look.
For context on broader kitchen planning, this industry overview on kitchen renovation considerations illustrates how incremental upgrades like cabinets impact the overall refresh.
How a Professional Service Works (10-Step Process)
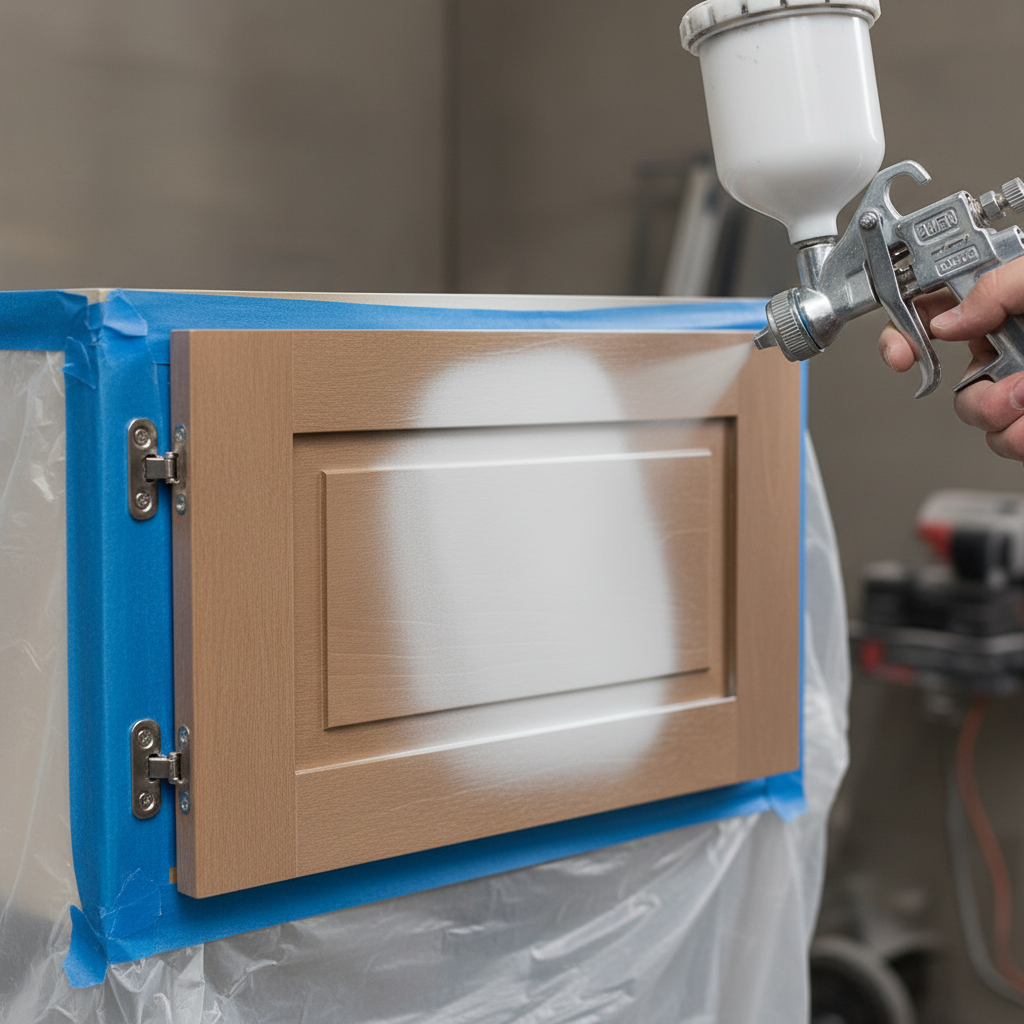
A professional kitchen cabinet painting service follows a controlled 10-step process: survey, labeling, cleaning, sanding, priming, spraying, curing, reassembly, touch-ups, and final inspection. The sequence protects surfaces, speeds workflow, and ensures a durable, factory-smooth finish across doors, drawer fronts, and frames.
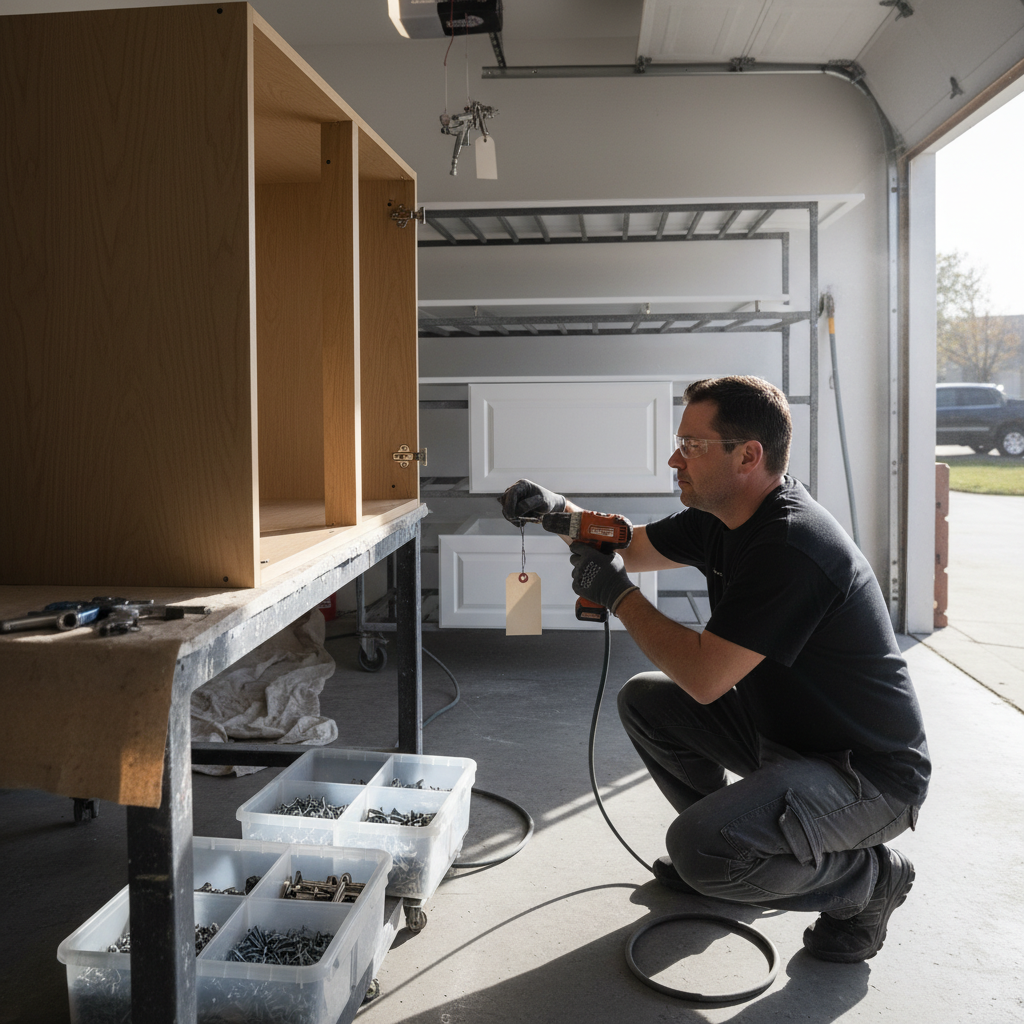
- In-home survey: Confirm box integrity, hinge conditions, and finish compatibility. Note any repairs.
- Label and remove: Doors/drawers come off, labeled for accurate reassembly, and hardware is organized.
- Degrease and clean: Kitchens accumulate oils; proper cleaning boosts primer adhesion.
- Mechanical sanding: Scuff-sand to open pores and level micro-defects for a smoother finish.
- High-adhesion primer: Bonding primers lock down old finishes and help block tannins on species like oak.
- Spray application: Doors/drawers are sprayed off-site; frames are finished on-site under dust control.
- Intermediate sand: Light sanding between coats levels nibs and enhances final smoothness.
- Color coats: Consistent mil build with professional sprayers yields a uniform sheen.
- Cure and reassemble: Allow proper cure time, reinstall doors, align reveals, and install hardware.
- Final walkthrough: Punch-list minor touch-ups and review care instructions with the homeowner.
Want a deeper view of spraying? Our kitchen cabinet spraying overview and respraying guide cover gear, nozzles, and shop setup.
Methods, Finishes, and Sheens
Spray finishing delivers the smoothest, most consistent cabinet results. Waterborne coatings are popular for low odor and fast dry, while urethane-modified formulas boost durability. Choose satin or semi-gloss sheens for wipeability. The right system depends on wood species, prior finish, and your cleaning habits.
Application methods
- HVLP spray: Factory-smooth finish, consistent film build, and superior edge coverage.
- Hybrid approach: Spray doors off-site; brush/roll frames in confined spaces where spraying is impractical.
- Brush/roll only: Viable for small touch-ups; less ideal for full kitchens where smoothness matters.
Coating categories
- Waterborne acrylic/alkyd hybrids: Fast dry, soap-and-water cleanup, and excellent leveling with modern formulas.
- Urethane-modified finishes: Added abrasion resistance for high-traffic family kitchens.
- Stain-blocking primers: Essential on species like oak or previously stained maple to limit bleed-through.
Sheen selection
- Satin: The go-to for cabinets—soft luster, forgiving on minor imperfections, easy to wipe.
- Semi-gloss: Brighter reflectance and excellent cleanability; shows surface prep more.
- Matte/eggshell: Design-forward but less wipeable; use selectively on islands or accent doors.
For a fundamentals refresher, see this step-by-step industry explainer on how to paint kitchen cabinets. Our approach mirrors the pro standards while tailoring to Toronto homes.
Best Practices that Protect Your Investment
Durable cabinet finishes come from systems thinking: clean first, sand precisely, prime for adhesion, control dust, and allow full cure before heavy use. Consistency in each step prevents early wear at high-touch points like handles and door edges.
- Deep clean before sanding: Degreasers remove oils that inhibit primer bonding.
- Control dust: Isolate the work zone, seal returns, and use HEPA vacuums for sanding cleanup.
- Labeling discipline: Bag and label hardware, hinges, and bumpers to speed accurate reassembly.
- Edge attention: Scuff and prime edges thoroughly; they see the most handling.
- Cure time matters: Light use after reassembly is fine; delay heavy scrubbing until coatings reach full cure.
If you’re comparing approaches, our professional cabinet painting guide outlines standards we hold on every project in the GTA.
Tools and Resources We Use
Pro results rely on pro tools: HVLP turbines or high-efficiency airless sprayers, fine-finish tips, bonding primers, and durable waterborne topcoats. Add organized labeling, drying racks, and dust containment to keep on-site spaces clean and kitchens functioning during work.
- Spray systems: HVLP for fine atomization; airless with fine-finish tips for large batches.
- Abrasives: Multi-grit progression (typically 120→180→220) for leveling and intercoat sanding.
- Primers: High-adhesion bonding and stain-blockers that lock old finishes and tannins.
- Topcoats: Modern waterborne hybrids with strong mar and abrasion resistance.
- Containment: Zip walls, masking films, sticky mats, and HEPA filtration where appropriate.
We keep an organized workflow so your kitchen remains as usable as possible. For a smooth-finish explainer, read our overview on repainting kitchen cupboards.
Refinish vs. Reface vs. Replace (Comparison)
Refinishing/painting reuses your existing boxes and doors for a like-new look fast. Refacing keeps boxes but replaces doors and adds veneers. Replacement builds all-new cabinets. Choose based on box condition, style goals, and timeline—not just aesthetics.
| Approach | What Changes | Speed/Disruption | Keeps Layout | When It Fits |
|---|---|---|---|---|
| Refinish/Paint | New finish on current doors/frames | Fast, minimal demo | Yes | Boxes in good shape; want color change |
| Reface | New doors + veneers | Moderate | Yes | Need new door style; boxes still solid |
| Replace | All-new cabinetry | Longest, most disruptive | Optional | Major layout change or damaged boxes |
For more on spray-specific upgrades, see our cabinet respraying service page.
Material-Specific Tips (Maple, Oak, Laminate)
Different materials demand different prep. Maple needs careful sanding for adhesion; oak requires grain management and stain-blocking; laminates need specialty primers. The right approach ensures smoothness, consistent color, and edge durability across all doors and drawer fronts.
Maple
- Scuff thoroughly; maple is dense and can be slick under previous coatings.
- Use a bonding primer to anchor color coats and limit flashing.
Oak
- Expect grain telegraphing; choose satin sheen and consider grain-filling for ultra-smooth results.
- Apply stain-blocking primer to limit tannin bleed-through.
Laminates/Melamine
- Specialty adhesion primers are non-negotiable for long-term durability.
- Edge prep is critical; soft edges can chip without proper sealing and film build.
Thinking beyond the kitchen? Our team also handles bathroom vanity and cabinet painting best practices drawn from the same pro workflow.
York & Toronto: Local Considerations
In York and the greater Toronto metro, scheduling, building access, and winter humidity shape project plans. We organize off-site spraying, protect your home with dust control, and time on-site work around your family’s schedule for minimal disruption.
Local considerations for York
- Weekday access and parking near 2710 St Clair Ave W are straightforward; we coordinate around Jane St at St Clair Ave West traffic patterns for efficient arrivals.
- Cold-season dryness can speed cure yet increase static dust; we adjust containment and workflow accordingly.
- Need a quick breather during on-site work? A short walk by Smythe Park is a nice reset while coats cure.
We’ve refined our logistics across York homes, condos, and older Toronto layouts—protecting stairwells, elevators, and shared corridors as needed.
Homeowner Prep Checklist
A little prep goes a long way: clear counters, empty top drawers and high-use cabinets, choose a staging area for doors, and plan pet/kid paths during masking. We provide labeled bins for hardware and protect floors and appliances before any sanding begins.
- Clear counters and tops of cabinets; store small appliances.
- Empty the most-used drawers and a few key cabinets to stay functional.
- Pick a staging area for door transport (garage, spare room).
- Plan pet/kid routes during masking and spraying windows.
- Confirm paint color and sheen before the first topcoat.
Ready to plan? Explore our complete cabinet painting guide for additional prep details.
Timeline and Cleanliness
Most professionally managed projects balance speed and cure time. Doors and drawers move off-site for dust-free spraying while frames are finished on-site with containment. Expect a clean workflow, organized labeling, and a tidy kitchen each day before we leave.
- Containment and masking protect floors, counters, and appliances.
- Daily cleanup keeps pathways open and kitchens usable.
- Clear communication: we map each day’s tasks so you can plan meals and routines.
To contrast cabinet updates with broader overhauls, this high-level discussion of kitchen cabinet maintenance within renovations shows why careful staging matters.
Maintenance and Care
Treat freshly finished cabinets gently for the first weeks while coatings reach full cure. Wipe with non-abrasive cloths and mild soap. Avoid harsh scouring pads, and use bumpers and soft-close hardware to reduce impact wear at edges and corners.
- Use microfiber cloths and mild, non-ammonia cleaners.
- Install felt pads or soft-close hardware to limit slams.
- Wipe spills promptly to prevent staining at seams and edges.
Good care habits extend finish life and keep sheen consistent across high-touch doors and drawers.
GTA Case Studies (Mini Examples)
Targeted cabinet painting lets you transform kitchens quickly. These mini examples show how finish choice, prep, and workflow deliver durable, designer-level results across common GTA cabinet materials and layouts.
- York shaker refresh: Solid maple doors, satin warm white, labeled hardware, off-site spray for doors—frames finished on-site. The kitchen felt brighter immediately.
- Toronto condo upgrade: Melamine doors benefited from specialty primer; satin neutral gray coordinated with quartz counters for a cohesive, modern feel.
- Family kitchen tune-up: Oak grain softened with stain-blocking primer and a satin sheen; new pulls completed the look without changing the layout.
When you’re comparing options, review our cabinet respraying service alongside cabinet painting in Toronto to match goals and timelines.
Frequently Asked Questions
These quick answers address the top questions Toronto homeowners ask about cabinet painting. Each response is direct and based on our field experience in York and across the GTA.
How do I know if my cabinets are good candidates for painting?
If boxes are sturdy, doors close properly, and there’s no major water damage or delamination, painting is usually ideal. We verify adhesion with cleaning and scuff-sanding tests and recommend refacing or replacement only if structure or veneers are compromised.
How long does a typical kitchen cabinet painting project take?
Timelines vary by kitchen size and complexity. Our workflow moves doors off-site for spraying while we finish frames on-site with dust control. This parallel process keeps your kitchen usable and shortens the overall project window.
Is spray finishing better than brushing for cabinets?
For most kitchens, yes. Professional spraying creates a smoother, more consistent finish and better edge coverage. We still brush or roll certain tight frame areas when spraying isn’t practical, but doors and drawers are best sprayed off-site in a controlled setup.
Will the new finish be durable for a busy family kitchen?
Modern waterborne hybrid coatings are tough and easy to clean. Durability depends on proper prep, strong primer adhesion, adequate film build, and allowing full cure before heavy scrubbing. With good care, finishes stay attractive and resist common wear.
What’s the difference between painting, refinishing, and refacing?
Painting/refinishing updates your existing doors and frames with new coatings. Refacing keeps boxes but replaces doors and adds veneers for a new style. Replacement builds all-new cabinets and is best when layouts change or boxes are damaged.
Conclusion & Next Steps
A professional kitchen cabinet painting service turns solid cabinetry into a fresh, durable centerpiece—without the disruption of replacement. If you like your layout, painting is the fastest path to a modern, wipeable finish that elevates daily life in your kitchen.
- Confirm your cabinets’ condition and goals (color, sheen, hardware).
- Plan for a staged workflow: off-site door spraying + on-site frame finishing.
- Adopt simple care habits to keep the finish looking new.
Ready to refresh? Explore our service pages on kitchen cabinet painting in Toronto and cabinet respraying, then reach out for a friendly walkthrough of your project.
Free walkthrough, zero pressure: If you’re in York or the Toronto metro, we’ll assess your cabinets, explain options, and map a clean, efficient plan that fits your schedule.