
Painting oak cabinets is the process of cleaning, deglossing, grain-filling, priming, and finishing oak doors and boxes to achieve a smooth, durable, modern finish. In York (2710 St Clair Ave W) and across Toronto, homeowners use this method to refresh kitchens fast without full replacement. Done right, it looks factory-made and lasts.
By Paint2decor INC • Last updated: 2026-05-18
Overview and Quick Summary
If you want a modern kitchen without replacing cabinetry, painting oak cabinets delivers a smooth, long-lasting finish by filling open grain, using a bonding primer, and applying two to three coats of cabinet-grade enamel. The best results come from controlled spray application, careful prep, and a full 21–30 day cure.
This complete guide blends pro insights with step-by-step instruction. You’ll learn preparation basics, grain control, primer selection, spray versus brush/roll methods, durability tips, and troubleshooting. We also include York/Toronto specifics and examples from real GTA kitchens.
- What “painting oak cabinets” really means and why oak needs extra prep
- Prerequisites, materials, and a realistic timeline from prep to cure
- Step-by-step method plus pro best practices for a factory-level finish
- Brush-and-roll vs HVLP spraying vs hybrid approaches (comparison)
- 11 common issues and exact fixes, from tannin bleed to orange peel
- Local considerations for York/Toronto homes and schedules
Local considerations for York
- Book pickup/drop-off timing to avoid traffic around Jane St at St Clair Ave West when we transport doors to our spray area.
- Plan for humidity swings. Aim for 40–60% relative humidity during finishing so enamel levels properly in Toronto’s shoulder seasons.
- If you need a quiet day at home, schedule onsite box work while family is out at the nearby Toronto Public Library – Daniel G. Hill Branch.
What Is Painting Oak Cabinets?
Painting oak cabinets is a refinishing method that seals oak’s open grain, blocks tannins, and coats the doors and boxes with cabinet-grade enamel. Unlike a quick paint job, it follows a strict sequence: degrease, sand, fill grain, sand again, prime, sand, then enamel topcoats for levelling and durability.
Oak is strong and timeless, but its open pores telegraph through thin paint. That’s why grain control and stain-blocking primers matter. In our experience refinishing kitchens across Toronto, the projects that feel “brand new” follow the entire sequence with no skipped steps.
If your goal is a “new cabinet” look from existing boxes, consider how painting compares to other upgrades we offer in the GTA. For color-driven upgrades, our professional kitchen cabinet painting process focuses on factory-smooth finishes. If you’re debating style changes, see our primer on updating oak cabinets to weigh doors, profiles, and hardware.
Why Painting Oak Cabinets Matters Right Now
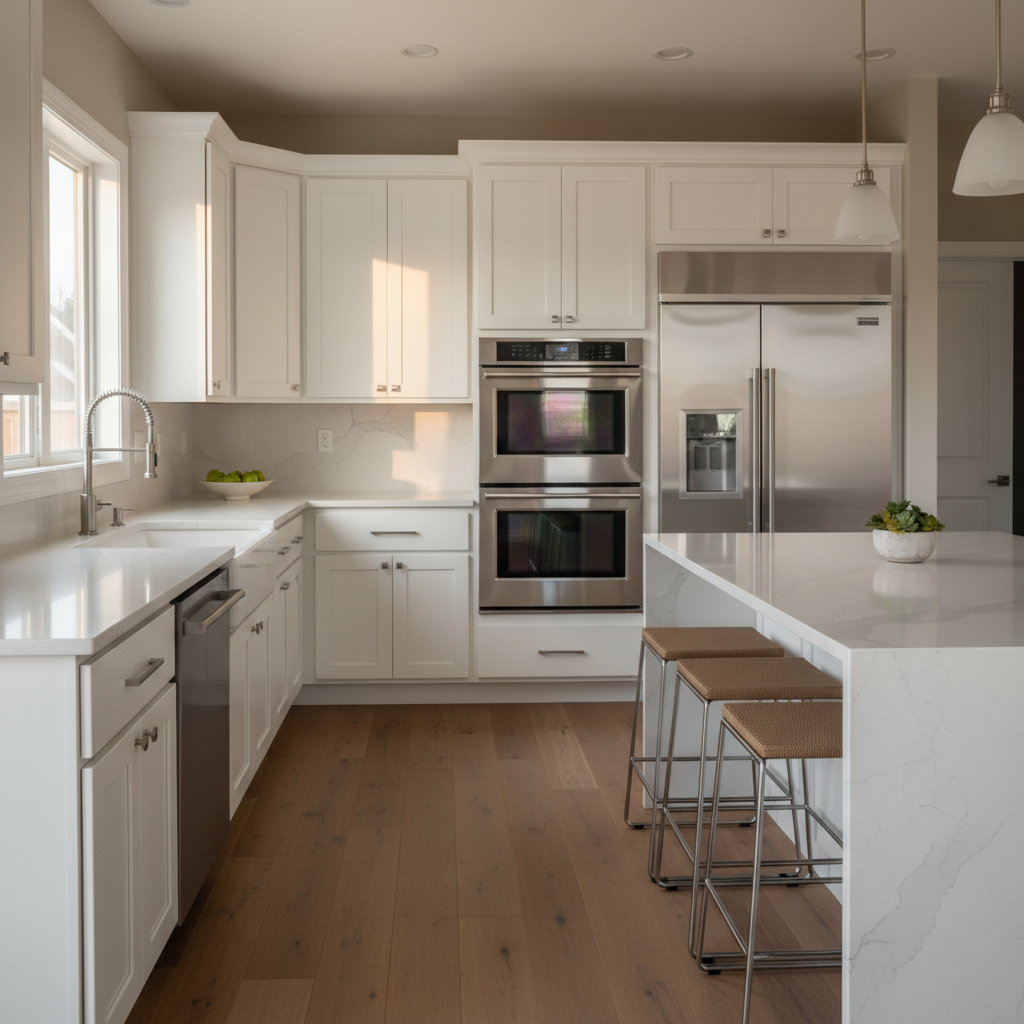
Painting oak cabinets instantly modernizes honey or golden oak kitchens, stretches your renovation budget, and reduces disruption. With proper prep and enamel, finishes resist daily wear, clean easily, and complement current Toronto palettes like satin white, greige, soft black, and deep green.
Here’s the thing: kitchens carry heavy traffic, grease, and cleaning cycles. Coatings that aren’t designed for cabinets fail early. We specify cabinet-grade enamels because they level well, harden predictably, and hold sheen under scrubbing. In homes around York, this choice keeps doors looking sharp between seasons.
Thinking beyond color, some homeowners want a tone-on-tone or wood-and-paint mix. If you’re considering keeping some oak visible, our note on restaining honey oak cabinets explains when stain makes sense—especially for islands or accent uppers.
Prerequisites and Surface Prep (Don’t Skip These)
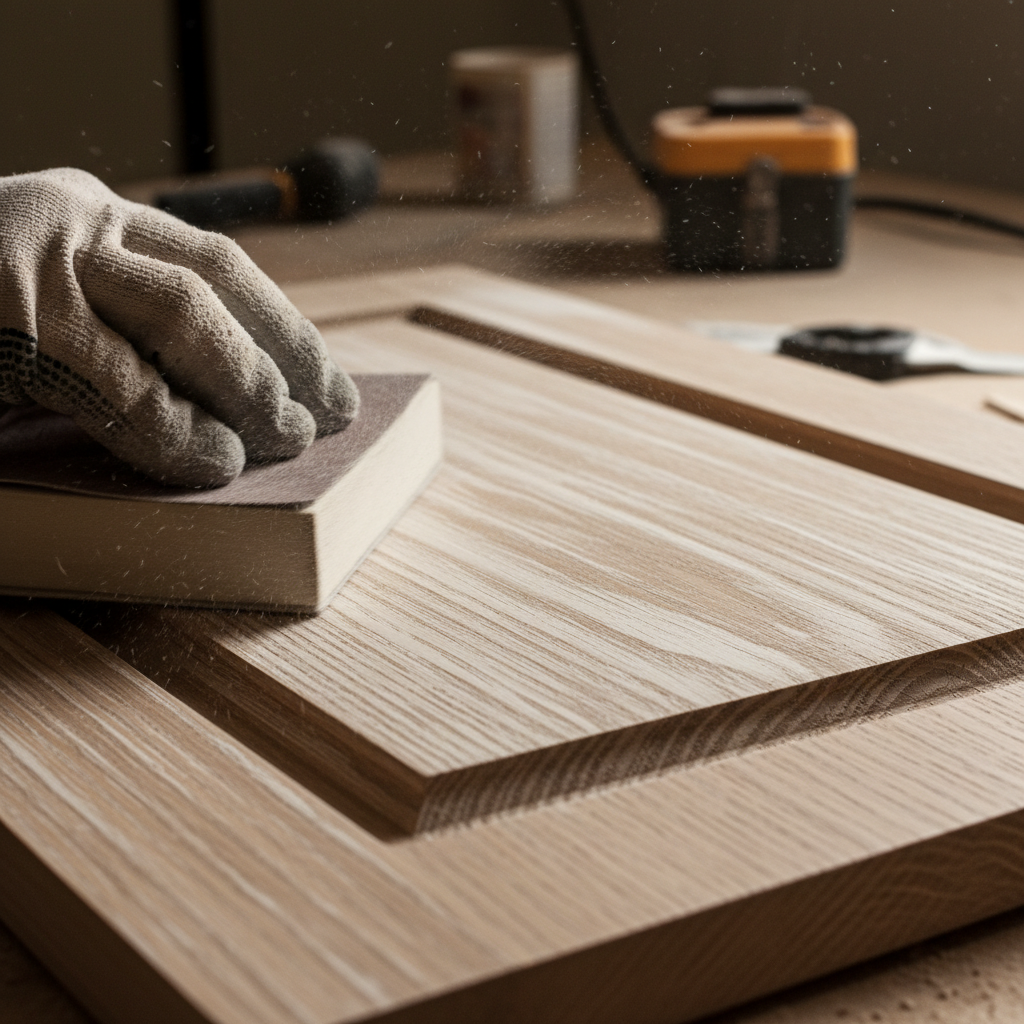
Great results start with clean, deglossed, stable wood. Degrease with a cabinet-safe cleaner, scuff-sand to 180–220 grit, fill grain if you want a smooth finish, and ensure temperature 65–75°F with 40–60% relative humidity. Label hardware, number doors, and create dust-controlled zones.
Preparation is where 70–80% of the transformation happens. Oak’s coarse grain, kitchen oils, and prior finishes can fight adhesion. We remove doors, number everything, and stage a clean finishing area separate from your living space. Boxes get masked thoroughly to protect counters, floors, and appliances.
Prep checklist
- Remove doors/drawers; label hinges and locations.
- Degrease twice, especially around knobs and handles.
- Scuff to a uniform dullness (180–220 grit).
- Repair dings with a compatible filler; caulk hairline seams after priming.
- Decide on grain: showcase subtle texture or fill for glass-smooth.
- Ventilation: light airflow, no open flames, dust extraction ready.
Choosing the right coatings matters as much as prep. For product guidance tailored to our climate, review our GTA-focused note on best paint for cabinets and how we pair primers and enamels for levelling and durability.
How Painting Oak Cabinets Works: Step-by-Step
The process follows seven controlled stages: label and remove, degrease, sand, grain-fill, prime with stain blocker, sand to 320–400 grit, and apply 2–3 enamel coats. Maintain clean air, proper temperature, and drying windows between coats for a smooth, durable result.
- Label and remove. Number doors/drawers and bag hardware. Photograph hinge positions for quick reassembly.
- Degrease thoroughly. Two passes around pulls and edges. Rinse residue; let dry.
- Sand smart. 180–220 grit scuff to remove sheen. Vacuum and tack-cloth dust.
- Grain strategy. Apply grain filler or high-build surfacer where smoothness is the goal. Knife it across the grain; sand flat.
- Prime for oak. Use a strong bonding, tannin-blocking primer. Aim for even coverage without flooding profiles.
- Denib and inspect. Light 320–400 grit sand to remove nibs. Spot-patch, then dust control again.
- Finish coats. Two enamel coats, possibly a third for deep colors. Respect recoat windows; allow a full cure (21–30 days).
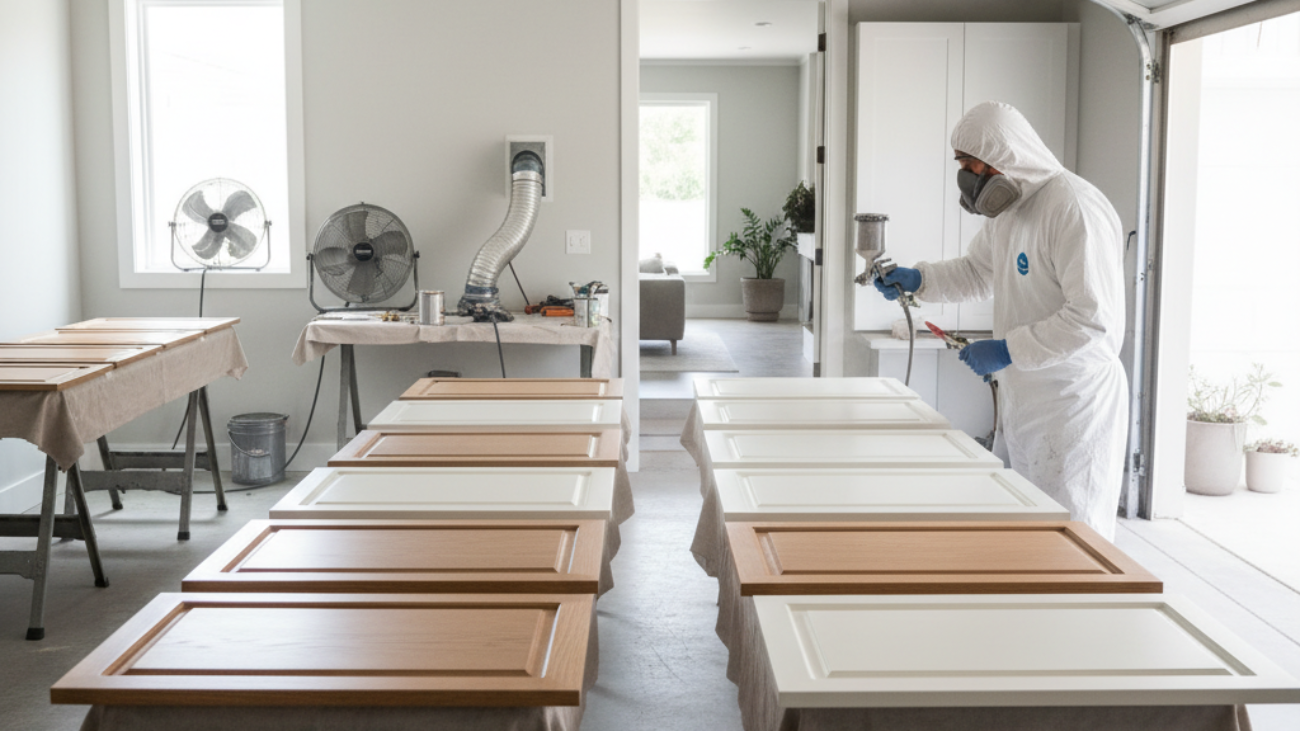
We often spray doors offsite and brush/roll boxes onsite with microfiber rollers for minimal texture. If you’re weighing equipment and logistics, our cabinet respraying guide breaks down HVLP setup, tips, and safety.
Methods: Brush-and-Roll vs HVLP Spraying vs Hybrid
Brush-and-roll is flexible and low equipment, HVLP spraying delivers the smoothest “factory” look, and a hybrid approach often balances on-site practicality with finish quality. Choose based on access, ventilation, and whether you can remove doors for controlled spray.
Approach overview
- Brush-and-roll: Minimal setup, great for boxes; use fine microfiber rollers and lay off lightly. Expect faint texture.
- HVLP spray: Finest finish on doors/drawer fronts. Requires masking, extraction, and clean staging.
- Hybrid: Spray doors offsite; brush/roll boxes onsite for speed and logistics.
Comparison table
| Method | Finish Smoothness | Setup Complexity | Best Use |
|---|---|---|---|
| Brush-and-roll | Good (light texture) | Low | Cabinet boxes and interiors |
| HVLP spray | Excellent (factory-like) | High | Doors/drawer fronts, panels |
| Hybrid | Excellent on faces; good on boxes | Medium | Most lived-in kitchens |
In our GTA projects, a 1.3–1.4 mm needle/nozzle with a 6–8 inch fan is a reliable HVLP starting point for cabinet enamels. For brush work, use sash brushes with flagged tips and 4–6 mm microfiber rollers to minimize stipple.
Best Practices for a Factory-Level Finish
Control dust, temperature, and humidity; seal oak’s grain; prime for tannins; and apply thin, even enamel coats with generous dry time. Use fine abrasives between coats, handle doors by the edges only, and wait for a full cure before heavy kitchen use.
Environment and timing
- Maintain 65–75°F and 40–60% RH for levelling and cure.
- Use light airflow and filtration; avoid strong drafts that cause overspray drift or dry spray.
- Respect recoat windows; do not force-dry with excessive heat.
Coating discipline
- Strain paints/primers. Thin only if label allows; test first.
- Two finish coats are typical; deep colors may need a third.
- Sand lightly with 320–400 grit between coats to remove nibs and improve adhesion.
Handling and cure
- Use door racks; touch edges only. Install soft bumpers behind doors.
- “Set to touch” is not “fully cured.” Avoid harsh cleaners for 21–30 days.
- Reinstall hardware after enamel is firm but before full cure to prevent sticking.
For a deeper dive into pro workflow, our professional kitchen cabinet painting article outlines how we stage, mask, and sequence work in occupied homes without interrupting your routine.
Troubleshooting and Fixes
Most paint failures trace back to contaminants, missed grain control, or rushing recoat windows. Address the root: clean, sand, re-prime if needed, and apply thin, level coats. For tannin bleed, use a stronger stain-blocking primer; for texture, sand flat and adjust your application.
Tannin bleed (yellowing through white)
- Cause: Oak tannins migrating through waterborne layers.
- Fix: Spot-seal with a stronger stain blocker; allow full dry; recoat.
Adhesion failure (peeling/chipping)
- Cause: Residual oils, silicone, or inadequate scuff.
- Fix: Feather-sand, degrease, re-prime with bonding primer, and recoat.
Orange peel or heavy texture
- Cause: Thick coats, wrong tip, or hot/dry conditions.
- Fix: Sand smooth with 400–600 grit; adjust viscosity, tip, and distance.
Brush marks and lap lines
- Cause: Overworking enamel as it sets.
- Fix: Work in sections; tip off once; maintain a wet edge.
Fish eyes (craters)
- Cause: Silicone or oil contamination.
- Fix: Deep clean; solvent wipe if compatible; spot-prime.
Grain telegraphing
- Cause: Insufficient filler or surfacer.
- Fix: Apply another filler pass; sand to glass-flat before finishing.
Runs/sags
- Cause: Excess material or vertical application.
- Fix: Let set; shave/sand flat; recoat thin.
Dust nibs
- Cause: Airborne dust or dirty strainers.
- Fix: Improve filtration; tack-cloth; denib between coats.
Blocking (sticking when closed)
- Cause: Premature reassembly or heavy coats.
- Fix: Wait longer, use door bumpers, reduce film build.
Sheen inconsistency
- Cause: Uneven film thickness or mixing.
- Fix: Stir thoroughly; maintain wet mil thickness; add a uniform final coat.
If you’re weighing a deeper refresh instead of paint—like new doors or veneer—we also perform cabinet respraying with updated profiles and finishes to align with today’s Toronto kitchens.
Tools and Materials Checklist
A smooth, durable finish depends on the right kit: degreasers, abrasives (180–400 grit), grain filler, stain-blocking primer, cabinet-grade enamel, microfiber rollers, quality brushes, and—when available—HVLP spray gear with a 1.3–1.4 mm setup and proper filtration.
Core materials
- Cabinet-safe degreaser and clean water rinse
- Abrasives: 180, 220, 320–400 grit
- Grain filler or high-build surfacer (optional for texture control)
- Bonding, stain-blocking primer formulated for wood
- Cabinet-grade enamel in chosen sheen (satin/semi-gloss)
Application tools
- Microfiber rollers (4–6 mm nap) and flagged-tip sash brushes
- HVLP sprayer, 1.3–1.4 mm needle/nozzle, spray stands, and door racks
- Strainers, mixing cups, and labeled storage for hardware
Safety and staging
- Masking plastic and paper, low-tack tapes, floor protection
- Filtration and light ventilation; respirator per product label
- Lighting for raking inspection and dust detection
For a homeowner-friendly overview of sequence and materials, this neutral cabinet-painting explainer walks through the basics: how to paint kitchen cabinets. Pair those fundamentals with the oak-specific grain blocking steps in this guide.
Case Studies and Examples from GTA Homes
Small design choices compound into a “brand-new” feel: consistent sheen, filled grain on doors, and careful reinstall. These GTA mini-cases show how color, method, and prep vary by home—while the pro sequence stays the same for durability.
York galley kitchen: honey oak to satin white
- Challenge: Strong, open grain and heavy cooking residue.
- Approach: Double degrease, filler on door centers/rails, hybrid method.
- Result: Brighter sightlines; subtle box texture; glassy doors.
Toronto family home: two-tone island accent
- Challenge: Wear at high-touch edges.
- Approach: Stain-blocking primer; enamel in satin white on uppers, deep green on the island.
- Result: Modern palette; durable edges with door bumpers.
Condo kitchenette: limited spray space
- Challenge: No on-site spray area.
- Approach: Offsite door spraying; meticulous onsite box masking and microfiber rolling.
- Result: Quiet install day; minimal disruption.
Accent wood kept: selective restain
- Challenge: Homeowners wanted some natural oak warmth.
- Approach: Paint perimeter white; restain a few accent doors per our restaining guide.
- Result: Balanced contrast and easier maintenance.
If you’re weighing a professional hand from day one, our professional kitchen cabinet painting write-up outlines expectations, timelines, and how we stage work to keep your home functional.
How Long It Takes and What to Expect
Typical projects span several days of active work plus a 21–30 day full cure. Doors are removed early, boxes are finished in place, then everything is reinstalled and adjusted. Light use can resume soon after reassembly; save heavy scrubbing for post-cure.
- Prep and prime: 1–2 days depending on kitchen size and repairs.
- Finish coats: 1–2 days with drying windows respected.
- Reinstall and adjust: Usually within 24–48 hours after final coat sets.
- Cure: Enamel hardens over 3–4 weeks; treat gently during this window.
For homeowners comparing routes, this neutral overview of sequence and considerations is useful: cabinet painting process overview. Keep in mind—oak needs the extra grain and tannin steps we’ve detailed here.
Style, Color, and Hardware Tips for Oak
Oak’s strong pattern pairs well with calm, modern palettes like satin white, greige, deep navy, and forest green. Use consistent sheen, updated pulls, and soft-close hardware. If you prefer visible texture, skip filler and let a light oak pattern show under paint.
- Match sheen across doors and boxes for a unified look.
- Use elongated pulls to update classic oak rails and stiles.
- Consider two-tone: light uppers, darker base cabinets or an accent island.
- Warm metals (brushed brass) pair well with greige; matte black suits crisp whites.
If you’re leaning toward new profiles instead, a design-forward explainer on modernizing oak can spark ideas: making oak cabinets look modern. We can also discuss refacing if you want entirely new doors while keeping your boxes.
When to Paint vs Reface vs Refinish
Paint when your oak boxes are solid and you want a color change; reface when you want new door styles and hardware; refinish/restain when you love wood but want a tone update. Structure condition, layout plans, and design goals guide the choice.
- Paint: Sound boxes, happy with current layout, modern color desired.
- Reface: Need new door profiles and hardware while keeping boxes.
- Refinish: Preserve natural wood character with updated stain.
Unsure which path suits your kitchen? Our Toronto-focused overview of updating oak cabinets and the deeper dive into respraying can help you compare finish quality and timelines.
Frequently Asked Questions
Common questions focus on durability, grain visibility, and whether spraying is required. You can get a smooth finish on oak with the right prep and primer; spraying looks best on doors, while boxes often perform well with careful brush-and-roll techniques.
Do I have to fill oak grain to get a smooth finish?
No, but it’s the fastest path to a factory look. Without filler, you’ll see some texture telegraph through paint. We often fill door centers and rails, then rely on primer build and careful sanding on boxes to balance effort and smoothness.
Is spraying always better than brushing and rolling?
Spraying produces the smoothest door faces. For cabinet boxes in lived-in homes, brush-and-roll with fine microfiber can be nearly as clean with less masking. Many Toronto projects use a hybrid: spray doors offsite, finish boxes onsite.
How long before I can use my kitchen again?
Most kitchens are reassembled within a couple of days after finish coats. Doors will be set-to-touch, not fully cured. Treat the finish gently and avoid harsh cleaners until the enamel reaches full cure at about 3–4 weeks.
What primer works best for oak’s tannins?
Use a bonding, stain-blocking primer specifically formulated for wood. Oak’s tannins can discolor light paints; a strong stain blocker prevents this and improves enamel adhesion, especially on doors with heavy grain.
Can you match trending Toronto colors?
Yes. We regularly finish with Toronto-friendly palettes—satin white, greige, soft black, and deep green—paired with updated hardware. Consistent sheen and grain control do as much for a modern look as the color itself.
Conclusion and Next Steps
Painting oak cabinets gives you a modern, durable kitchen without replacing boxes. Prioritize grain control, stain-blocking primer, and thin, even enamel coats. If you want a professional, factory-level look, consider spraying doors and finishing boxes onsite for minimal disruption.
Key takeaways:
- Prep is the difference-maker; oak needs extra cleaning and grain control.
- Primer choice matters—block tannins and boost adhesion.
- Hybrid methods deliver results with less disruption.
- Allow a full cure before heavy scrubbing or harsh cleaners.
If you’d like help in York or anywhere in Toronto, we’re local and ready to stage your project with minimal downtime. Explore our professional kitchen cabinet painting process, review our respraying guide, and when you’re ready, reach out for a free consultation from our team at 2710 St Clair Ave W.